Table of Contents
Advertisement
Quick Links
Advertisement
Table of Contents

Related Manuals for Whip Mix VeriBuild

Summary of Contents for Whip Mix VeriBuild
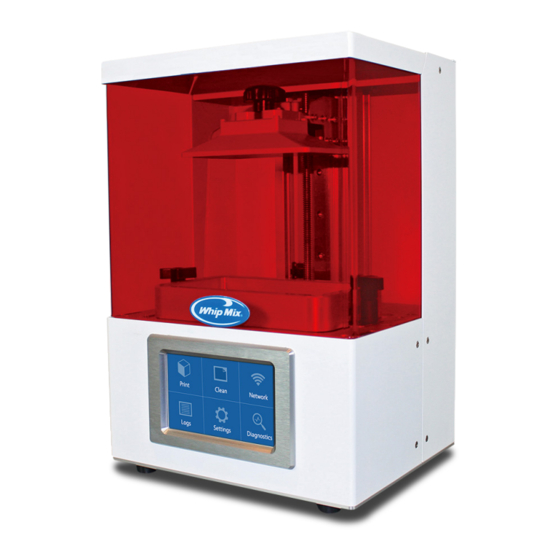
- Page 1 VeriBuild LCD 3D Printer...
- Page 2 VeriBuild, Alpha 3D, Omega 3D, Whip Mix, and all associated logos are trademarks of Whip Mix Corporation. Other company names or products mentioned herein are registered trademarks of their owners.
- Page 3 Resin Safety Resins provided by Whip Mix are non-carcinogenic acrylic-based photopolymer liquids that give off a light odor. These resins may cause skin, eye and respiratory system irritation, and skin sensitivities or allergic reactions by skin contact.
- Page 4 Resin Protective Gear The hands are the most likely affected area when handling resins. Wear rubber, nitrile, polyvinyl Gloves chloride, or other chemical-resistant gloves. While using air compressors or due to usage or handling, resin may splash into the eyes. Wear protective Eye Protection goggles, safety glasses with side shields, or a face shield.
- Page 5 For more information, please refer to the Material Safety Data Sheet for your particular resin. Cleaning Alcohol Safety To clean prints, Whip Mix recommends using solutions of 95% ethylalcohol or 95-99% isopropyl alcohol (IPA). Both compounds are colorless, transparent, and naturally give off strong odors. Both compounds have the following major safety concerns: •...
- Page 6 TABLE OF CONTENTS...
- Page 7 Chapter 1 Specifications Features About the VeriBuild Package Contents Machine Overview Machine Console Interface Web Console Interface Chapter 2 Unboxing Your Machine What You Need Getting Started Setup Environment Connecting to Your Wi-Fi Network Attach Your Vat Fill Your Vat With Resin...
-
Page 8: Chapter 1: About The Veribuild
Resin-based 3D printing has advanced in several stages, starting from laser-based SLA machines to much faster DLP printers. Whip Mix brings its technical expertise into the next stage of printing with the VeriBuild, a desktop LCD printer that delivers high-resolution, smooth surface prints at a price point that is ideal for the entry-level market. -
Page 9: Machine Overview
Ethernet Cable Hex Key Wi-Fi Dongle Vat Film Sheets (×2) LCD Panels (×2) VeriBuild Machine Overview Front Side Back Side Build Platform Hood Power Console Port USB Ports Power Switch Ethernet/LAN Port Guideway Serial Number Sticker VeriBuild LCD 3D Printer... -
Page 10: Machine Console Interface
Machine Console Interface When you turn on your VeriBuild, the machine will spend a few seconds loading, and will then show the Home screen. The Home screen has the following functions: The Print screen is the primary screen for uploading files and getting your printer start- Print ed. -
Page 11: Chapter 2: Getting Started
Chapter 2: Getting Started When you first receive your VeriBuild printer, you must do a little bit of work to get your printer up-and-running. This section describes the setup procedure for your machine, so you can go from package to printing as soon as possible. - Page 12 6. You can remove the plastic wrap or leave it on. 7. Remove and store the contents of the three accessory boxes. CABLE: 1 Ethernet Cable, 1 Hex Key (Allen wrench) PANEL: 2 Print Screens wrapped in protective packaging VAT: The other Vat is already installed VeriBuild LCD 3D Printer...
-
Page 13: What You Need
Consult your resin distributor regarding the proper cleaning alcohol to use. In addition, you may want an alcohol bath, such as an ultrasonic cleaner. 4. Resin – the VeriBuild is tested with all Whip Mix Qura- resins, but you may use any 405 nm resin. VeriBuild LCD 3D Printer... -
Page 14: Setup Environment
5. UV oven – Whip Mix resins are all tested with the Whip Mix UV oven. Other resin suppliers may recommend other UV ovens. 6. Knife or scraper – Sharper tools are better for removing prints from the build platform. Dull scrapers may damage the build platform. -
Page 15: Connecting To Your Wi-Fi Network
1. Ensure that your Wi-Fi dongle is connected to the printer. Note: After you connect your laptop to the VeriBuild, your computer should be able to automatically obtain an IP address. If your computer does not, then you may need to modify your network settings. See Configuring... - Page 16 4. Ensure that Connect to Wi-Fi box is set to On. 5. Press the arrow next to Choose a network. 6. Select the network that you want the printer to use. You can use the arrows on the right side to select different pages. VeriBuild LCD 3D Printer...
- Page 17 8. When your printer connects to the network, an IP address appears on this screen. 9. Open an internet browser on a computer that is connect to the same network as the VeriBuild printer. Key in the printer IP address shown into the address bar. The browser shows the VeriBuild web console.
- Page 18 Attaching Your Vat The VeriBuild comes with the vat attached during shipping. If you remove your vat and need to reattach it, do the following. Warning: Always put the vat on the VeriBuild before putting the build platform in place. The vat protects the LCD, panel which may be easily damaged if resin or the build platform falls on it.
- Page 19 If any resin is in the vat, mix the old resin with the new resin using a rubber spatula. Pull resin from the bottom of the vat so that if any of the resin particles are separated, they properly mix with the new resin. VeriBuild LCD 3D Printer...
- Page 20 Attaching Your Build Platform The VeriBuild comes with a build platform attached during shipping. If you remove the build platform and need to reattach it, do the following: 1.
- Page 21 3. Align the build platform so that the 4 prongs are evenly spaced around the guideway arm. 4. Turn the handle clockwise to securely attach the build platform to the guideway arm. 5. Your VeriBuild printer is ready for use when the build platform is instaled and securely attached. VeriBuild LCD 3D Printer...
-
Page 22: Chapter 3: Printing
Chapter 3: Printing After you set up your VeriBuild, the next step is to get your first print up and running. This section describes the basic process for getting your printer ready and starting a print. The topics covered in this section are as follows: •... - Page 23 Printing via a USB Device There are two ways to start a print on the VeriBuild: • Attach a USB device (with the print file) to the printer, and then use the printer console to start the print. • Connect the printer to a LAN or Wi-Fi network and use the web console to print.
- Page 24 For more information about making a print file, see Making Your Print File. 3. On the VeriBuild console, press Print. 4. On the Select Files screen, press USB. 5. Find and press the file that you want to print. You can use the arrows on the right side to select different pages.
- Page 25 7. Review and confirm your print details. Then, press Print to begin your print. Note: Press Material to change your resin settings if your resin profile is incorrect. If you are using a Whip Mix resin profile from Alpha 3D or Omega 3D, your resin profile will be automatically set by the software.
- Page 26 1. Open an internet browser while on a computer that is connected to the same network as the VeriBuild printer, and key in the printer IP address into the address bar. The browser shows the web console for the VeriBuild printer.
- Page 27 If your resin profile is incorrect, press the Whip Mix resin profile from Alpha 3D or Omega 3D, your resin profile is automatically set by the software. If you are using a third-party resin, you may need to adjust your resin settings. See Material Settings more information.
-
Page 28: Printing Process
When the VeriBuild starts curing resin, the Cancel button changes to a Pause button. This option temporarily stops the printer so that you can see if a print has failed, or if you want to add more resin. - Page 29 Press the Stop button to end the print so you can clean the platform and begin printing a new print. cannot undo this action. When you stop, the printer finishes printing its current layer before returning to the home screen. When the layer is finished, the build platform moves back to the top position. VeriBuild LCD 3D Printer...
-
Page 30: Chapter 4: Finishing Your Print
Chapter 4: Finishing Your Print After the VeriBuild completes printing, the print still requires some preparation before it is ready for polishing, casting, or applying to a machine or a patient. The order of the process is variable; Most steps can be done before or between others. Generally, the process is as follows: •... - Page 31 5. The print will have residual liquid on it from the vat. Turn the platform over quickly to avoid dripping resin and to keep your environment clean. Tip: Use a rubber spatula or air blower to save resin and push resin off of the build platform back into the vat. VeriBuild LCD 3D Printer...
- Page 32 Function. Separating Your Print from the Build Platform What You Need A. Safety equipment – gloves, UV-protective glasses, and a respirator or face mask B. Knife or scraper C. Tissues or a container for resin disposal VeriBuild LCD 3D Printer...
- Page 33 2. Slide a utility knife or scraper under one corner of the print. Pull the knife under the print to separate it from the build platform. 3. Continue sliding the knife through the other side of the print, if necessary. VeriBuild LCD 3D Printer...
-
Page 34: Cleaning And Drying Your Print
B. Cleaning alcohol – isopropyl alcohol (99% solution) or ethylalcohol (95% solution) C. Drying tools – an air compressor is preferred, but you can also use a handheld blower or tissues D. Ultrasonic cleaner or bath - Optional VeriBuild LCD 3D Printer... - Page 35 3. Submerge the print into a bath of cleaning alcohol or an ultrasonic cleaner. For most prints, Ackuretta recommends soaking for about 2 minutes. After soaking the print, dry the print with your air blower or compressor, and then perform additional fine cleaning if necessary. VeriBuild LCD 3D Printer...
- Page 36 Most supports can be cut with a scissors. Whip Mix recommends cutting the supports farther from the print at first, and then cutting close to the print afterwards. This reduces damage to the print.
- Page 37 The 3D printer cures the resin to a certain level, but the print usually cannot be fully cured by the printer alone. After printing, cleaning, and drying, put the print into a UV oven for final curing. See your resin supplier for details about which UV ovens they recommend that you use. VeriBuild LCD 3D Printer...
-
Page 38: Chapter 5: Configuring Your Printer
The Printer Settings screen shows system-wide settings and information. This section shows the Printer Settings screen on the web console. All the same functionality exists on the printer console. Go to Settings > Printer. The functions in the Printer Settings screen are shown below. VeriBuild LCD 3D Printer... - Page 39 Firmware version The currently installed version of the VeriBuild firmware. Printer CPU The unique ID for this VeriBuild. This is not the same as the serial number, which is affixed to the back side of the printer. Storage Used The VeriBuild has 16 GB of on-board storage. About 2 GB of that storage is dedicated to the VeriBuild firmware and is inaccessible.
- Page 40 files you want to delete, and press the Delete button. Saving the file log to a USB device If you encounter a problem with your printer and contact Whip Mix Support, Whip Mix may request your log file to perform important system or print diagnostics.
- Page 41 1. Click Set Time Zone on the Settings tab of the VeriBuild web console. • Toggle either + or - to set whether your time zone is before or after UTC 0:00.
-
Page 42: Updating The Settings
2. Click the Set Timezone button when you complete setting the time zone. Updating the Settings You can check your version of your VeriBuild firmware and update the firmware via this screen. Go to Settings > Update. The functions available via the Update Settings screen are shown below. - Page 43 Click this button to check your USB device for a newer version of the firmware and start the installation process. Use this method of firmware installation only if your VeriBuild is not connected to the Internet via a LAN or Wi-Fi network.
-
Page 44: Material Settings
Settings screen. If you upload a print file using an Whip Mix resin in Alpha 3D or Omega 3D, the VeriBuild automatically detects the resin profile and prints using the settings stored in the printer. If you use the “Resin Test” profile in Alpha 3D, or any non-Whip Mix resin in Omega 3D, you must also set a material setting on the VeriBuild. - Page 45 The Z-resolution of the print. This value should be the same as the value chosen in Alpha 3D or Omega 3D. Z resolution The minimum Z-resolution for the VeriBuild is 10 µm, and the guideway only (Layer Thickness) moves in multiples of 10 µm.
- Page 46 The number of additional layers that cured. Whip Mix recommends using a value between 4 and 10. • Illumination Time The amount of time these layers will be cured. Whip Mix recommends using a value about 3 times that of the Normal Layers Illumination time.
- Page 47 Immediately after printing a layer, the guideway moves at this speed for a distance equal to the Slow Peel Height. After that, it increases speed based on the Z-Axis Peel Speed. Ackuretta recommends using a value of half of the Z-Axis Peel Speed. VeriBuild LCD 3D Printer...
- Page 48 Connecting to Your LAN Network Connect to a network that you can access the printer web console and start up prints from your internet browser. There are two major methods to connect your VeriBuild printers to your networks: LAN (Ethernet) connection and Wi-Fi connection.
-
Page 49: Configuring A Static Ip Address
The LAN IP address appears here. Open an internet browser while on the same network as the VeriBuild and type the IP address shown into the address bar. The VeriBuild web console opens. Configuring a Static IP Address Most connection use dynamic IP address and DNS servers. Go to the IP address tab if your office security systems require you a set a Static IP address or DNS server, then you will need the IP configuration feature in... - Page 50 Choose the network type that you want to set a Static IP address for, either Wi-Fi or Ethernet. Press the IP address. The IP address will be blank if your VeriBuild is not yet connected to any network. In that case, press the arrow button.
-
Page 51: Chapter 6: Vat Maintenance
D. Resin - at least 0.5 mm across the surface of the vat B. Small pieces of paper - note cards, sticky notes, or E. Tissues business cards work well F. A container for resin disposal C. Vat VeriBuild LCD 3D Printer... - Page 52 3. Click Clean after entering your preferred period of time for cleaning. 4. The VeriBuild cures one layer of resin at the bottom of the machine. When it is finished, the Clean Finished screen appears.
- Page 53 6. Pull the layer of cured resin off of the vat. If you are wearing a chemical-resistant glove, you can use your fingers to remove the layer by hand. Allow any excess resin to drip off the layer before disposal. 7. Dispose of the resin thoughtfully. VeriBuild LCD 3D Printer...
- Page 54 Cleaning your vat takes about 10-20 minutes. Tip: Instead of cleaning your vat every time you want to change resins, Whip Mix recommends keeping a number of vats available for every resin that you intend to use. Store the vats with resin in a dry, dark location, such as a closed cabinet.
- Page 55 Otherwise, set two holders on your table, such as pencils, chopsticks, or square plastic parts. Set the metal parts of your vat down on those holders so that the vat film does not directly touch the table. VeriBuild LCD 3D Printer...
- Page 56 8. Spray alcohol into the gap between the vat frame and the vat film. 9. Using your spatula, push a tissue between the gap to absorb the resin and alcohol mixture. Repeat these steps as necessary until you clean all the resin out from under the frame. VeriBuild LCD 3D Printer...
- Page 57 If you think there’s any chance that your vat film could have a hole in it, immediately remove it from the printer. If resin is on the LCD, it will harden and that will make the LCD unusable. If resin leaks into the machine itself, that can damage the entire system. VeriBuild LCD 3D Printer...
- Page 58 2. Inspect your vat for visible cuts or holes. If you find any cuts or holes, the vat film is damaged. You can skip the rest of this procedure and go to Replacing the Vat Film. VeriBuild LCD 3D Printer...
- Page 59 6. Check the tissues for wet spots. If any of the water goes through the vat, then the vat film is damaged or the screw locations are not secure. In either case, replace the vat film. VeriBuild LCD 3D Printer...
- Page 60 If you feel any of the bumps with your fingertip, these bumps can cause problems with your print. Replace your vat film. If you can only see the bumps, but cannot feel them, then they will probably not affect your prints. VeriBuild LCD 3D Printer...
- Page 61 In general, these types of issues do not affect the quality of your print. You can continue to use your vat normal- ly, even with these types of marks on your vat film. If you see print failures in the same areas as these marks, then Whip Mix recommends replacing your vat film in those cases.
- Page 62 1. Cut a new vat film sheet in half so that it is about 2-4 cm larger than the vat frame on all sides. Tip: Store the other half in a dry, safe space to use in Vat film Vat film Vat film the future. VeriBuild LCD 3D Printer...
- Page 63 Use the screwdriver to assist in removing the bottom plate. 4. Remove the old vat film. The screwdriver may also be useful here. Note: Clean any resin that may be between the vat film and the frame. VeriBuild LCD 3D Printer...
- Page 64 • Attach screws through those 4 holes to tighten the vat film to the vat frame. 7. Poke holes in the vat film at the screw holes on the 4 corners of the vat frame. 8. Put screws in those 4 holes. VeriBuild LCD 3D Printer...
- Page 65 9. Put holes through the vat film and insert screws in the remaining holes. 10. Tighten all screws so that the vat film is very tight. 11. Cut off any excess film with a utility knife. Your vat is now ready for printing. VeriBuild LCD 3D Printer...
-
Page 66: Chapter 7: Troubleshooting
LCD panel, you should immediately replace it. The VeriBuild comes with 2 free LCD screens in the box, along with one that is connected to the machine. In general, you can expect to use your VeriBuild for about 1 year before purchasing a set of new LCD panels. - Page 67 Vat Issue 2 - LCD Deterioration (Moderate) When you first start using your VeriBuild, the LCD panel should be clear and let all light through. Over time, some pixels will die, which will reduce the light intensity at those points. A few dead pixels will not have a major effect on prints, because nearby pixels will still cure normally.
- Page 68 If you do not find obvious spots of deterioration on your panel, but you are still concerned that the panel may be damaged, you can print a thin layer of resin to see if there are unprinted areas. This follows a modified form Using the Clean Vat Function. of the normal procedure shown in VeriBuild LCD 3D Printer...
- Page 69 The first part of this procedure is to find the curing time of your resin. 1. Turn on your VeriBuild, go to Print, and then choose Materials from the drop-down list. 2. Select the 100 micron setting for the resin you will use for this printing test.
-
Page 70: Replacing The Lcd Panel
LCD panel. Replacing the LCD Panel The VeriBuild LCD panel encounters some wear over time. Eventually, pixels on the LCD panel will go dark, and some areas of the panel will not cure as thoroughly as other areas. - Page 71 3. Use the Hex key to remove the 4 screws from both sides of the front casing. Note: Do not remove the screws holding the back panel. It is not necessary for this operation. 4. Pull the front cowling forward from the machine and put it face-down on the table. VeriBuild LCD 3D Printer...
- Page 72 5. Before completely removing the front casing, disconnect the UI console cable by moving the connector from side to side. Tip: If the console cable is too tight to pull out, you can push the prongs outward with a pen or screwdriver. 6. Disconnect the LCD cable from the circuit board. VeriBuild LCD 3D Printer...
- Page 73 8. Remove the LCD panel frame from the machine and set it aside. 9. Lift the LCD panel from the gap on the cable side. You can carefully use the hex key or a screwdriver to lift it. VeriBuild LCD 3D Printer...
- Page 74 11. Gather your new LCD panel. Put the new LCD panel into the machine by first sliding the panel wire through the gap in the side. 12. Put the LCD panel frame back in place and reattach the 4 Hex screws to secure the LCD panel. VeriBuild LCD 3D Printer...
- Page 75 15. Reassemble your machine. To prepare for printing, make sure to complete the following: • Put the vat back on and fill it with resin. • Attach the build platform. • Close the hood. • Connect the power cable. • Turn on the machine. VeriBuild LCD 3D Printer...
- Page 76 361 Farmington Ave, Louisville, KY 40217, United States www.whipmix.com +1 800-626-5651...
Need help?
Do you have a question about the VeriBuild and is the answer not in the manual?
Questions and answers