Table of Contents
Advertisement
Quick Links
Welcome to the Taylor® WeatherGuide™ System. Simple, reliable, accurate...it allows you to monitor indoor conditions
and read outdoor temperatures from indoors, creating an all-in-one weather display.
BATTERY INFORMATION
YourWeatherGuide™ is powered by 1 CR2025 lithium battery (included). There is a strip under the battery cover to
prevent battery drain in shipping. Please remove the strip before continuing with these instructions. (You may need to
remove the battery compartment cover to avoid breaking the strip). Also, some models have a static cling label on the lens
to prevent scratching. Please remove before use.
Replace the battery when the readings grow dim or irregular. To replace the battery:
1. Use one 3 volt CR2025 lithium battery.
2. Pull out the battery compartment on the side of the thermometer.
3. Remove the old battery from the compartment.
4. Place the new battery with the "+" sign up into the battery compartment.
5. Push the battery compartment cover back in.
NOTE: Please recycle or dispose of batteries per local regulations.
WARNING: Batteries may pose a choking hazard. As with all small items, do not let children handle batteries.
If swallowed, seek medical attention immediately.
PRECAUTION: Do not dispose of batteries in fire. Batteries may explode or leak. Remove the battery if the unit will not
be used for a long period of time.
DISPLAYING YOUR WEATHERGUIDE
Place the unit indoors in a well-ventilated location away from direct sunlight.
Table top display – Pull out the Table Stand on the back of the unit.
Wall display – use the keyhole on the back of the remote to hang on a wall using a nail or screw (not included).
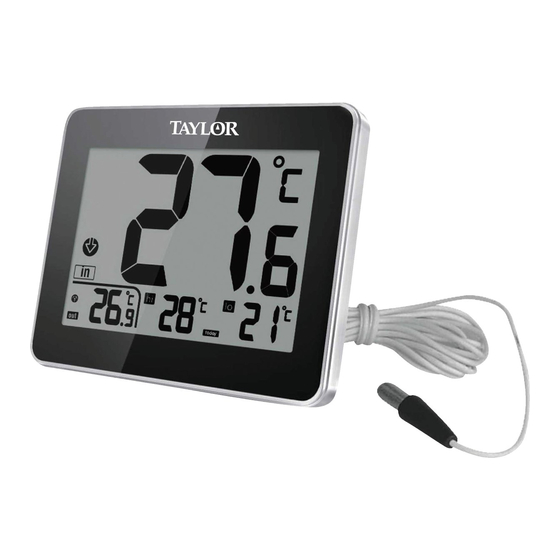
TEMPERATURE READINGS
Your WeatherGuide™ displays current indoor and outdoor temperatures, as well as the maximum and minimum
temperatures recorded over the last 24 hours.
● Current temperature readings display in the center and the bottom left corner of the LCD screen
(next to the "
" and "
● Maximum temperature readings display in the middle screen at the bottom of the LCD screen
(next to the "
" icon).
● Minimum temperature readings display in the right screen at the bottom of the LCD screen
(next to the "
" icon).
Indoor temperature readings – these are temperatures at the thermometer's location.
Outdoor temperature readings – these are temperatures measured by the attached sensor probe. Open a window and run
the cable through the opening so that the sensor probe is exposed to the outdoor temperature. Gently close the window to
avoid crimping or severing the cable.
Alternately, the probe may be used to measure temperatures of aquariums, swimming pools, hot tubs, etc. Simply allow
the end of the probe to hang where you wish to measure temperatures.
Temperature readings will update approximately every 10 seconds.
WeatherGuide™ Wired Indoor/Outdoor Thermometer
Instruction Manual
" icons).
Model 1710
Advertisement
Table of Contents

Summary of Contents for WeatherGuide 1710
- Page 1 WeatherGuide™ Wired Indoor/Outdoor Thermometer Model 1710 Instruction Manual Welcome to the Taylor® WeatherGuide™ System. Simple, reliable, accurate…it allows you to monitor indoor conditions and read outdoor temperatures from indoors, creating an all-in-one weather display. BATTERY INFORMATION YourWeatherGuide™ is powered by 1 CR2025 lithium battery (included). There is a strip under the battery cover to prevent battery drain in shipping.
- Page 2 MAXIMUM/MINIMUM TEMPERATURE READINGS Your WeatherGuide™ will store the last recorded high (maximum) and low (minimum) temperatures over a 24 hour period. The 24 hour period starts when the unit is powered up. To view the maximum and minimum temperature records in place of the clock, press and hold the “MODE” button on the back of the thermometer for 3 seconds.
- Page 3 Made to our exact specifications in China. © 2015 Taylor Precision Products, Inc. and its affiliated companies, all rights reserved. Taylor® is a registered trademark and WeatherGuide™ is a trademark of Taylor Precision Products, Inc. and its affiliated companies. All rights reserved. 1710 7.15...
Need help?
Do you have a question about the 1710 and is the answer not in the manual?
Questions and answers
Outside temp says Lo but is sitting in direct 80 degree sun
The WeatherGuide 1710 may display a low outside temperature while in direct sunlight because it is not sealed against moisture and is not designed for outdoor use. Exposure to direct sunlight and outdoor conditions can affect the sensor's accuracy, leading to incorrect temperature readings.
This answer is automatically generated
My unit shows the indoor temperature and says Lo Lo with a big Lo for the main temperature. How do I fix this. We have enjoyed this for over a year.
The "Lo Lo" indoor temperature display means the indoor temperature is below 32°F (0°C), which is outside the unit's indoor temperature range. To fix this, move the unit to a warmer indoor location above 32°F (0°C). Once the temperature rises above this threshold, the actual temperature reading will reappear.
This answer is automatically generated
Brand new 1710. Following directions to set clock. Hour Digits do NOT flash to change the hour (or minutes)
Press and hold the "SET" button on the back of the thermometer for 3 seconds to enter Clock Setting Mode. If the hour digits do not flash, ensure the thermometer is displaying the clock instead of the maximum/minimum temperature. Once in Clock Setting Mode, press the "▲" button to change the hours, then press "SET" to confirm. Repeat for the minutes. If no buttons are pressed within 30 seconds, the unit will exit Clock Setting Mode automatically.
This answer is automatically generated
Unit keeps switching to Celsius display
I accidentally set the alarm. How do I change alarm setting to off