
Summary of Contents for PORTMAN P1 retro lamp
- Page 1 P1 retro lamp USER MANUAL portmanlights.com /PortmanLights © Portman Lights sp. z o.o. Designed and made in oland, EU...
-
Page 2: Welcome
Welcome! Dear User, Thank you for choosing our P1 Retro Lamp. We are proud of delivering you the highest quality, the greatest design and the real passion with our product. Each fixture in Portman P range is different, but all of them ensure you the best performance and support your creativity. -
Page 3: Table Of Contents
USER MANUAL – Portman Lights P1 Retro Lamp Table of contents Table of contents Welcome! ........................................2 Table of contents ....................................3 Safety information ................................... 4 Technical specification ................................6 Fixture Overview ....................................7 Preparation for use ..................................9 Lamp and fuse replacement ..............................11 Operation modes .................................... -
Page 4: Safety Information
WARNING This product is for professional use only! It is not for household use. P1 Retro Lamp presents risk of lethal or severe injury due to heat, electric shock, fire or falls. Intense and flashing light could trigger epileptic seizures. - Page 5 USER MANUAL – Portman Lights P1 Retro Lamp Safety information Protection against electrical shock • Disconnect the fixture from AC power when not in use. • Disconnect the fixture from AC power before any operation. • Do not remove the rear cover. There are no user-serviceable parts inside.
-
Page 6: Technical Specification
USER MANUAL – Portman Lights P1 Retro Lamp |Technical specification • Always use safety glasses to protect your eyes when changing a lamp or opening front cover. Technical specification 842 x 999 x 170 mm dimensions 12,5 kg weight 240V 50Hz/60Hz... -
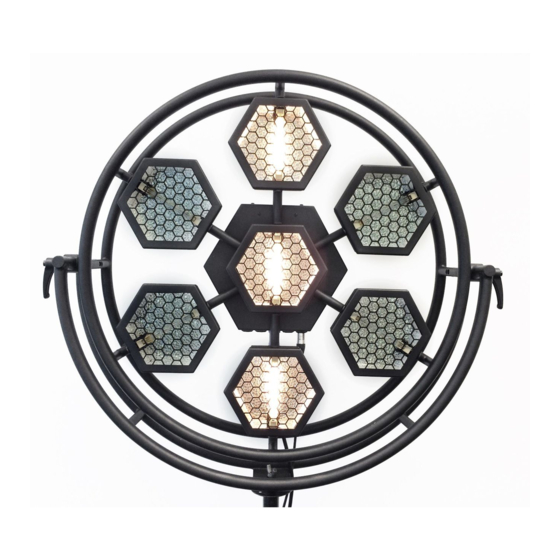
Page 7: Fixture Overview
USER MANUAL – Portman Lights P1 Retro Lamp Fixture Overview Fixture Overview Dimensions P1 Retro Lamp v2.0 7/16... - Page 8 USER MANUAL – Portman Lights P1 Retro Lamp |Fixture Overview DMX chart DMX channel DMX Value function CH.1 0 – 255 0 - 100% smooth dimming CH.2 0 – 255 0 - 100% smooth dimming CH.3 0 - 255 0 - 100% smooth dimming CH.4...
-
Page 9: Preparation For Use
Before mounting the fixture read and follow the safety recommendations indicated in the Safety Information. The Portman P1 Retro Lamp may be installed on a tripod or on a clamp. The fixture has 13 mm (0,512 in) hole for a spigot, rigging clamp or a screw. Before rigging operations make sure, that the structure onto which you are mounting the fixtures can withstand the weight of all of the fixtures. - Page 10 USER MANUAL – Portman Lights P1 Retro Lamp |Preparation for use REMEMBER! Always secure hanged fixture with appropriate safety wire! To adjust the position of the fixture when aiming it to the desired angle, use the side handles. Loosen them by turning them counterclockwise before adjustment and set the desired angle.
-
Page 11: Lamp And Fuse Replacement
USER MANUAL – Portman Lights P1 Retro Lamp Lamp and fuse replacement Lamp and fuse replacement To replace the lamp: • Disconnect the fixture from AC power. • Make sure the fixture and lamps are cool. • Open the front cover by releasing a screw located on top of the front cover. -
Page 12: Operation Modes
Wireless DMX mode (if the WDMX card is installed) and standalone mode. You can link The P1 Retro Lamp to a DMX controller using a 5 or 3 pin DMX wire, or Wireless Solution Sweden hardware (if WDMX card is installed). You can control each channel individually whether with a DMX controller or a manual control build in the fixture. -
Page 13: Menu
Retro Lamp supports bi - directional WDMX TRX module. It means, that the fixture supports RDM in wireless mode too. To link P1 Retro Lamp with W-DMX transmitter first use “UPAIR ALL WDMX DEVICES” option from menu, than turn the scanning mode in the transmitter. - Page 14 USER MANUAL – Portman Lights P1 Retro Lamp |Menu Menu map Main section Level 1 Description ADDRESS 1 - 505 Sets up the DMX start address. Changes the DMX input to wired (default). In this DMX INPUT WIRED mode fixture is receiving DMX signal from the DMX IN 5 pin XLR socket.
- Page 15 USER MANUAL – Portman Lights P1 Retro Lamp Menu Portman Lights Sp. z o.o. Al. Zwycięstwa 96/98, 81-451 Gdynia, Poland +48 58 766 49 49 portmanlights.com /PortmanLights P1 Retro Lamp v2.0 15/16...
- Page 16 USER MANUAL – Portman Lights P1 Retro Lamp |Menu Help preserve the environment! Ensure that this product is recycled at the end of its life. Your supplier can give details of local arrangements for the disposal of Portman products. 16/16...
Need help?
Do you have a question about the P1 retro lamp and is the answer not in the manual?
Questions and answers