Table of Contents
Advertisement
Advertisement
Table of Contents

Summary of Contents for Orange Pi Zero 2
- Page 1 A USER GUIDE FOR ORANGE PI ZERO 2 THE OFFICIAL Orange Pi User's Guide Orange Pi...
- Page 3 THE OFFICIAL ORANGE PI USER'S GUIDE THE OFFICIAL Orange Pi User's Guide...
- Page 4 THE OFFICIAL ORANGE PI USER'S GUIDE...
- Page 5 THE OFFICIAL ORANGE PI USER'S GUIDE Contents Chapter 1: Getting familiar with your Orange Pi Chapter 2: Getting started with your Orange Pi Chapter 3: Using Linux on your Orange Pi Chapter 4: Using Android on your Orange Pi Chapter 5: Building Linux from source...
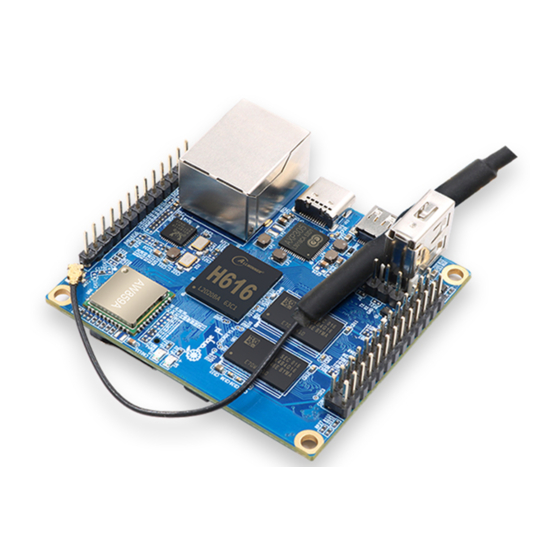
- Page 6 Debian and so on. Orange Pi Zero 2 uses the Allwinner H616 system-on-chip and has 512MB/1GB DDR3 memory. Orange Pi Zero 2 is for anyone who wants to start creating with technology not just consuming it. It's a simple, fun, useful tool that you can use to start taking control of the world around you.
- Page 7 THE OFFICIAL ORANGE PI USER'S GUIDE Hardware Overview...
- Page 8 13 pin GPIO header with 2 USB Host, IR pin, TV-out, Audio and GPIO ports • 5V DC via USB-C connector (minimum 2A) • OS: Android10, Ubuntu and Debian • Dimension: 85mm×56mm • Weight: 30g Pinout Diagram THE OFFICIAL ORANGE PI USER'S GUIDE...
- Page 9 ORANGE PI USER'S GUIDE Expansion board The expansion board is an easy way to expand the functionalities of the Orange Pi Zero2 board by providing two extra USB ports, One IR receiver, and an audio/video composite port. Note: The Orange Pi Zero2 does not support MIC Input on the expansion board.
- Page 10 The Orange Pi Zero2 is very compact and offers only two USB ports out-of-box. The USB Type-C port used for powering the board and the USB Type-A port is available for use. We can get additional two USB Type-A ports with the Orange Pi Zero Addon board.
- Page 11 ORANGE PI USER'S GUIDE Peripheral Requirements If you have only bought the Orange Pi Zero2 board then you will need the following items. USB power supply – A 5V 3amps(3A) power supply with a USB Type-C connector. The official OrangePi power supply is recommended for this board.
- Page 12 Micro-HDMI cable – A Micro-HDMI to HDMI cable is needed for getting Audio/Video from Orange Pi to your TV or Monitor. THE OFFICIAL ORANGE PI...
- Page 13 ORANGE PI USER'S GUIDE USB Hub – The Orange Pi Zero2 has only one USB Type-A port that you may need to use a USB Hub if you want to use more the one USB device. Orange Pi Zero expansion board(Optional) – The expansion board can provide two...
- Page 14 Insert the SD card – Insert the SD card into the microSD card slot on the underside of your OrangePi Zero2. Connect USB Mouse & Keyboard – Connect the mouse to a USB port on OrangePi Zero2 (You can use either a USB Hub or OrangePi Addon board). THE OFFICIAL ORANGE PI USER'S GUIDE...
- Page 15 THE OFFICIAL ORANGE PI USER'S GUIDE Connect HDMI cable – Connect your moniter to the Micro HDMI port of OrangePi Zero2. Connect Ethernet cable(Optional) – If you want to connect your OrangePi Zero2 to the internet via Ethernet then use an Ethernet cable to connect the Ethernet port on...
- Page 16 Connect USB-C Power Supply – Connect a USB-C Power supply to the Orange Pi Zero2. This board doesn't have a power switch, so it will start booting as soon as you connect it to a power supply. Finally, supply power to the USB-C power adapter, and OrangePi Zero2 will start booting.
- Page 17 THE OFFICIAL ORANGE PI USER'S GUIDE After boot-up is complete, you will be greeted with the login screen. The default password for OrangePi OS is "orangepi". Enter the password and hit return. Congratulations! You have booted your first Operating System on the OrangePi...
- Page 18 Chapter 3 Using Linux on your Orange Pi Learn about the Orange Pi Operating System. range Pi Zero2 can run a wide range of Operating Systems like Ubuntu, Debian, and Android 10, including server editions of Ubuntu and Debian. In this chapter, we will learn some basic configurations like changing the screen resolution, adjusting Linux log levels, setting up an SSH connection, etc.
- Page 19 THE OFFICIAL ORANGE PI USER'S GUIDE Changing the screen resolution. The screen resolution can be changed by choosing a different mode for the disp_mod variable and adjusting the width/height values of the frame buffer. We need to change the values of fb0_width, fb0_height, and disp_mode in the /boot/ orangepiEnv.txt file according to the following table.
- Page 20 Then select SSH in Session Setting c. Then enter the IP address of the development board in Remote host d. Then enter the username root or orangepi of the Linux system in Specify username e. Finally click OK THE OFFICIAL ORANGE PI USER'S GUIDE...
- Page 21 THE OFFICIAL ORANGE PI USER'S GUIDE You will be prompted to enter a password, the default passwords for root and orangepi users are orangepi...
- Page 22 Click the network configuration icon in the upper right corner of the desktop (please do not connect the network cable when testing WIFI) Click More networks in the pop-up drop-down box to see all scanned WIFI hotspots, then select the WIFI hotspot you want to connect to THE OFFICIAL ORANGE PI USER'S GUIDE...
- Page 23 THE OFFICIAL ORANGE PI USER'S GUIDE Then enter the password of the WiFi hotspot, and then click Connect to start connecting to WiFi Connect to the WiFi in the Server edition Open the command terminal and enter the following command...
- Page 24 Select Activate a connection and press Enter. Select the WiFi hotspot you want to connect to, then use the Tab key to position the cursor on Activate and press Enter THE OFFICIAL ORANGE PI USER'S GUIDE...
- Page 25 THE OFFICIAL ORANGE PI USER'S GUIDE A dialog box for entering the password will pop up, enter the corresponding password in Password and press Enter to start connecting to WiFi. After the WiFi connection is successful, a "*" will be displayed before the connected...
- Page 26 Connecting to the Bluetooth Click the Bluetooth icon in the upper right corner of the desktop Then select the adapter Set Visibility Setting to Always visible in the Bluetooth adapter setting interface, and then click close THE OFFICIAL ORANGE PI USER'S GUIDE...
- Page 27 THE OFFICIAL ORANGE PI USER'S GUIDE Then open the configuration interface of the Bluetooth device Click Search to start scanning surrounding Bluetooth devices...
- Page 28 When pairing with a mobile phone, a pairing confirmation box will pop up in the upper right corner of the desktop, select Confirm to confirm. At this time, the mobile phone also needs to be confirmed THE OFFICIAL ORANGE PI USER'S GUIDE...
- Page 29 THE OFFICIAL ORANGE PI USER'S GUIDE After pairing with the phone, you can select the paired Bluetooth device, then right- click and select Send a File to start sending a picture to the phone The interface for sending pictures is as follows...
- Page 30 13 pin header for Addon board Please refer to the figure below for the sequence of the Orange Pi Zero 2 dev board 13 pin adapter board interface pins The schematic diagram of the 13pin interface of the Orange Pi Zero 2 development...
- Page 31 USER'S GUIDE 26 pin GPIO expension header Please refer to the figure below for the sequence of the 26 pin of the Orange Pi Zero2 development board The function of the 26 pin of the Orange Pi Zero2 development board is shown in the...
- Page 32 Chapter 4 Using Android on your Orange Pi Learn about the Android 10 Operating System. range Pi Zero2 can run a wide range of Operating Systems like Ubuntu, Debian, and Android 10, including server editions of Ubuntu and Debian. In this chapter, we will learn some basic configurations in Android 10 Operating system.
- Page 33 THE OFFICIAL ORANGE PI USER'S GUIDE Using USB debugging. Goto Settings -> Device Preferences -> Developer options Find USB debugging, make sure it is turned on Use data cable to connect adb debugging Prepare a USB Typc C interface data cable. One end of the USB interface is inserted into the USB interface of the computer, and the other end of the Type C interface is inserted into the power interface of the development board.
- Page 34 4) If service.adb.tcp.port is not set, you can use the following command to set the port number of the network adb cupid-p2:/ # setprop service.adb.tcp.port 5555 cupid-p2:/ # stop adbd cupid-p2:/ # start adbd THE OFFICIAL ORANGE PI USER'S GUIDE...
- Page 35 THE OFFICIAL ORANGE PI USER'S GUIDE 5) Install adb tool on Ubuntu PC test@test:~$ sudo apt update test@test:~$ sudo apt install adb 6) Then connect to the network adb on the Ubuntu PC test@test:~$ adb connect 192.168.1.xxx (The IP address needs to be modified to the IP address of the development board) * daemon not running;...
- Page 36 4) Download the USB camera test APP from the official tool on the page below the Orange Pi Zero 2 information 5) Then use the adb command to install the USB camera test APP to the Android system, of course, you can also use the U disk copy method to install test@test:~$ adb install usbcamera.apk...
- Page 37 USB camera Android system ROOT description The Android 10.0 system released by Orange Pi is already ROOT, you can use the following method to test 1) Download rootcheck.apk from the official tool on the Orange Pi Zero 2 data...
- Page 38 Orange Pi boards. The build script can make server and desktop versions of Debian and Ubuntu. Orange Pi build script based upon Armbian build script. We will make a few different images as an example. Get the Build script source The compilation of the Linux is done on a PC with Ubuntu 18.04 installed.
- Page 39 THE OFFICIAL ORANGE PI USER'S GUIDE Orangepi-build will contain the following files and folders after downloading build.sh: Compile the startup script external: Contains the configuration files needed to compile the image, specific scripts, and the source code of some programs, etc.
- Page 40 C. Repeat the command to compile the image, use the following command without selecting through the graphical interface, you can directly start to compile the image [ o.k. ] Repeat Build Options [ sudo ./build.sh BOARD=orangepizero2 BRANCH=legacy BUILD_OPT=image RELEASE=bionic BUILD_MINIMAL=no BUILD_DESKTOP=no KERNEL_CONFIGURE=yes ] THE OFFICIAL ORANGE PI USER'S GUIDE...
- Page 41 2) Android SDK is the original SDK released by the chip manufacturer. If you want to use the Android image compiled by the Android SDK on the Orange Pi development board, you need to adapt to different boards to ensure that all functions are used...
- Page 42 2) Configure JAVA environment variables a. First determine the installation path of java, generally test@test:~$ ls /usr/lib/jvm/java-8-openjdk-amd64 ASSEMBLY_EXCEPTION bin docs include THIRD_PARTY_README THE OFFICIAL ORANGE PI USER'S GUIDE...
- Page 43 THE OFFICIAL ORANGE PI USER'S GUIDE b. Then use the following command to export java environment variables test@test:~$ export JAVA_HOME=/usr/lib/jvm/java-8-openjdk-amd64 test@test:~$ export PATH=$JAVA_HOME/bin:$PATH test@test:~$ export CLASSPATH=.:$JAVA_HOME/lib:$JAVA_HOME/lib/tools.jar 3) Use Ubuntu 14.04 to compile the source code of android 10, you need to ensure that Ubuntu 14.04 uses the linux 4.4 kernel, otherwise an error will be reported when...
- Page 44 3) The output after compilation is as follows sun50iw9p1 compile Kernel successful INFO: build kernel OK. INFO: build rootfs ... INFO: skip make rootfs for android INFO: ---------------------------------------- INFO: build lichee OK. INFO: ---------------------------------------- THE OFFICIAL ORANGE PI USER'S GUIDE...
- Page 45 THE OFFICIAL ORANGE PI USER'S GUIDE Compile android source code 1) The command to compile android is as follows test@test:~$ cd android test@test:~/android$ source build/envsetup.sh test@test:~/android$ lunch cupid_p2-eng test@test:~/android$ extract-bsp test@test:~/android$ make -j8 2) After compiling, the following information will be printed...
- Page 46 Install an OS to a microSD card 1. Download the tools. We are going to use a Open Source tool called balenaEtcher for writing Orange Pi OS images to MicroSD card. Download the tool using following link. Download balenaEtcher from here.
- Page 47 THE OFFICIAL ORANGE PI USER'S GUIDE 3. Select a MicroSD card drive. Click on Select target and select your MicroSD drive.
- Page 48 4. Perform the Write opration Click on the Flash! button to write OS image to MicroSD card. Sometimes Etcher gives you a warnning about MicroSD card being unusually large if you use a large size MicroSD card. THE OFFICIAL ORANGE PI USER'S GUIDE...
- Page 49 THE OFFICIAL ORANGE PI USER'S GUIDE You may have to give Root permission to perform the write opration. Wait for Etcher to finish the write opration.
- Page 50 5. Success! If you see 1 Successful target then this MicroSD card is ready to boot on Orange Pi SBC. THE OFFICIAL ORANGE PI USER'S GUIDE...
- Page 51 First, you need to prepare a USB to TTL module. This module can be bought in Orange Pi store. If there are other similar USB to TTL modules, you can also insert the USB end of the USB to TTL module into the USB port of the computer The corresponding relationship between the debug serial port GND, TX, and RX pins of the development board is shown in the figure below...
- Page 52 Connect the TX of the USB to TTL module to the RX of the board The schematic diagram of connecting the USB to TTL module to the computer and the Orange Pi development board is shown below How to use the debug serial port on the Ubuntu platform.
- Page 53 THE OFFICIAL ORANGE PI USER'S GUIDE 6) First, select the setting interface of the serial port 7) Then set the parameters of the serial port...
- Page 54 First, select the Connection type as Serial b. Then click the Open button to connect to the serial port 9)After starting the development board, you can see the Log information output by the OS from the opened serial terminal THE OFFICIAL ORANGE PI USER'S GUIDE...
- Page 55 THE OFFICIAL ORANGE PI USER'S GUIDE How to use the debug serial port on the Windows platform? 1) Many serial debugging tools that can be used under Windows, such as SecureCRT, MobaXterm, etc. The following shows how to use MobaXterm. This software has a free version and can be used without purchasing a serial number.
- Page 56 4)After clicking the "OK" button, you will enter the following interface, and you can see the output information of the serial port after starting the development board THE OFFICIAL ORANGE PI USER'S GUIDE...
- Page 57 THE OFFICIAL ORANGE PI USER'S GUIDE...
- Page 58 Network: 10/100/1000Mbps Ethernet Wireless: WiFi/BT4.0 Orange Pi 3 Orange Pi 3 is an All-in-One SBC suitable for most embedded needs, comes with plenty of USB-3 ports for peripherals. It comes with a modern PCIe interface for high-speed devices. CPU: Allwinner H6 GPU: Mali-T720...
Need help?
Do you have a question about the Zero 2 and is the answer not in the manual?
Questions and answers