Table of Contents
Advertisement
Advertisement
Table of Contents

Related Manuals for GenMark Dx ePlex

Summary of Contents for GenMark Dx ePlex
- Page 1 Quick Reference Guide PI1067- Rev. F...
- Page 2 Licensing inquiries should be directed to GenMark's Legal Department at 5964 La Place Court, Carlsbad, CA 92008. Unless otherwise agreed to in writing, by using the ePlex instrument, Recipient acknowledges that Recipient has read, accepts and agrees to be bound by and comply with the Terms and Conditions available on GenMark’s website which can be amended from time to time by GenMark without consent.
-
Page 3: Chapter 1. Preface
Getting Help For any questions concerning how to set up, use, or maintain the ePlex instrument that are not covered in this manual, refer to the following available resources: –... -
Page 4: Chapter 2. Compliance And Safety
Operating the ePlex system outside the procedures specified in the ePlex Operator manual can result in exposure to hazards that can cause injury to personnel, damage the system, or adversely impact system performance. - Page 5 WEEE - Do not throw in trash RoHS Directive ETL Listed Mark Caution Biological Risk Electrical Risk Note Compliance The ePlex system has been tested according to the following directives: Electromagnetic Compatibility (EMC) CISPR 11:2015 IEC EN 61326-2-6:2013 Standards UL 61010-1:2012 ...
-
Page 6: Warnings And Hazards
For routine surface cleaning, do not spray any fluids directly on the ePlex instrument, accessories or components. Do not shut off main power to the ePlex system while the system is starting or running. Please use the ePlex software to properly shutdown or restart the ePlex system . - Page 7 Do not use the ePlex instrument in close proximity to sources of strong electromagnetic radiation as these devices may interfere with the ePlex system operation. Ensure at least 7.62cm (3") clearance around and on top of the ePlex system for adequate ventilation and cooling.
- Page 8 Perform only maintenance and service procedures in this manual or authorized by GenMark or a GenMark authorized representative. Do not operate the ePlex system if any liquid has leaked inside or on the ePlex system or cartridge. Shutdown ePlex software before turning off front power button or main power switch.
-
Page 9: Chapter 3. Operation
Chapter 3. Operation The workflow for processing a cartridge on the ePlex system includes the following: 1. Apply an accession ID barcode to the cartridge matching the accession barcode on the primary sample. Note: Ensure both barcodes match prior to transferring sample. - Page 10 5. Insert cartridge into any ready bay indicated by a blinking white LED. The system will match the accession ID to that bay and automatically starts the run. 6. Upon run completion, the bay will automatically eject the cartridge and prepare the Detection Report for display, print, or export using View Sample Report on the Bay icon or Bay Details view.
-
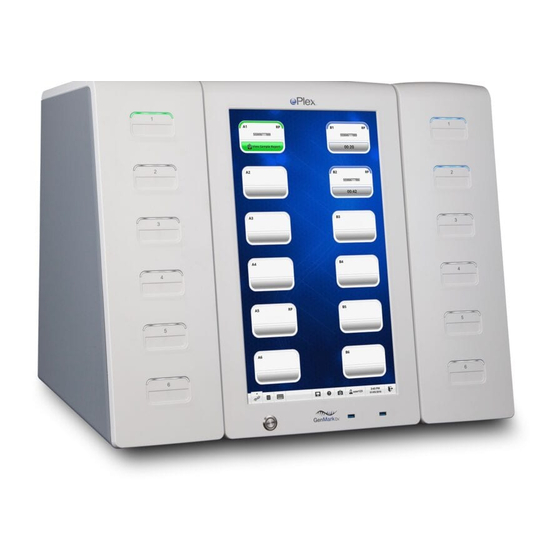
Page 11: Navigating The User Interface
Navigating the User Interface The ePlex user interface is organized into four main views: Run, Reports, Settings and Tools. The default view is the Run view. To move from one screen to the next, select the Navigation icon in the lower left hand corner of the toolbar and choose the desired view from the menu. - Page 12 The toolbar is visible at the bottom of the screen in all screen views. The toolbar includes: Navigation icon 2. Pending Test Orders icon Manual Entry icon 3. Remote icon 4. Help icon 5. Screen Capture icon 6. Current User icon 7.
-
Page 13: Chapter 4. Using The System
1. Ensure the main power switch is in the "On" position indicated by "-" The main power switch controls power to the entire ePlex System. 2. Press the power button on front of the base to illuminate the switch and turn the ePlex instrument on. The front power switch controls power to the ePlex integrated PC. - Page 14 Electrical Warning: Once the instrument is running, the main power switch in the back left corner of the base will shut down the ePlex instrument immediately. All samples running at the time of shutdown will be lost. Electrical Warning: Turn off the power using the front power button before disconnecting the AC power cord.
-
Page 15: Using The Touch Screen
Touch delay may occur on certain screens including the Bay Configuration screen as the ePlex instrument is gathering information from the bays. After selecting certain functions you may see the Loading icon please be patient as the ePlex instrument is processing the request. -
Page 16: Preparing Cartridges
The following sections in this manual assume that each cartridge has been properly loaded in compliance with laboratory standards and safety protocols. Before inserting the cartridges into the ePlex instrument, check that they are properly labeled, cap is closed completely and confirm the accession ID barcode on each sample tube and cartridge match. - Page 17 Using the barcode scanner is the recommended workflow on the ePlex cartridge as it maintains positive sample identification. Note: If downloading test orders, upon scanning an accession ID, the ePlex instrument will check for a matching pending test order and start the run. Pending Test Orders (PTO) Manual Run 1.
-
Page 18: Using The Barcode Scanner
ID in the search field. Barcode Scanning Tips For effective barcode scanning follow these guidelines: Ensure room has adequate ambient lighting. Hold the ePlex cartridge in hand without covering any barcodes. PI1067-Rev. F... - Page 19 Maintain at least a cartridge length between the bottom of the scanner and the cartridge. Move cartridge in a horizontal position with arrows pointing to the back of the ePlex instrument, aiming the red crosshairs for the scan location shown below.
- Page 20 Once the ePlex instrument has the information needed to start a run, the user interface will instruct the user to enter the cartridge into any ready bay indicated by blinking white LEDs. Insert the cartridge with the label facing up and arrows facing the bay as shown below.
-
Page 21: Monitoring The Run
Note: A blinking LED indicates a user action is required. Monitoring the Run The Run view displays the Bay icons with colors matching the physical bay LEDs. Selecting the Bay icon with a running bay will open the Bay Details view, which contains additional information for the bay and test cartridge. - Page 22 6. Select the Comments text box. 7. Add or edit the comments and select Enter. 8. Select Save. 9. Select Close. Bay Errors The Bay Error icon is visible in the toolbar of any screen of the user interface if any bay is in the error state.
-
Page 23: Aborting A Run
A Detection Report will be created with invalid results with a message indicating the test was aborted by user. Note: If run is aborted, the aborted test cartridge cannot be run again on the ePlex instrument. Cartridge Removal Upon test completion, the bay status LEDs will blink green on both the Bay icon and the physical bay. -
Page 24: Generating And Viewing Reports
Note: If cartridge does not properly eject after run completes press cartridge in and release. If cartridge still does not eject, contact Technical Support. Generating and Viewing Reports To view a Detection Report for a sample that was run on a particular bay, select the green View Sample Report button on the Bay icon or Bay Details view. - Page 25 PI1067-Rev. F...
Need help?
Do you have a question about the ePlex and is the answer not in the manual?
Questions and answers