Table of Contents
Advertisement
Quick Links
Advertisement
Table of Contents

Summary of Contents for Arroyo Instruments LaserSource 4400 Series
-
Page 2: Table Of Contents
Page 2 · 4400 Series LaserSource User’s Manual Table of Contents Introduction ....................4 Safety Terms and Symbols ............... 6 Quick Start ....................8 Installation ....................9 Powering Up the Unit ................9 Ventilation ..................... 9 ... - Page 3 4400 Series LaserSource User’s Manual · Page 3 Using the Cable R Setting ............... 34 Measure the Voltage at the Laser ............35 Short the Connection at the End of the Cable ........35 How the Calculation Is Used .............. 35 ...
-
Page 4: Introduction
User’s Manual Introduction Thank you for choosing the LaserSource from Arroyo Instruments. Your LaserSource is a combination of leading-edge technology combined with years of experience in the field of current control. With a crystal clear VFD display, both RS232 and USB computer interfaces, and... - Page 5 Computer Interfacing Manual, and USB drivers are included. For USA customers, a power cord is included. For non-USA customers, an IEC-60320- C13 rated AC power cord must be provided. Accessories Arroyo Instruments also sells several accessories designed to work with the LaserSource. These include: LaserSource...
-
Page 6: Safety Terms And Symbols
Storage of the unit outside the standard storage temperature or humidity rating, or prolonged storage under harsh conditions. Failure to operate properly. If needed, contact your distributor or Arroyo Instruments for service or repair to ensure the safety of the product is maintained. Symbols Power Off... - Page 7 CAUTION There are no user-serviceable parts inside. All service and repair work shall be done by Arroyo Instruments or personnel authorized by Arroyo Instruments. Modifications done by non-authorized personnel will void the warranty. Please see the Service section later in this manual for instructions on how to obtain service for this instrument.
-
Page 8: Quick Start
Page 8 · 4400 Series LaserSource User’s Manual Quick Start LaserSource was designed with ease of use in mind. This section will show how you can quickly get the unit up and running. The unit uses a universal AC input, just ensure you are within the 100V to 250V AC operating range. -
Page 9: Installation
4400 Series LaserSource User’s Manual · Page 9 Installation Installation of the 4400 LaserSource is very straightforward, as the quick start section above illustrated. This section will provide additional details and considerations for installing your LaserSource. After unpacking the unit, make sure all packing materials have been removed and nothing obscures the ventilation ports on the back and bottom of the unit. -
Page 10: Warm-Up And Environmental Considerations
Page 10 · 4400 Series LaserSource User’s Manual typically be several degrees higher than room ambient) does not exceed the unit’s operating temperature. Warm-up and Environmental Considerations In order to achieve the highest level of accuracy, the LaserSource should be powered on for at least one hour prior to taking measurements. -
Page 11: Rear Panel Connections
4400 Series LaserSource User’s Manual · Page 11 Rear Panel Connections In addition to the front panel connections described, the rear panel has connections for AC power, Output connector or bus bars, Auxiliary connector, Interlock connector, USB connector, and RS232 connector. LaserSource Rear Panel, 40 Amp Rated Units and Below LaserSource... -
Page 12: Bus Bar Laser Output Connector
Page 12 · 4400 Series LaserSource User’s Manual Bus Bar Laser Output Connector For controllers with a current rating of over 40 Amps, the Output connector is bus bar with M6 threaded holes. The remaining signals are housed in a DB9 female signal connector directly above the bus bar terminals: Description Description... -
Page 13: Auxiliary Connector
4400 Series LaserSource User’s Manual · Page 13 Using Remote Voltage Sense The Remote Sense pins are used to remotely measure the laser voltage. See Using Remote Voltage Sense section for more information. Auxiliary Connector The Auxiliary connector is a female DB-25, and has the following pin-out: Description Description Digital Input 1... -
Page 14: Rs232 Connector
Page 14 · 4400 Series LaserSource User’s Manual RS232 Connector The RS232 connection is male DB-9 connector wired in a NULL modem configuration. Description Receive Transmit Ground 1,4,6 Commoned together Commoned together No connection Shell Earth ground RS232 Connector (DB-9 Male) For more information on using the RS232 interface, see the Computer Interfacing Manual which is included on the CD that accompanied this product. - Page 15 4400 Series LaserSource User’s Manual · Page 15 The Menu button is used to enter the LaserSource menu. When in remote mode, it acts as a Local button, returning the instrument to local mode. There are two menus in the system: the Main Menu, which can be accessed by pressing the Menu button on any screen except the pilot laser, and the Pilot Menu, which can only be accessed when on the pilot laser screen.
-
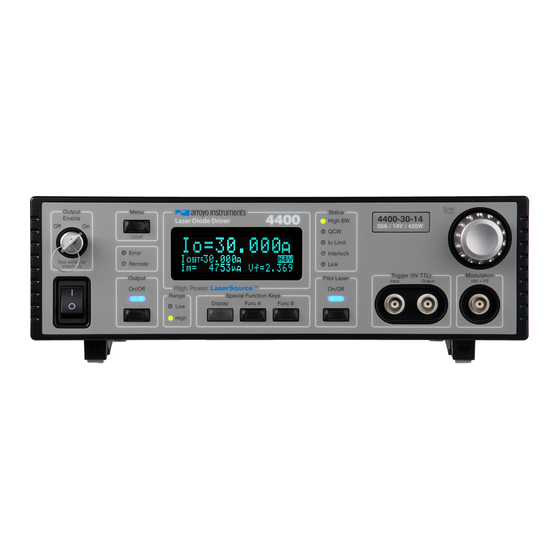
Page 16: Main Display Screen
Page 16 · 4400 Series LaserSource User’s Manual When the unit is in remote mode, the yellow Remote LED will be lit. More information about how the instrument behaves in remote mode can be found in the Remote Mode Operation section. Main Display Screen The top of the main display will be the set point or actual read of the control mode value (for example, current when in constant current mode). -
Page 17: Using Limits
4400 Series LaserSource User’s Manual · Page 17 .Pilot Laser. IoSET= 25mA 25mA Vf= 1.78v Main Display: pilot laser The set point will depend on the control mode you have selected. Using Limits LaserSource supports five different types of limits: current, voltage, photodiode current, photodiode power, and temperature. -
Page 18: Settings And Menus
Page 18 · 4400 Series LaserSource User’s Manual Possible condition messages are: Status When showing, indicates LoBW The unit is in Io (LoBW) mode. HiBW The unit is in Io (HiBW) mode. Pulse The unit is in Io (Pulse) mode. ExtTrig The unit is in Io (Ext Trig) mode. -
Page 19: Main Laser Menu
4400 Series LaserSource User’s Manual · Page 19 Main Laser Menu Menu Description Factory Default Top Level Menu As described in the Control Modes section, the unit offers seven control modes: Io (ACC), Io Mode HiBW (ACC), Io (Pulse), Io (Ext Trig), Io (Burst), Io (ACC) Im (AMC), Po (APC), and Vf (AVC). - Page 20 Page 20 · 4400 Series LaserSource User’s Manual Menu Description Factory Default Selects the pulse risetime when operating in QCW Risetime QCW mode. Only available when in QCW mode. Sets the delay, in seconds, from the start of trigger input pulse to the start of the current DelayIn 0.000015s pulse.
- Page 21 4400 Series LaserSource User’s Manual · Page 21 Menu Description Factory Default The cable resistance, in ohms. This setting can be used to compensate for voltage losses in the cable due to cable and connector resistances. Cable R Cable R is ignored in Vf (AVC) Mode. For more 0.0000 Ω...
- Page 22 Page 22 · 4400 Series LaserSource User’s Manual Menu Description Factory Default Di2 Invert Inverts the active state of Digital Input 2. Selects what status is used to control Digital Do1 Func Output 1. Do1 Invert Inverts the state of Digital Output 1. Selects what status is used to control Digital Do2 Func Output 2.
- Page 23 4400 Series LaserSource User’s Manual · Page 23 Menu Description Factory Default AutoDim Automatically dims the display after 1 hour. Display This setting controls when the unit produces audible feedback. Set to No to prevent sound, Audible Beep or Yes to enable audible alerts such an error message.
-
Page 24: Pilot Laser Menu
Page 24 · 4400 Series LaserSource User’s Manual Menu Description Factory Default Sets the ramp time for power up, power down, Ramp Time and set point changes for Io and Io HiBW 80ms modes. Disables Vf Limit hardware safety (E-505 errors). Disable Vf Lim Use with caution. - Page 25 4400 Series LaserSource User’s Manual · Page 25 Menu Description Factory Default Digital I/O Menu Selects the action to perform when Digital Input 1 Di1 Func None is true. Di1 Invert Inverts the active state of Digital Input 1. Selects the action to perform when Digital Input 2 Di2 Func None is true.
-
Page 26: Remote Mode Operation
Hardware tab then click on the Device Manager button. When the Device Manager appears, click on the plus sign to the left of Ports. The port identified as an Arroyo Instruments Virtual COM Port or USB Serial Port is the LaserSource. In the event you have multiple Arroyo Instruments products plugged in simultaneously, you will need to experiment to see which instrument was assigned to which port. -
Page 27: Grounding Considerations
Poor or intermittent connections can damage or destroy the laser diode. Depending on the model, Arroyo Instruments carries cables specifically designed for this controller. Contact the factory for more information. See the manual for your laser (and fixture) for additional safety and operational information. -
Page 28: Cable Wiring For Modulation And Qcw
Wire Size 131C10039X 132C10039X 10-12 AWG Pin/Socket 131C10049X 132C10049X 8-10 AWG D-Sub 3013W3PCM99A10X 3013W3SCM99A10X Hood 952-025-030R121 Arroyo Instruments’ cables are shielded, twisted-pair cables, and designed to support these applications. For questions, contact the factory or your local representative for additional help. -
Page 29: Laser Control Modes
4400 Series LaserSource User’s Manual · Page 29 Laser Control Modes LaserSource offers eight laser control modes: Io (ACC) – “eye-oh” Current set point, automatic current control Io HiBW (ACC) – “eye-oh-Hi-B-W” Current set point, high bandwidth mode, automatic current control ... -
Page 30: Modulation
Page 30 · 4400 Series LaserSource User’s Manual Po mode (also referred to as APC, or automatic power control, mode) is simply Im mode with a mathematical constant applied to the set point, providing a convenient way of operating in milliwatts. Using the PD Resp factor (in μA/mW), a Po set point is internally converted to an equivalent Im set point by the driver, which is then used to control the photodiode feedback. - Page 31 4400 Series LaserSource User’s Manual · Page 31 Duty Freq Width As an example, a 0.6ms pulse width and 30% duty cycle results in a frequency of 500 Hz. Put into the formula above, it would be written: 500 Because of this relationship, when adjusting any of these parameters, it requires a change in one of the others.
-
Page 32: Qcw Low Setpoint
Page 32 · 4400 Series LaserSource User’s Manual When triggering remotely (or via the LASER:TRIGGER command), the LED will also remain lit solid during the pulse train. Also, the LASER:OUTPUT command is only used to turn the output on or off; use the LASER:TRIGGER command to start a pulse train. -
Page 33: Trigger Input And Trigger Output
4400 Series LaserSource User’s Manual · Page 33 Trigger Input and Trigger Output The Trigger Input and Trigger Output connectors located on the front panel of the 4400 can be used to synchronize the 4400 with other instruments. Using the Trigger Input, another instrument can act as the master, sending a trigger to the 4400 to generate a pulse output when in Io (Ext Trig) mode. -
Page 34: Using Limits
Page 34 · 4400 Series LaserSource User’s Manual Using Limits LaserSource provides several limit features for protection of the laser diode. These include current, voltage, intermittent contact, photodiode current, and photodiode power limits. Both the current and voltage limits are implemented in hardware, providing for fast response to changes in laser diode operation. -
Page 35: Measure The Voltage At The Laser
4400 Series LaserSource User’s Manual · Page 35 While it is possible to use a DMM to measure the resistance of the cable, because resistance is so small, you will not typically get proper readings. A better approach is to use the instrument to drive current through the system and then measure the voltage loss to determine resistance. -
Page 36: Using Remote Voltage Sense
Page 36 · 4400 Series LaserSource User’s Manual Limit must take into account all the voltage required, including the cable loss (i.e., the voltage displayed if the Cable R value were zero). Cable R is ignored in Vf mode. This means that the set point and measured voltage are always the voltages at the connector, and Cable R is not used. -
Page 37: Using The Auxiliary Interface
4400 Series LaserSource User’s Manual · Page 37 Using the Auxiliary Interface The Auxiliary Interface provides connections to the auxiliary sensors, the digital inputs and output, an electromechanical relay, and an auxiliary +5V power supply. Auxiliary Sensors Auxiliary sensors are wired for a common ground return, so take care to ensure that a common ground will not cause interference with other parts of your system. -
Page 38: Digital Outputs
Page 38 · 4400 Series LaserSource User’s Manual The digital input is not a high-speed circuit and may take many milliseconds to detect and react to a signal. Therefore, it is not suitable in applications where high-speed response is required. For high speed triggering, use the Trigger Input on the front panel on the instrument. -
Page 39: Dig Out Modes
4400 Series LaserSource User’s Manual · Page 39 the assigned function is true, the polarity will reverse: pin 6 will be open (not shorted) and pin 7 will be closed (shorted) to the common pin 19. Dig Out Modes The System->Dig Out Modes settings are used to control how to merge the digital signals generated from the main and pilot laser. -
Page 40: Using The Interlocks
Page 40 · 4400 Series LaserSource User’s Manual Using the Interlocks The 4400 has two interlock inputs that can be used to disable the laser output. The Chassis Interlock is the two-pin green Phoenix connector located next to the USB connector on the rear of the unit. The Laser Interlock is located either on the 13W3 connector or the DB-9 Signal connector on units equipped with buss- bar outputs. -
Page 41: Working With Thermistors
LaserSource is designed to work with negative temperature coefficient (NTC) thermistors, such as the BetaTHERM 10K3A1 thermistor used in many of the Arroyo Instruments LaserMounts and TECMounts. A thermistor works by translating temperature into resistance, with resistance decreasing as temperature increases (hence the ‘negative coefficient’). -
Page 42: The Steinhart-Hart Equation
Page 42 · 4400 Series LaserSource User’s Manual As can be seen be the graph, the resistance of the thermistor drops very quickly. In the typical control range (0°C to 40°C), typical 10K thermistors offer good sensitivity to changes in temperature, and this is the range in which most 10K thermistors are typically used. - Page 43 4400 Series LaserSource User’s Manual · Page 43 point or two-point calibration and apply the calibration to your voltage input. You can read actual current using the LAS:I? query. The modulation input on the 4400 supports bipolar modulation (not all Arroyo Instruments controllers do).
-
Page 44: Optimizing For Pulse Performance
Page 44 · 4400 Series LaserSource User’s Manual Optimizing for Pulse Performance LaserSource is a high-power instrument that requires an understanding of proper setup when operating the unit in pulse mode, either via with a square wave signal into the analog modulation input or in QCW mode. Cables The most critical aspect of your setup is the cable connecting the LaserSource... -
Page 45: Lowering Bw Or Risetime
4400 Series LaserSource User’s Manual · Page 45 Lowering BW or Risetime When using cables that are not well suited for high performance modulation, the 4400 includes settings to lower the bandwidth or risetime and virtually eliminate current overshoot or ringing but at the sacrifice of lower BW or rise time. ... -
Page 46: Eliminating E-540 (Voltage Headroom) Error
Page 46 · 4400 Series LaserSource User’s Manual Eliminating E-540 (Voltage Headroom) Error The E-540 error is caused when the difference between the peak voltage and the supply voltage drops below an internal safety limit. While the cause of the error is different than an E-537 error, the same methods above can be used to prevent the error. -
Page 47: Noise
4400 Series LaserSource User’s Manual · Page 47 Noise On some controllers, lowering the voltage limit will allow for the power supply to operate at a lower voltage and reduce current noise. This is particularly true for low compliance loads operating on high compliance drivers. In general, operating with the voltage limit as low as possible without generating E-505 errors will provide the best possible noise performance. -
Page 48: Using The Pilot Laser
Page 48 · 4400 Series LaserSource User’s Manual Using the Pilot Laser The 4400 includes an additional low-power driver for controlling a pilot (or aiming) laser that is often included inside high-power laser modules. With both current and voltage mode operation and a wide current and voltage range, the pilot laser driver meets the requirements of most pilot lasers. -
Page 49: Loading A Previously Stored Configuration
4400 Series LaserSource User’s Manual · Page 49 the computer interface, see the Computer Interfacing Manual for more information on how to construct and store scripts. Because the 4400 is a multi-channel controller, if you are including any laser commands in the script, be sure to include a LAS:CHAN command at the start of the script to specify which channel the script should run against. -
Page 50: User Calibration
Page 50 · 4400 Series LaserSource User’s Manual User Calibration LaserSource supports the ability to apply a user calibration to all measurement and control functions of the instrument. This allows for field calibration of the instrument as needed to meet the requirements of the user’s application. - Page 51 4400 Series LaserSource User’s Manual · Page 51 M and B values are 1.000 and 0.00, respectively, but can be adjusted to change the sensor measurement. The calibrated measurement is computed as follows: User calibrated reading = M * reading + B For set points, the set point is calculated as follows: User calibrated setpoint = M * set point + B B is always in the units of the measurement (for example, volts for laser voltage,...
-
Page 52: Specifications
Page 52 · 4400 Series LaserSource User’s Manual Specifications 10A to 20A Unit Specifications Description 4400-10-56 4400-15-28 4400-20-48 CW Specifications SETPOINT LASER CURRENT Range (A) 0 – 10 0 – 15 0 – 20 Max Resolution (A) 0.0005 0.0005 0.001 Accuracy (±[% set+A]) 0.05 + 0.005 0.05 + 0.0075... - Page 53 4400 Series LaserSource User’s Manual · Page 53 Description 4400-10-56 4400-15-28 4400-20-48 LASER VOLTAGE Resolution (V) 0.01 0.01 0.01 Accuracy (±[% reading+V]) 2 + 0.1 2 + 0.1 2 + 0.1 PHOTODIODE CURRENT Resolution (μA) Accuracy (±[% reading+μA]) 2 + 100 2 + 100 2 + 100 QCW PARAMETERS...
- Page 54 Page 54 · 4400 Series LaserSource User’s Manual 30A and 40A Unit Specifications Description 4400-30-14 4400-30-28 4400-40-24 CW Specifications SETPOINT LASER CURRENT Range (A) 0 – 30 0 – 30 0 – 40 Max Resolution (A) 0.001 0.002 0.002 Accuracy (±[% set+A]) 0.05 + 0.015 0.05 + 0.015 0.05 + 0.02...
- Page 55 4400 Series LaserSource User’s Manual · Page 55 Description 4400-30-14 4400-30-28 4400-40-24 Resolution (μA) Accuracy (±[% reading+μA]) 2 + 100 2 + 100 2 + 100 QCW PARAMETERS PULSE WIDTH Range (ms) 0.1 – 600 0.1 – 600 0.1 – 600 Resolution (ms) 0.001 0.001...
- Page 56 Page 56 · 4400 Series LaserSource User’s Manual 60A to 100A Unit Specifications Description 4400-60-14 4400-80-12 4400-100-10 CW Specifications SETPOINT LASER CURRENT Range (A) 0 – 60 0 – 80 0 – 100 Max Resolution (A) 0.005 0.005 0.005 Accuracy (±[% set+A]) 0.05 + 0.03 0.05 + 0.04 0.05 + 0.05...
- Page 57 4400 Series LaserSource User’s Manual · Page 57 Description 4400-60-14 4400-80-12 4400-100-10 PHOTODIODE CURRENT Resolution (μA) Accuracy (±[% reading+μA]) 2 + 100 2 + 100 2 + 100 QCW PARAMETERS PULSE WIDTH Range (ms) 0.1 – 600 0.1 – 600 0.1 –...
- Page 58 Page 58 · 4400 Series LaserSource User’s Manual General Specifications PILOT LASER CURRENT Range (mA) 0 – 500 Resolution (mA) Accuracy (±[% + mA]) 1% + 3 Compliance Voltage (V) > 5 Current Limit Accuracy (±mA) VOLTAGE Range (V) 0 – 5 Resolution (V) 0.01 Accuracy (±[% + V])
-
Page 59: Error Messages
4400 Series LaserSource User’s Manual · Page 59 Error Messages Error Description Cause Code The error code is non-specific, and is generally E-100 General Error used when no other error code is suitable. The message is too long to process (USB/Serial E-102 Message too long only). - Page 60 Page 60 · 4400 Series LaserSource User’s Manual Laser voltage limit The laser voltage exceeded the voltage limit and E-505 disabled output the output was turned off. The laser output was turned off because a Laser photodiode photodiode current limit was detected and the E-506 current limit disabled corresponding bit in the OUTOFF register was...
-
Page 61: Maintenance And Service
4400 Series LaserSource User’s Manual · Page 61 I-701 Config loaded Instrument configuration successfully loaded. The user-provided calibration for the laser I-703 Laser usercal reset measurements and set points reset by the user. When in remote voltage sense mode, the controller detected a significant difference Remote voltage sense W-800... -
Page 62: Service
Warranty Arroyo Instruments warrants this product to be free from defects in material and workmanship under normal use and service for a period of one (1) year from date of shipment. It does not apply when the product has been misused, altered or damaged by accident or abnormal conditions of operation. - Page 63 LaserSource User’s Manual · Page 63 European Community Declaration of Conformity EC Declaration of Conformity I/We Arroyo Instruments 1201 Prospect Street San Luis Obispo, CA 93401 declare that 4400 Series LaserSource Laser Diode Driver In accordance with the following directives...
- Page 64 Copyright © 2020, Arroyo Instruments. All Rights Reserved P/N 530-1055C...
Need help?
Do you have a question about the LaserSource 4400 Series and is the answer not in the manual?
Questions and answers