Advertisement
Quick Links
Advertisement

Summary of Contents for Evil Mad EggBot
- Page 1 EggBot Instructions...
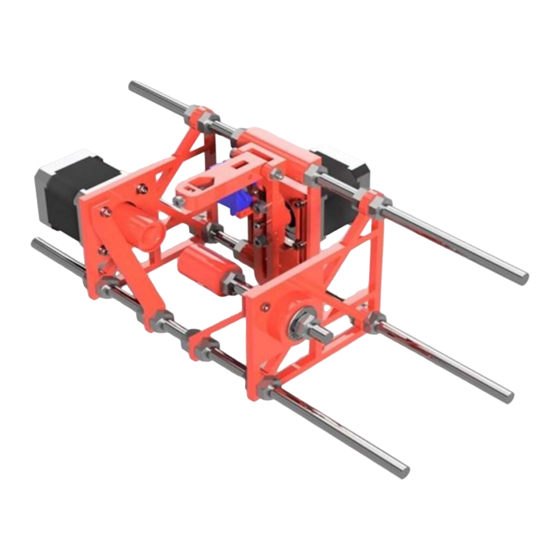
- Page 2 The eggbot is a mini cnc machine capable of drawing on spherical objects such as eggs or christmas decorations balls. Users can produce their own digital drawings and the machine will then transfer them onto spherical objects.
-
Page 3: Equipment List
EQUIPMENT LIST • 3D printed parts for the 1 x [Adafruit motor shield • 5 x [M2x10 screws] • eggbot, available here • 3 x [m3x15 screws] • 2 x [NEMA 17 stepper motors , • 3 x [M8x300 threaded rods] step angle 1.8°, rated voltage 12V,... -
Page 4: Assembling Instructions
Assembling instructions... - Page 5 ATTACH THE BEARINGS Position the bearings on each side part of the eggbot as depicted below...
- Page 6 ASSEMBLE THE MAIN BODY Assemble the two sides, the rear of the eggbot and the supports for the two sides (purple 3D printed parts in the picture below) together, using threaded rods and M8 bolts. You will need about 20 bolts, 1 M2x14 screw and 1 M2 nut to achieve this.
- Page 7 MOUNT THE X AXIS MOTOR Use 3 M2x7 screws and 1 M2x14 screw + 1 M2 washer to mount the X-axis motor to the left side of the eggbot...
- Page 8 MOUNT THE Y AXIS MOTOR Use 4 M2x10 screws and 4 M3 washers to mount the Y-axis motor to the back of the eggbot.
- Page 9 MOUNT ATTACHMENT PIECE FOR PEN ARM Place 2 M2 nuts inside the 3D printed part depicted below. Then mount the latter to the Y-axis engine (M2 nuts facing the rear of the eggbot).
- Page 10 ASSEMBLE PEN ARM Use 2 M3x10 screws + 2 M3 washers to mount the part mentioned above to the servo arm.
- Page 11 MOUNT THE PEN ARM mount the arm for the pen to the Y-axis motor as shown below.
- Page 12 ASSEMBLE THE SUPPORT FOR THE SPHERICAL OBJECT Attach the 3D printed head onto the X-axis motor. Position the M8X10 threaded rod to act as the support on the right hand side. The spring should be positioned on the inside of the structure along the threaded rod.
- Page 13 CONNECT STEPPER MOTORS Connect the cables of each stepper motor to the motor shield. connect the X-axis motor to M1 and M2 (left side of the motor shield) and the Y-axis motor to M3 and M4 (right side of the shield). Connect the cables in the same order for each motor.
- Page 14 CONNECT THE SERVO MOTOR Connect the servo motor to “servo 1” on the shield, with the brown cable (ground) on the left and the yellow cable (signal) to the right.
- Page 15 CONNECT THE POWER SUPPLY Finally, connect the power supply to the power pins of the shield. Red to the positive input (left) and black to the negative (right)
-
Page 16: Final Checks
FINAL CHECKS • The distance between the two sides should be around 16 cm apart • The spring should be slightly compressed when the egg sits inside to hold it sufficiently • The egg is being held firmly so that it won’t slip when it rotates •... - Page 17 PROGRAM YOUR BOARD...
-
Page 18: Install Firmware
INSTALL FIRMWARE • Get the Arduino IDE from https://www.arduino.cc/en/Main/Software. • Get the firmware from https://github.com/jinschoi/SphereBot (download ZIP button) Open up SphereBot.ino with the IDE. a. Under Tools, ensure Board is set to “Arduino/Genuino Uno” and Port is set to the proper serial port. b. - Page 19 CONNECT TO THE BOARD Connect the board using the USB Check that the correct board and port is selected...
- Page 20 VERIFY IT WORKS Click the serial monitor button in the upper right of the IDE. Make sure you have “Newline” and "115200 baud” selected in the lower right drop downs.
- Page 21 CHECK THE X MOTOR Type “G0 X1600” into the top field. The egg motor should spin 180 degrees with the side facing you traveling down (counter clockwise looking at the face of the motor). Type “G0 X0”, it should rotate back to the starting position.
- Page 22 CHECK THE Y MOTOR Manually centre the pen arm. Type “G1 Y480”. The pen arm should travel counter clockwise (to your left) to its limit. Make sure it’s not hitting anything. Type “G1 Y-480”, the pen arm should now swing all the way to the right. Again, make sure it isn’t hitting anything.
- Page 23 CHECK THE SERVO FOR THE PEN ARM Recentre the arm with “G1 Y0”, then enter “M300 S100”. That will lift the pen to the top of its default travel. Enter “M300 S115”, that should gently lower the pen a little bit. Enter “M300 S110”...
- Page 24 CREATING DIGITAL DESIGN...
- Page 25 CREATE YOU DIGITAL DESIGN ON INKSCAPE You can now create your own designs on inkscape. Under File, Document Properties, Page, set a custom size of 3200 width, 800 height and all of the units are in px Make sure the x to y scaling is 1 to 1...
- Page 26 MAKE SURE ALL YOUR COMPONENTS ARE VECTORISED If you type any text, make sure to convert it to path before exporting the design for the eggbot. Path>Object to path. If you import an image from the internet or your own image, make sure to...
- Page 27 PLEASE EMAIL YOUR FINISHED DESIGN TO: c.souter226@gmail.com Or if you have more time please continue… A person from group 3 will join you at some point please help them to vectorise their image in Inkscape and email to Chloe...
- Page 28 CREATE DIGITAL FILE FOR THE EGGBOT...
- Page 29 DOWNLOAD THE SOFTWARE YOU NEED This is an free open source software that you will use to create your digital design Download the Unicorn G-Code plugin for inkscape, and install it. Save the contents of the Zip folder in your inkscape extentions folder as shown.
- Page 30 SAVE YOUR FILE AS A GCODE Once you’ve finished working on the design, you will need to turn your drawing into g-code for the eggbot. To do so, choose File>Save as. Under type, select Makerbot Unicorn G-Code...
- Page 31 SET THE SETTING FOR YOUR GCODE FILE When prompted by the software, provide the following values: Page (1 of 2) 125.0...
- Page 32 SET THE SETTING FOR YOUR GCODE FILE When prompted by the software, provide the following values: Page (2 of 2)
- Page 33 EMAIL YOUR DESIGN TO c.souter226@gmail.com A person from group 3 will now join you Please help them to vectorise their image and turn it into a gcode which the EggBot can read!
- Page 34 CREATING DIGITAL DESIGN FROM A DRAWING...
- Page 35 DOWNLOAD CAMSCANNER Install the CamScanner App onto your phone through the Google Play Store You should ‘Skip’ the page about the premium free trial and there is also no need to make an account by clicking ‘Use Now’...
- Page 36 CREATE YOUR IMAGE Draw your image on paper using black marker pens. Make sure that it is a clear and solid black line with no small white gaps (this will make it easier to vectorise)
- Page 37 DIGITISE YOUR IMAGE Using the CamScanner app scan in your drawing by taking a photo. Crop the image so you have a small white border around your drawing. Use the ‘Magic Color’ filter to give a good contrast between your drawing and the white paper.
- Page 38 DIGITISE YOUR IMAGE ‘Save’, then share (small button in the top right corner) as a jpeg to yourself by emailing, uploading to your drive or sending to yourself over fb messenger.
- Page 39 VECTORISE YOUR IMAGE Find a partner who was in Group 2, who has Inkscape and the Unicorn G- Code plug in already installed. Work together to import your image into Inkscape, vectorise it and save it as a G-Code.
- Page 40 PRINT YOUR DESIGN...
-
Page 41: Repetier Host
REPETIER HOST Once you’ve successfully turned your design into g-code, download and launch Repetier Host. Connect your Eggbot by clicking connect and load your g-code. Once loaded, put your egg into the EggBot and click print!. SUCCESS! Watch your EggBot draw your design onto the spherical object! - Page 42 Common Errors/Troubleshooting • Not drawing the design properly, check the document setup details in InkScape: Pixels, Size, Scaling • If failing to save the Gcode, recheck how you have saved the contents of the unicorn Zip folder. You may need to move the contents of the src folder into the extensions folder itself.
Need help?
Do you have a question about the EggBot and is the answer not in the manual?
Questions and answers