Advertisement
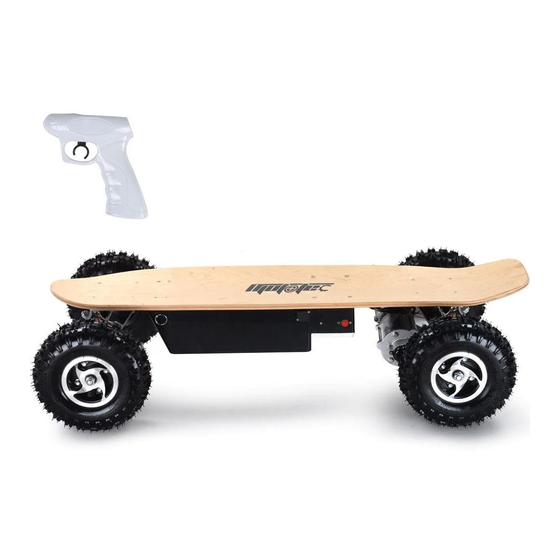
Remote Controlled Electric Skateboard
OWNERS MANUAL
Instruction to the Remote Controlled Electric Skateboard
Dear Customer:
Congratulations and thank you for purchasing Electric Skateboard.For the greatest pleasure and
maximum use of your Electric Skateboard please read this manual thoroughly before your first test
ride.With proper use,your Electric Skateboard will prode safe,trouble free service in a long
term.Thorough understanding of the information in this manual is the first step in safety enjoying
your Electric Skateboard.
Preface:
Your Electric Skateboard is engineered and manufactured with the most technologically advanced
production methods and quality control processes;we inspect and test each Electric Skateboard
before shipment.
1
Advertisement
Table of Contents

Subscribe to Our Youtube Channel
Summary of Contents for MotoTec MT-SKT-1600
- Page 1 Remote Controlled Electric Skateboard OWNERS MANUAL Instruction to the Remote Controlled Electric Skateboard Dear Customer: Congratulations and thank you for purchasing Electric Skateboard.For the greatest pleasure and maximum use of your Electric Skateboard please read this manual thoroughly before your first test ride.With proper use,your Electric Skateboard will prode safe,trouble free service in a long term.Thorough understanding of the information in this manual is the first step in safety enjoying your Electric Skateboard.
- Page 2 Tables of Contents Contents Pages Preface Important safety information Riding instructions Maintaining your electric skateboard Parts diagram of electric skateboard 1.Inspect outter carton for damages and report any to your freight carrier or dealer. 2.Open carton and inspect for internal damage,report any to your freight carrier or dealer. 3.Remove your new Electric Skateboard,remote controller and charger.
- Page 3 Do not operate your Electric Skateboard in crowded areas. NOTE:IF YOU DO NOT UNDERSTAND ANY AND ALL PARTS OF THIS SAFETY OPERATION INFORMATION,PLEASE CALL SKATEBOARD WARRANTY SERVICE TO CLARIFY ALL POINTS IN THIS OWNER’S MANUAL. RIDING INSTRUCTIONS Before riding your new Electric Skateboard,please be sure you fully understand how the model you have purchased operates.
- Page 4 Adjustments Under normal use the Electric Skateboard requires no adjustments.However,it is prudent to check all fasteners for tightness before every use.The bushings in the trucks are specially formulated to provide shock absorption and positive steering control for the Electric Skateboard RIDING YOUR ELECTRIC SKATEBOARD BEFORE YOU RIDE Be sure that you are thoroughly familiar with all of the features and controls discussed in the...
- Page 5 SPEED NEVER RIDE DOWN HILLS THAT ARE TOO STEEP.TO MAINTAIN SAFE CONTROL OF YOUR ELECTRIC SKATEBOARD NEVER RIDE DOWN HILLS THAT REQUIRE CONSTANT BRAKING,AS IT CAN DAMAGE THE BOARD’S ELECTRONICS. Turning your Electric Skateboard The Electric Skateboard turns like any other skateboard.Apply pressure to the deck with your heels or toes and the board will turn in that direction.More pressure will result in tighter turns.In the hands of experienced rider,the Electric Skateboard is capable of making 10”...
- Page 6 Battery Maintenane The rechargeable battery that powers your Elecctric Skateboard should last 1-2 years if kept properly charged,but will slowly decrease in capacity and eventually fail to hold a charge.To maintain maximum life,always keep your Electric Skateboard charged when storing for extended periods of time.Plug in once a month to maintain a charge.They are easily replaceable using the Battery Replacement Kit,which is available from Manufacturer or Dealer.See diagram below.ALWAYS STORE YOUR ELECTRIC SKATEBOARD ON...
- Page 7 Parts Diagram of the Raptor: 1.Bolt 31.Snap link 2.Plate 32.Bolt 3.Washer 33.Screw 4.Truck base 34.Nut 5.Washer 35.Snap link 6.Battery 36.Washer 7.Pull rod 37.Nut 8.Loop 38.Bearing 9.Spring 39.Brush holder 10.Battery case 40.Brush 11.Block 41.Screw 12.Receiver 42.Rotor 13.Plastic case 43.Bolt 14.Screw 44.Tyre 15.Nut 45.Screw 16.Washer...
Need help?
Do you have a question about the MT-SKT-1600 and is the answer not in the manual?
Questions and answers
How to pair universal remote to moto tec 1600w skateboard