Advertisement
HDE's PRX Series Proximity Voltage Detector Battery Replacement Kit consists of one overlay, one
battery with tape attached and three switch plungers. To change the battery, follow these
instructions:
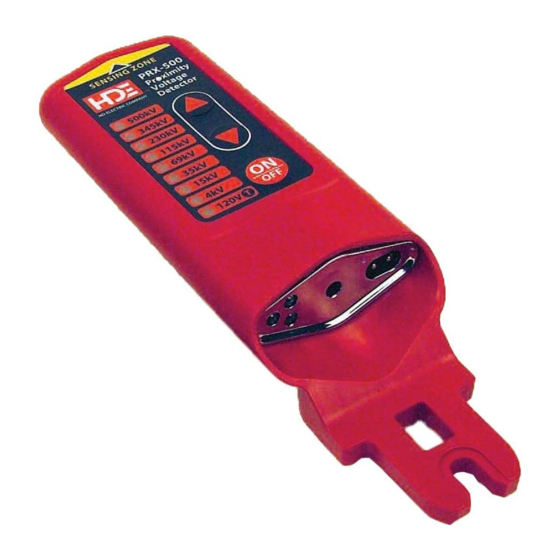
1. Carefully remove the overlay of the PRX (Figure 1) and
discard. Remove the switch plungers and set aside in a
safe place, you will need them once the battery
replacement is complete. Spare plungers have been
included in the battery replacement kit if needed.
2. Once the overlay is removed, remove the two screws on
the front of the instrument. Then carefully use a
screwdriver to slide the chassis out of the housing
(Figure 2).
3. Clean the front surface of the housing to remove any
adhesive that may still be on the instrument. Adhesive
remover or rubbing alcohol is recommended. If using
adhesive remover, make sure the housing is cleaned with
alcohol so no oily residue remains.
4. Once the chassis is removed, carefully lift up
the shielding, unplug the battery and remove
it (Figure 3). Be careful while doing this so
no damage is done to the board.
PRX Series Proximity Voltage Detectors
Battery Replacement Instructions
HDElectricCompany com
Figure 1
Figure 2
Figure 3
Advertisement
Table of Contents

Related Manuals for HD Electric PRX Series

Summary of Contents for HD Electric PRX Series
- Page 1 PRX Series Proximity Voltage Detectors Battery Replacement Instructions HDE’s PRX Series Proximity Voltage Detector Battery Replacement Kit consists of one overlay, one battery with tape attached and three switch plungers. To change the battery, follow these instructions: 1. Carefully remove the overlay of the PRX (Figure 1) and discard.
- Page 2 5. Replace the battery with the new one supplied in the kit. The battery has a polarized locking connector and can only be plugged in one way (Figure 4). Make sure the connector snaps into place on the board. 6. After the battery has been replaced, remove the backing Figure 4 from the tape on the battery, close the chassis and slide it back into the housing.
Need help?
Do you have a question about the PRX Series and is the answer not in the manual?
Questions and answers