Table of Contents
Advertisement
Quick Links
Fax (918) 446-8125 · www.enduropls.com
P.O. Box 3489 · Tulsa, Oklahoma 74101-3489 · Office (918) 446-1934
Toll Free 1-800-752-1628 · Fax (918) 446-8125 · www.enduropls.com
0002-40-38085 Rev 01
P.O. Box 3489 · Tulsa, Oklahoma 74101-3489 · Office (918) 446-1934
ENDURO
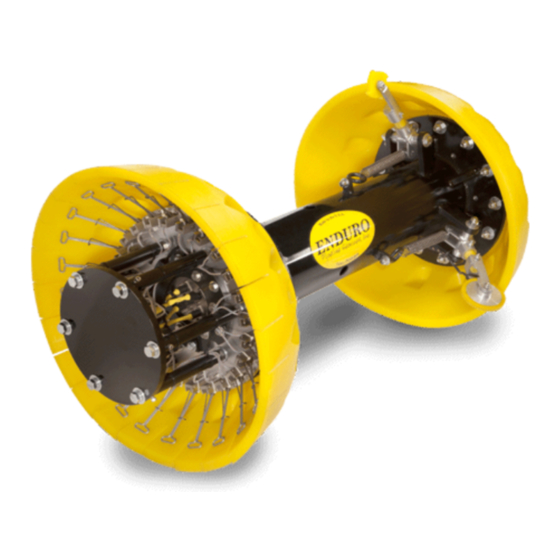
DdL™ Caliper Tool
User Manual
Using the ENDURO Tech-Less
DdL™ Caliper Inspection Tool
© Enduro Pipeline Services, Inc. All Rights Reserved.
0
Advertisement
Table of Contents

Summary of Contents for Enduro Ddl Caliper Tool
- Page 1 User Manual Using the ENDURO Tech-Less DdL™ Caliper Inspection Tool P.O. Box 3489 · Tulsa, Oklahoma 74101-3489 · Office (918) 446-1934 Toll Free 1-800-752-1628 · Fax (918) 446-8125 · www.enduropls.com 0002-40-38085 Rev 01 © Enduro Pipeline Services, Inc. All Rights Reserved.
-
Page 2: Table Of Contents
Connecting Laptop Computer to the DdL™ Caliper Tool 18-26 2.7. Connecting Laptop Computer to the AGM2 Box 27-33 2.8. Final DdL™ Caliper Tool Check 34-37 2.9. Loading DdL™ Caliper Tool into Pipeline 38-50 0002-40-38085 Rev 01 © Enduro Pipeline Services, Inc. All Rights Reserved. - Page 3 NewCommTC 64 Dialog User Interface Reference 88-106 8.1. Communication Dialog Windows 88-98 8.2. Download Dialog Windows 99-114 8.3. Upload Dialog Windows 115-123 Troubleshooting 9.1. Troubleshooting Laptop Computer 9.2. Troubleshooting DdL™ Caliper Tool 0002-40-38085 Rev 01 © Enduro Pipeline Services, Inc. All Rights Reserved.
-
Page 4: Disclaimer
From this point forward, Enduro Pipeline Services, Inc. will be referred to as ENDURO. Any company that has rented the DdL™ Caliper Tool will be referred to as CUSTOMER. ****It is not necessary to upload the data from the Laptop Computer to Enduro Headquarters after each download****... -
Page 5: Survey Preparation
1.3.1.1. Single Stage Air Compressor(s) is / are recommended. 1.3.1.2. ENDURO will recommend the amount of CFM required to propel the DdL™ Caliper Tool at a sufficient rate per the pipeline specifications provided to ENDURO. 1.3.1.2.1. These requirements will change depending on pipe diameter and line section length. - Page 6 Low output setting to maximize the air volume being produced by the Air Compressor(s). 1.3.1.3. ENDURO will recommend the amount of pressure (PSI) required to be placed on the pipeline in relation to the recommended amount of CFM required to propel the DdL™ Caliper Tool. 1.3.1.3.1.
- Page 7 1.3.1.7.1. ENDURO does not provide pressure gauges with the Standard Support Equipment that is sent with the DdL™ Caliper Tool. 1.3.1.7.2. These gauges MUST remain on the pipeline through the duration of the survey. 1.3.1.7.3. The gauges MUST be either: 1.3.1.7.3.1.
-
Page 8: Water
ENDURO recommends that Fresh Water be used when running the DdL™ Caliper Tool in a water environment. 1.3.2.2. ENDURO recommends that the CUSTOMER have a minimum of 25% over the amount of water that is required for line fill to accommodate the possibility of Water bypassing around the DdL™ Caliper Tool during the survey. - Page 9 1.3.2.8.2.1. Pump stopped working 1.3.2.8.2.2. Water ran out 1.3.2.8.3. Contact ENDURO for further information and details regarding this method of propelling the DdL™ Caliper Tool. 1.3.2.9. When running with Water pushing Water, the CUSTOMER will maintain a minimum of 20 psi over what the static pressure is on the pipeline at the receive location before the DdL™...
-
Page 10: Product
Running the Tool with PRODUCT 1.3.3.1. Verify with ENDURO the type of on-stream environment that will be used to propel the DdL™ Caliper Tool. 1.3.3.2. Verify with ENDURO the flow rate that will be available to propel the DdL™ Caliper Tool. -
Page 11: Ddl™ Caliper Tool Pre-Run
This will help the CUSTOMER verify that all equipment to be returned is present and accounted for. 2.2. Laptop Computer 2.2.1. ENDURO provides a Laptop Computer as part of the Standard Support Equipment shipped with the DdL™ Caliper Tool. 2.2.1.1. The Laptop Computer will be inside a protective Pelican Case. 2.2.1.1.1. -
Page 12: Agm2 Box
Premature Failure to the Laptop Computer could occur if left out in the Extreme Heat, Extreme Cold, Rain and/or Snow. 2.2.3. The Laptop Computer will be shipped from ENDURO fully charged, but the battery life will deplete over time. 2.2.3.1. -
Page 13: Powering Up The Ddl™ Caliper Tool
2.4. Powering Up the DdL™ Caliper Tool 2.4.1. Locate the Power Plug at the Rear of the DdL™ Caliper Tool (refer to 2.4.1. Table). 2.4.1. Table 0002-40-38085 Rev 01 © Enduro Pipeline Services, Inc. All Rights Reserved. - Page 14 When the DdL™ Caliper Tool is not in use, keep the tool powered down by verifying that the Male and Female Plugs are disconnected, and the protective covers are installed on both Plugs. 0002-40-38085 Rev 01 © Enduro Pipeline Services, Inc. All Rights Reserved.
-
Page 15: Powering Up The Agm2 Box
2.5.2.1. Press Power Button to turn on AGM2 Box. 2.5.2.2. A light within the Power Button will illuminate, showing that the AGM2 Box has been turned on. 2.5.2. Table 0002-40-38085 Rev 01 © Enduro Pipeline Services, Inc. All Rights Reserved. - Page 16 There will be a series of lights that will begin to blink on the AGM2 Box (refer to 2.5.3.1. Table). 2.5.3.2. GPS SEARCH light will remain ON during the Satellite search. 2.5.3.1. Table 0002-40-38085 Rev 01 © Enduro Pipeline Services, Inc. All Rights Reserved.
- Page 17 2.5.4. Once the AGM2 Box has established a Satellite connection, the following lights will be on solid (refer to 2.5.4. Table): 2.5.4.1. GPS FOUND 2.5.4. Table 0002-40-38085 Rev 01 © Enduro Pipeline Services, Inc. All Rights Reserved.
- Page 18 If the AGM2 Box is unable to establish a Satellite connection, power the box down and proceed back to “Powering Up the AGM2 Box” to begin the process over again. 2.5.6.1.1. If the problem persists, Contact ENDURO Operations for further assistance. 0002-40-38085 Rev 01 © Enduro Pipeline Services, Inc. All Rights Reserved.
-
Page 19: Connecting Laptop Computer To The Ddl™ Caliper Tool
2.6.1.2.1. Password = 4461934 2.6.1.3. Contact ENDURO for any IT issues regarding the Laptop Computer that was provided. 2.6.2. Locate the Communication Cable A and plug the USB TYPE A end into the Laptop Computer USB Port labeled TOOL. (refer to 2.6.2. Table) 2.6.2. - Page 20 2.6.3. Locate the Communication Port at the rear of the DdL™ Caliper Tool. (refer to 2.6.3. Table) 2.6.3. Table 0002-40-38085 Rev 01 © Enduro Pipeline Services, Inc. All Rights Reserved.
- Page 21 DO NOT disconnect any of the other connectors that are located around the Communication Port. 2.6.3.1.1.2. These other connections may become disconnected or even damaged if moved in a manner not intended. 2.6.3.1. Table 0002-40-38085 Rev 01 © Enduro Pipeline Services, Inc. All Rights Reserved.
- Page 22 2.6.3.2. Locate the Communication Cable A and plug the USB MICRO B end into the Communication Port of the DdL™ Caliper Tool. (refer to 2.6.3.2. Table) 2.6.3.2. Table 0002-40-38085 Rev 01 © Enduro Pipeline Services, Inc. All Rights Reserved.
- Page 23 Locate the NewCommTC 64 Icon on the desktop of the Laptop Computer (refer to 2.6.4. Table) 2.6.4.1. Double click this Icon below to open the program. 2.6.4. Table 2.6.5. Communication between the DdL™ Caliper Tool and the Laptop Computer should commence. 0002-40-38085 Rev 01 © Enduro Pipeline Services, Inc. All Rights Reserved.
- Page 24 2.6.6. DdL™ Caliper Tool Icon - Laptop Computer Icon - AGM2 Box Icon - Enduro Logo Icon (refer to 2.6.6. Table) 2.6.6.1. These Icons represent the various points within the data communication chain. 2.6.6. Table DdL™ Caliper Tool Icon Laptop Computer Icon...
- Page 25 After double clicking the NewCommTC 64 Icon on the Desktop, this window below will open (refer to 2.6.7. Table) 2.6.7.1. The “ Job Data Manager ” window will open. 2.6.7. Table 0002-40-38085 Rev 01 © Enduro Pipeline Services, Inc. All Rights Reserved.
- Page 26 Logger ” located at the top left of the screen and this window will open (refer to 2.6.8. Table) 2.6.8.1. Information communicated from the DdL™ Caliper Tool will automatically populate in the various cell boxes within the Configuration tab under “ Logger ”. 2.6.8. Table 0002-40-38085 Rev 01 © Enduro Pipeline Services, Inc. All Rights Reserved.
- Page 27 2.6.9.1. When communication is established, the status will state “Connected.” 2.6.9.1.1. “Connecting…” = In the process / attempting to make connection. 2.6.9.1.2. “Disconnected.” = No Connection established. 2.6.9. Table 0002-40-38085 Rev 01 © Enduro Pipeline Services, Inc. All Rights Reserved.
-
Page 28: Connecting Laptop Computer To The Agm2 Box
Connecting Laptop Computer to the AGM2 Box 2.7.1. Locate the Communication Cable B and plug the USB TYPE A end into the Laptop Computer USB Port labeled AGM2. (refer to 2.7.1. Table) 2.7.1. Table 0002-40-38085 Rev 01 © Enduro Pipeline Services, Inc. All Rights Reserved. - Page 29 2.7.2. Locate the Communication Port on the AGM2 Box. (refer to 2.7.2. Table). 2.7.2. Table 0002-40-38085 Rev 01 © Enduro Pipeline Services, Inc. All Rights Reserved.
- Page 30 2.7.3. Locate the Communication Cable B and plug the USB TYPE B end into the AGM2 Box. (refer to 2.7.3. Table) 2.7.3. Table 0002-40-38085 Rev 01 © Enduro Pipeline Services, Inc. All Rights Reserved.
- Page 31 2.7.4.1. When communication is established, the status will state “Connected.” 2.7.4.1.1. “Connecting…” = In the process / attempting to make connection. 2.7.4.1.2. “Disconnected.” = No Connection established. 2.7.4. Table 0002-40-38085 Rev 01 © Enduro Pipeline Services, Inc. All Rights Reserved.
- Page 32 2.7.5. When communication is established, the “Synchronize with AGM” button will become enabled (refer to 2.7.5. Table). 2.7.5.1. Click the “Synchronize with AGM” button. 2.7.5. Table 0002-40-38085 Rev 01 © Enduro Pipeline Services, Inc. All Rights Reserved.
- Page 33 A pop-up window will open showing that the AGM2 Box is in progress of Synchronizing the AGM with the DdL™ Caliper Tool Logger (refer to 2.7.6. Table). 2.7.6.1. A progress bar will continue to update during this process, increasing the percentage that has been completed. 2.7.6. Table 0002-40-38085 Rev 01 © Enduro Pipeline Services, Inc. All Rights Reserved.
- Page 34 If something other than a Success window pops up, check all communication cable connections, and return to “Powering Up the DdL™ Caliper Tool” to begin the process over again. 2.7.8.1. If the problem persists, contact ENDURO Operations for further assistance. 2.7.9. Proceed to the next steps after all DdL™ Caliper Tool Checks have been completed 0002-40-38085 Rev 01 ©...
-
Page 35: Final Ddl™ Caliper Tool Check
2.8. Final DdL™ Caliper Tool Check 2.8.1. Unplug the Communication Cable A from the DdL™ Caliper Tool and from the Laptop Computer. (refer to 2.8.1. Table) 2.8.1. Table 0002-40-38085 Rev 01 © Enduro Pipeline Services, Inc. All Rights Reserved. - Page 36 DO NOT disconnect any of the other connectors that are located around the Communication Port. 2.8.2.1.2.2. These other connections may become disconnected or even damaged if moved in a manner not intended 2.8.2. Table 0002-40-38085 Rev 01 © Enduro Pipeline Services, Inc. All Rights Reserved.
- Page 37 2.8.3. Unplug the Communication Cable B from the AGM2 Box and from the Laptop Computer. (refer to 2.8.3. Table) 2.8.3. Table 0002-40-38085 Rev 01 © Enduro Pipeline Services, Inc. All Rights Reserved.
- Page 38 Return Laptop Computer, Communication Cables, and all other components to the Pelican Case until required again. 2.8.7. DdL™ Caliper Tool is now ready to be loaded into the pipeline. 0002-40-38085 Rev 01 © Enduro Pipeline Services, Inc. All Rights Reserved.
-
Page 39: Loading Ddl™ Caliper Tool Into Pipeline
Pushing the DdL™ Caliper Tool is the preferred method. 2.9.4.2. Assemble the provided Push Poles that were shipped with the DdL™ Caliper Tool as part of the Support Equipment. (refer to 2.9.3.2. Table) 2.9.3.2. Table 0002-40-38085 Rev 01 © Enduro Pipeline Services, Inc. All Rights Reserved. - Page 40 The DdL™ Caliper Tool will be transported on a utility tray that will assist with loading / unloading of the DdL™ Caliper Tool. (refer to 2.9.3.3. Table) 2.9.4.3.1. Position the DdL™ Caliper Tool at the location that it allows it to be loaded into the pipeline. 2.9.3.3. Table 0002-40-38085 Rev 01 © Enduro Pipeline Services, Inc. All Rights Reserved.
- Page 41 Position and support utility tray in front of the opening of the pipeline in such a way that the tray is going in the same direction as the pipeline. (refer to 2.9.3.4. Table) 2.9.4.4.1. Remove the supplied Support Equipment used to secure the DdL™ Caliper Tool to the utility tray. 2.9.3.4. Table 0002-40-38085 Rev 01 © Enduro Pipeline Services, Inc. All Rights Reserved.
- Page 42 2.9.4.5. Located on the rear of the DdL™ Caliper Tool is a Push Plate. (refer to 2.9.3.5. Table) 2.9.3.5. Table 0002-40-38085 Rev 01 © Enduro Pipeline Services, Inc. All Rights Reserved.
- Page 43 Damage to the DdL™ Caliper Tool may occur if the Push Poles are struck, banged on, or rammed with the equipment used to load the tool into the pipeline. 2.9.3.6.a. Table 0002-40-38085 Rev 01 © Enduro Pipeline Services, Inc. All Rights Reserved.
- Page 44 2.9.3.6.b. Table 0002-40-38085 Rev 01 © Enduro Pipeline Services, Inc. All Rights Reserved.
- Page 45 2.9.3.6.c. Table 0002-40-38085 Rev 01 © Enduro Pipeline Services, Inc. All Rights Reserved.
- Page 46 2.9.4.7. Verify that the DdL™ Caliper Tool’s front urethane cup is properly seated into the same diameter pipe that is being surveyed. (refer to 2.9.3.7. Table) 2.9.3.7. Table 0002-40-38085 Rev 01 © Enduro Pipeline Services, Inc. All Rights Reserved.
- Page 47 NOTICE: Pressure MUST be brought back up slowly so that the DdL™ Caliper Tool does not prematurely move. 2.9.4.11. Once the trap is equalized, continue with procedures to properly launch the DdL™ Caliper Tool. 2.9.4.12. Verify that the DdL™ Caliper Tool has launched. 0002-40-38085 Rev 01 © Enduro Pipeline Services, Inc. All Rights Reserved.
- Page 48 Install the provided cable clamps on both ends of the cable to create an eyelet on each end of the cable. 2.9.5.7.1. Multiple clamps may be used to decrease the possibility of the cable coming undone. 0002-40-38085 Rev 01 © Enduro Pipeline Services, Inc. All Rights Reserved.
- Page 49 Position and support utility tray in front of the opening of the pipeline in such a way that the tray is going in the same direction as the pipeline 2.9.4.8. Table 0002-40-38085 Rev 01 © Enduro Pipeline Services, Inc. All Rights Reserved.
- Page 50 Begin pulling both ends of the cable at the pull port location with evenly distributed force to begin loading the DdL™ Caliper Tool. (refer to 2.9.4.9. Table) 2.9.4.9. Table 0002-40-38085 Rev 01 © Enduro Pipeline Services, Inc. All Rights Reserved.
- Page 51 NOTICE: Pressure MUST be brought back up slowly so that the DdL™ Caliper Tool does not prematurely move. 2.9.5.15. Once the trap is equalized, continue with procedures to properly launch the DdL™ Caliper Tool. 2.9.5.16. Verify DdL™ Caliper Tool launched. 0002-40-38085 Rev 01 © Enduro Pipeline Services, Inc. All Rights Reserved.
-
Page 52: Ddl™ Caliper Tool Post-Run
DdL™ Caliper Tool Post-Run: 3.1. Removing DdL™ Caliper Tool from Pipeline: 3.1.1. Verify DdL™ Caliper Tool was received. (refer to 3.1.1. Table) 3.1.1. Table 0002-40-38085 Rev 01 © Enduro Pipeline Services, Inc. All Rights Reserved. - Page 53 Once the Trap has been opened, locate the DdL™ Caliper Tool within the isolated area of the pipeline. 3.1.4. Assemble the provided Push Poles that were shipped with the DdL™ Caliper Tool as part of the Support Equipment. (refer to 3.1.4. Table) 3.1.4. Table 0002-40-38085 Rev 01 © Enduro Pipeline Services, Inc. All Rights Reserved.
- Page 54 Position and support utility tray in front of the opening of the pipeline in such a way that the tray is going in the same direction away from the pipeline. 3.1.4.1. Table 0002-40-38085 Rev 01 © Enduro Pipeline Services, Inc. All Rights Reserved.
- Page 55 Located on the front of the DdL™ Caliper Tool will be a chain or eyelet to grab the tool to remove it from the line. (refer to 3.1.4.2. Table) 3.1.4.2. Table 0002-40-38085 Rev 01 © Enduro Pipeline Services, Inc. All Rights Reserved.
- Page 56 Attach the Push Poles to the front of the DdL™ Caliper Tool using the hook end that was supplied with the Support Equipment. (refer to 3.1.4.3. Table) 3.1.4.3. Table 0002-40-38085 Rev 01 © Enduro Pipeline Services, Inc. All Rights Reserved.
- Page 57 Damage to the DdL™ Caliper Tool may occur if the Push Poles are struck, banged on, or rammed with the equipment used to remove the tool from the pipeline. 3.1.5. Table 0002-40-38085 Rev 01 © Enduro Pipeline Services, Inc. All Rights Reserved.
- Page 58 Once the DdL™ Caliper Tool is on the utility tray, unhook the Push Poles from the DdL™ Caliper Tool. (refer to 3.1.5.1. Table) 3.1.5.3. Secure the DdL™ Caliper Tool to the utility tray using the supplied Support Equipment. 3.1.5.1. Table 0002-40-38085 Rev 01 © Enduro Pipeline Services, Inc. All Rights Reserved.
- Page 59 3.1.9. CUSTOMER must visually inspect the DdL™ Caliper Tool for any apparent damage sustained during the survey. 3.1.9.1. The CUSTOMER should contact ENDURO for any questionable areas that the CUSTOMER may be unsure of regarding the tool condition. 3.1.9.2. ENDURO may request pictures of any areas of concern.
-
Page 60: Connecting Laptop Computer To The Ddl™ Caliper Tool
3.2.1.2.1. Password = 4461934 3.2.1.3. Contact ENDURO for any IT issues regarding the Laptop Computer that was provided. 3.2.2. Locate the Communication Cable A and plug the USB TYPE A end into the Laptop Computer USB Port labeled TOOL. (refer to 3.2.2. Table) 3.2.2. - Page 61 3.2.3. Locate the Communication Port at the rear of the DdL™ Caliper Tool. (refer to 3.2.3. Table) 3.2.3. Table 0002-40-38085 Rev 01 © Enduro Pipeline Services, Inc. All Rights Reserved.
- Page 62 DO NOT disconnect any of the other connectors that are located around the Communication Port. 3.2.3.1.1.2. These other connections may become disconnected or even damaged if moved in a manner not intended. 3.2.3.1. Table 0002-40-38085 Rev 01 © Enduro Pipeline Services, Inc. All Rights Reserved.
- Page 63 3.2.3.2. Locate the Communication Cable A and plug the USB MICRO B end into the Communication Port of the DdL™ Caliper Tool. (refer to 3.2.3.2. Table) 3.2.3.2. Table 0002-40-38085 Rev 01 © Enduro Pipeline Services, Inc. All Rights Reserved.
- Page 64 3.2.4. Locate the External Hard Drive and plug the USB TYPE A end into the Laptop Computer USB Port labeled “E.H.D.”. (refer to 3.2.5. Table) 3.2.5. Table 0002-40-38085 Rev 01 © Enduro Pipeline Services, Inc. All Rights Reserved.
- Page 65 Locate the NewCommTC 64 Icon on the desktop (refer to 3.2.5. Table) 3.2.5.1. Double click this Icon below to open the program. 3.2.5. Table 3.2.6. Communication between the DdL™ Caliper Tool and the Laptop Computer should commence. 0002-40-38085 Rev 01 © Enduro Pipeline Services, Inc. All Rights Reserved.
-
Page 66: Download Dialog Window
Locate and click the “Download Run Data from Pig” button to start the download process. (refer to 4.1.1. Table). 4.1.1. Table 4.1.2. ENDURO will assign a specific set of numbers and letters for each DdL™ Caliper Tool survey performed. 4.1.2.1. The ENDURO Job Number is assigned when the project is quoted to the CUSTOMER. - Page 67 4.1.3. A Download Dialog window will open (refer to 4.1.3. Table). 4.1.3. Table 0002-40-38085 Rev 01 © Enduro Pipeline Services, Inc. All Rights Reserved.
- Page 68 Dynamic guidance, or hints, for entering a correctly formed Job Number and Description (Line ID) are provided immediately below the Text Field. 4.1.4.2.1. The background of the Text Field is RED when the entered text does NOT match ENDURO’s Job Number and Description scheme. 4.1.4.a. Table 0002-40-38085 Rev 01 ©...
- Page 69 4.1.4.2.2. The background of the Text Field is GREEN when the entered text does match ENDURO’s Job Number scheme. 4.1.4.2.2.1. CUSTOMER can insert their Line ID within this Text field for Description. 4.1.4.2.2.2. The Description Text field MUST contain a minimum of 8 characters.
- Page 70 Click the Start button. (refer to 4.1.5. Table). 4.1.5.1. The Download process and subsequent checks can take anywhere from several minutes to approximately an hour, depending on the file size / line lengths. 4.1.5. Table 0002-40-38085 Rev 01 © Enduro Pipeline Services, Inc. All Rights Reserved.
- Page 71 This will give the user feedback regarding the download progress from the DdL™ Caliper Tool to the Laptop Computer / External Hard Drive and how much remains. 4.1.6.1.1. 100% = Download Complete 4.1.6. Table 0002-40-38085 Rev 01 © Enduro Pipeline Services, Inc. All Rights Reserved.
- Page 72 Re-Download the DdL™ Caliper Tool if there are either incomplete or failed Download messages. 4.1.7.1.1.1. Contact ENDURO Operations for further assistance. 4.1.7.1.2. If a successful download has been obtained, click “Close” to close window. 4.1.7. Table 0002-40-38085 Rev 01 © Enduro Pipeline Services, Inc. All Rights Reserved.
-
Page 73: Powering Down The Ddl™ Caliper Tool
4.2. Powering Down the DdL™ Caliper Tool 4.2.1. Unplug the Communication Cable A from the DdL™ Caliper Tool and from the Laptop Computer. (refer to 4.2.1. Table) 4.2.1. Table 0002-40-38085 Rev 01 © Enduro Pipeline Services, Inc. All Rights Reserved. - Page 74 DO NOT disconnect any of the other connectors that are located around the Communication Port. 4.2.2.1.2.2. These other connections may become disconnected or even damaged if moved in a manner not intended. 4.2.2. Table 0002-40-38085 Rev 01 © Enduro Pipeline Services, Inc. All Rights Reserved.
- Page 75 4.2.3. Locate the Power Plug at the rear of the DdL™ Caliper Tool (refer to 4.2.3. Table). 4.2.3. Table 0002-40-38085 Rev 01 © Enduro Pipeline Services, Inc. All Rights Reserved.
- Page 76 When the DdL™ Caliper Tool is not in use, keep the tool powered down by verifying that the Male and Female Plugs are disconnected, and the protective covers are installed on both Plugs 0002-40-38085 Rev 01 © Enduro Pipeline Services, Inc. All Rights Reserved.
-
Page 77: Upload Dialog Window
5.1. Uploading the Data to ENDURO Headquarters will be required: 5.1.1. CUSTOMER will need to upload the data to ENDURO Headquarters at their earliest convenience, preferably by the end of the day for any run. 5.1.2. CUSTOMER must connect the Laptop Computer to the internet, either by Wi-Fi or Ethernet Cable. - Page 78 5.1.5. Left click on row to select the Downloaded Job to be sent to ENDURO Headquarters for further inspection (refer to 5.1.5. Table). 5.1.5.1. If multiple jobs have been downloaded, multiple selections can be made for the Upload process. 5.1.5. Table 0002-40-38085 Rev 01 ©...
- Page 79 5.1.6. Locate and click the “Upload Job Data to Enduro” button to start the upload process. (refer to 5.1.6 Table). 5.1.6. Table 0002-40-38085 Rev 01 © Enduro Pipeline Services, Inc. All Rights Reserved.
- Page 80 5.1.7. An Upload Dialog window will open (refer to 5.1.7. Table). 5.1.7. Table 0002-40-38085 Rev 01 © Enduro Pipeline Services, Inc. All Rights Reserved.
- Page 81 5.1.8. Upload Progress Bar (refer to 5.1.8. Table). 5.1.8.1. This will give the user feedback regarding the upload progress from the Laptop Computer to ENDURO Headquarters and how much progress remains. 5.1.8. Table 0002-40-38085 Rev 01 © Enduro Pipeline Services, Inc. All Rights Reserved.
- Page 82 5.1.9. Jobs Upload Complete (refer to 5.1.9. Table). 5.1.9.1. Once the upload to ENDURO Headquarters has successfully completed, the Progress Bar will show “100.0% complete” and the upload status will change to “COMPLETE”. 5.1.9.1.1. 100% Upload Complete 5.1.9. Table 0002-40-38085 Rev 01...
- Page 83 Power down the Laptop Computer to conserve the battery life. 5.1.11.3. Unplug the External Hard Drive from the Laptop Computer. 5.1.11.4. Return Laptop Computer and all its components to the Pelican Case until required again. 0002-40-38085 Rev 01 © Enduro Pipeline Services, Inc. All Rights Reserved.
-
Page 84: Erasing Data From Ddl™ Caliper Tool
Erase Data from DdL™ Caliper Tool: 6.1. Erase Challenge Dialog 6.1.1. WARNING: DO NOT perform this task unless instructed by ENDURO directly. 6.1.2. Click the “Erase Job Data from Pig” button. (refer to 6.1.2. Table). 6.1.2. Table 0002-40-38085 Rev 01... - Page 85 This will require the user to manually type the word “erase” before the NewCommTC 64 program will proceed. 6.1.3.1.1. The “erase” button will only be enabled when the correct word has been typed into the dialog window. 6.1.3. Table 0002-40-38085 Rev 01 © Enduro Pipeline Services, Inc. All Rights Reserved.
- Page 86 An Erasing Pig window will open. (refer to 6.1.4. Table). 6.1.4.1. The window indicates progress during the erase process. 6.1.4.1.1. This screen will give feedback to the user during and after the erase process. 6.1.4. Table 0002-40-38085 Rev 01 © Enduro Pipeline Services, Inc. All Rights Reserved.
- Page 87 A hard reboot may be required of the DdL™ Caliper Tool once the Erase process has completed. 6.1.5.3.1. Powering the DdL™ Caliper Tool down and back up will accomplish the hard reboot. 6.1.5. Table 0002-40-38085 Rev 01 © Enduro Pipeline Services, Inc. All Rights Reserved.
-
Page 88: Shipping Ddl™ Caliper Tool Back To Enduro
7.1.5. Once equipment has been returned, ENDURO will inspect and inventory all equipment. 7.1.5.1. ENDURO may charge / bill the CUSTOMER for any missing and / or damaged equipment after completing the inspection and inventory. 0002-40-38085 Rev 01 © Enduro Pipeline Services, Inc. All Rights Reserved. -
Page 89: Newcommtc 64 Dialog User Interface Reference
NewCommTC 64 Dialog User Interface Reference: 8.1. Communication Dialog Windows 8.1.1. DdL™ Caliper Tool Icon - Laptop Computer Icon - AGM2 Box Icon - Enduro Logo Icon (refer to 8.1.1. Table) 8.1.1.1. These Icons represent the various points within the data communication chain. 8.1.1. Table DdL™... - Page 90 After double clicking the NewCommTC 64 Icon on the Desktop, the window below will open (refer to 8.1.2. Table) 8.1.2.1. The “ Job Data Manager ” window will open. 8.1.2. Table 0002-40-38085 Rev 01 © Enduro Pipeline Services, Inc. All Rights Reserved.
- Page 91 If everything is working and communicating properly, the status will state “Connected.” 8.1.3.1.1. “Connecting…” = In the process / attempting to make connection. 8.1.3.1.2. “Disconnected.” = No Connection established 8.1.3. Table 0002-40-38085 Rev 01 © Enduro Pipeline Services, Inc. All Rights Reserved.
- Page 92 Laptop Computer. 8.1.4.1.1.2. GREEN = Connection between DdL™ Caliper Tool and Laptop Computer is successful. 8.1.4.1.1.3. = Connection between DdL™ Caliper Tool and Laptop Computer is unsuccessful. 8.1.4. Table 0002-40-38085 Rev 01 © Enduro Pipeline Services, Inc. All Rights Reserved.
- Page 93 8.1.5. Laptop Computer - to - Enduro Logo Indicator (refer to 8.1.5. Table). 8.1.5.1. The Indicator has two presentation states and will have corresponding appearances as shown below. 8.1.5.1.1. The connection status is actively monitored and will dynamically respond to changes to Internet Connection.
- Page 94 8.1.6. A small, DdL™ Caliper Tool related text field will populate. (refer to 8.1.6. Table). 8.1.6.1. This field will display notes or tips to the user. 8.1.6. Table 0002-40-38085 Rev 01 © Enduro Pipeline Services, Inc. All Rights Reserved.
- Page 95 Download Job Data from Pig button (refer to 8.1.7. Table). 8.1.7.1. This will open the Download Dialog. 8.1.7.2. This button is only active if a DdL™ Caliper Tool is connected. 8.1.7. Table 0002-40-38085 Rev 01 © Enduro Pipeline Services, Inc. All Rights Reserved.
- Page 96 This will open the Erase Challenge Dialog. 8.1.8.2. This button is only active if a DdL™ Caliper Tool is connected. 8.1.8.3. WARNING: DO NOT perform this task unless instructed by ENDURO directly. 8.1.8. Table 0002-40-38085 Rev 01 © Enduro Pipeline Services, Inc. All Rights Reserved.
- Page 97 Upload Job Data to Enduro button (refer to 8.1.9. Table). 8.1.9.1. This will open the Upload Dialog. 8.1.9.2. This button is only active if an Internet connection to ENDURO Headquarters has been established. 8.1.9. Table 0002-40-38085 Rev 01 © Enduro Pipeline Services, Inc. All Rights Reserved.
- Page 98 The table will scroll vertically to handle more than one screen’s worth of jobs 8.1.10.2. Jobs will be added to this table as they have been downloaded from the DdL™ Caliper Tool to the Laptop Computer. 8.1.10. Table 0002-40-38085 Rev 01 © Enduro Pipeline Services, Inc. All Rights Reserved.
- Page 99 There will be three types of communication verbiage 8.1.11.2.1. “Connected.” Connection established. 8.1.11.2.2. “Connecting…” = In the process / attempting to make connection. 8.1.11.2.3. “Disconnected.” = No Connection established 8.1.11. Table 0002-40-38085 Rev 01 © Enduro Pipeline Services, Inc. All Rights Reserved.
-
Page 100: Download Dialog Windows 99-114
8.2. Download Dialog Windows 8.2.1. Click the “Download Job Data from Pig” button (refer to 8.2.1. Table). 8.2.1. Table 0002-40-38085 Rev 01 © Enduro Pipeline Services, Inc. All Rights Reserved. - Page 101 8.2.2. A Download Dialog window will open (refer to 8.2.2. Table). 8.2.2. Table 0002-40-38085 Rev 01 © Enduro Pipeline Services, Inc. All Rights Reserved.
- Page 102 Dynamic guidance, or hints, for entering a correctly formed Job Number and Description are provided immediately below the Text Field. 8.2.3.2.1. The background of the Text Field is RED when the entered text does NOT match ENDURO’s Job Number and Description scheme. 8.2.3.a. Table 0002-40-38085 Rev 01 ©...
- Page 103 8.2.3.2.2. The background of the Text Field is GREEN when the entered text does match ENDURO’s Job Number scheme. 8.2.3.2.2.1. CUSTOMER can insert their Line ID within this Text Field for Description. 8.2.3.2.2.2. The Description Text field MUST contain a minimum of 8 characters.
- Page 104 This field informs the user as to where their Job Data will be stored. 8.2.4.1.1. The Job Data will be stored in two locations. 8.2.4.1.1.1. Laptop Computer (Primary Location) 8.2.4.1.1.2. External Hard Drive (Backup Location) 8.2.4. Table 0002-40-38085 Rev 01 © Enduro Pipeline Services, Inc. All Rights Reserved.
- Page 105 8.2.5.2. If the External Hard Drive is not plugged into the Laptop Computer, the program is defaulted to not allow the data to be downloaded. 8.2.5. Table 0002-40-38085 Rev 01 © Enduro Pipeline Services, Inc. All Rights Reserved.
- Page 106 This will give the user feedback regarding the download progress from the DdL™ Caliper Tool to the Laptop Computer / External Hard Drive and how much progress remains. 8.2.6.1.1. 100% = Download Complete 8.2.6. Table 0002-40-38085 Rev 01 © Enduro Pipeline Services, Inc. All Rights Reserved.
- Page 107 Only enabled when a download is in progress. 8.2.7.3. Close Button 8.2.7.3.1. This will close the download dialog window 8.2.7.3.1.1. Only enabled when a download has completed successfully. 8.2.7. Table 0002-40-38085 Rev 01 © Enduro Pipeline Services, Inc. All Rights Reserved.
- Page 108 8.2.8. When the progress of the download reaches completion, the Progress bar will show “100.0% complete”. (refer to 8.2.8. Table) 8.2.8. Table 0002-40-38085 Rev 01 © Enduro Pipeline Services, Inc. All Rights Reserved.
- Page 109 8.2.9. Once the Download process has completed, a “Checking Primary & Backup Downloads” window will pop up (refer to 8.2.9. Table). 8.2.9.1. Click “Close” to close window. 8.2.9. Table 0002-40-38085 Rev 01 © Enduro Pipeline Services, Inc. All Rights Reserved.
- Page 110 8.2.10. IF a calibration file is missing from the Laptop Computer, a “Select an Option” window will open. (refer to 8.2.10. Table) 8.2.10.1. Click “OK” to proceed. 8.2.10. Table 0002-40-38085 Rev 01 © Enduro Pipeline Services, Inc. All Rights Reserved.
- Page 111 8.2.11. Click “Close” to get back to the main window (refer to 8.2.11. Table) 8.2.11. Table 0002-40-38085 Rev 01 © Enduro Pipeline Services, Inc. All Rights Reserved.
- Page 112 Left click on the row to select the Downloaded Job. (refer to 8.2.12. Table) 8.2.12.1. This will highlight the entire row of the Downloaded Job. 8.2.12.2. Right Click highlighted row to get the “Select Calibration File” window to open. 8.2.12. Table 0002-40-38085 Rev 01 © Enduro Pipeline Services, Inc. All Rights Reserved.
- Page 113 Navigate through the correct pathway to locate the appropriate calibration file. 8.2.13.1.1. Once the calibration file has been located, click on it to highlight it, and click “Open” 8.2.13. Table 0002-40-38085 Rev 01 © Enduro Pipeline Services, Inc. All Rights Reserved.
- Page 114 8.2.14. Once a Calibration file has been selected, a “Success” window will open (refer to 8.2.14. Table) 8.2.14.1. Click “OK” to complete the process. 8.2.14. Table 0002-40-38085 Rev 01 © Enduro Pipeline Services, Inc. All Rights Reserved.
- Page 115 8.2.15. If the Job Number entered already exists at ENDURO Headquarters, the Warning window below will pop up. (refer to 8.2.15. Table) 8.2.15.1. WARNING: DO NOT perform this task unless instructed by ENDURO directly. 8.2.15.2. Contact ENDURO Operations for further assistance.
-
Page 116: Upload Dialog Windows 115-123
8.3. Upload Dialog Windows 8.3.1. Laptop Computer - to - Enduro Logo Indicator (refer to 8.3.1. Table). 8.3.1.1. The Indicator has two presentation states and will have corresponding appearances as shown below. 8.3.1.1.1. The connection status is actively monitored and will dynamically respond to changes to Internet Connection. - Page 117 Left click on row to select the Downloaded Job (refer to 8.3.2. Table). 8.3.2.1. If multiple jobs have been downloaded, multiple selections can be made for the Upload process. 8.3.2. Table 0002-40-38085 Rev 01 © Enduro Pipeline Services, Inc. All Rights Reserved.
- Page 118 8.3.3. Locate and click the “Upload Job Data to Enduro” button to start the upload process. (refer to 8.3.3 Table). 8.3.3. Table 0002-40-38085 Rev 01 © Enduro Pipeline Services, Inc. All Rights Reserved.
- Page 119 8.3.4. An Upload Dialog window will open (refer to 8.3.4. Table). 8.3.4. Table 0002-40-38085 Rev 01 © Enduro Pipeline Services, Inc. All Rights Reserved.
- Page 120 8.3.5. Upload Progress Bar (refer to 8.3.5. Table). 8.3.5.1. This will give the user feedback regarding the upload progress from the Laptop Computer to ENDURO Headquarters and how much progress remains. 8.3.5.1.1. 100% Upload Complete 8.3.5. Table 0002-40-38085 Rev 01...
- Page 121 8.3.6. Jobs to Upload (refer to 8.3.6. Table). 8.3.6.1. This will list the Jobs to upload and their respective upload status. 8.3.6. Table 0002-40-38085 Rev 01 © Enduro Pipeline Services, Inc. All Rights Reserved.
- Page 122 8.3.7. Stop Upload button (refer to 8.3.7. Table). 8.3.7.1. This will stop the upload process if necessary. 8.3.7. Table 0002-40-38085 Rev 01 © Enduro Pipeline Services, Inc. All Rights Reserved.
- Page 123 8.3.8. Jobs Upload Complete (refer to 8.3.8. Table). 8.3.8.1. Once the Upload to ENDURO Headquarters process has successfully completed, the Progress Bar will show “100.0% complete” and the upload status will change to “COMPLETE”. 8.3.8. Table 0002-40-38085 Rev 01 © Enduro Pipeline Services, Inc. All Rights Reserved.
- Page 124 8.3.9. Once a successful upload has been completed, click the Close button on the Upload Dialog window (refer to 8.3.9. Table). 8.3.9. Table 0002-40-38085 Rev 01 © Enduro Pipeline Services, Inc. All Rights Reserved.
-
Page 125: Troubleshooting Laptop Computer
If an issue develops with the Laptop Computer, contact ENDURO IT Department for further assistance. 9.2. DdL™ Caliper Tool: 9.2.1. If an issue develops with the DdL™ Caliper Tool, contact ENDURO Operations Department for further assistance. 0002-40-38085 Rev 01 © Enduro Pipeline Services, Inc. All Rights Reserved.
Need help?
Do you have a question about the Ddl Caliper Tool and is the answer not in the manual?
Questions and answers