Advertisement
Quick Links
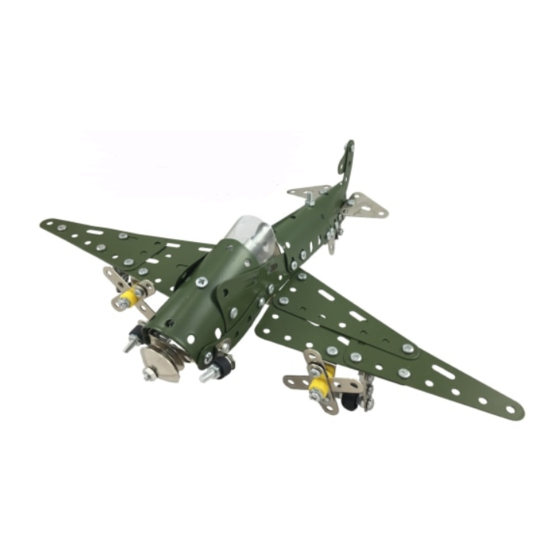
Fighter Plane Construction Kit
Follow these step by step
instructions to build a
fighter plane model. Work
on a flat surface and lay
the parts as shown here.
R
BOLT SIZE GUIDE
x3
USE 6mm NUTS FOR
ALL JOINTS UNLESS
DIRECTED OTHERWISE
Q
x1
6mm
(x43)
P
x1
12mm
(x6)
O
x1
20mm
(x10)
1
J
G
N
First gather these
parts along with one
20mm bolt and one
small 6mm bolt.
6
Bend these flaps
inwards so they
curve around the
engine.
11
12
C
Now to make the
wings! You need six
parts C.
16
17
H
E
D
Time to make the
seat, use these three
parts.
A
B
x2
x1
N
M
L
x5
x4
x5
2
Assemble them like
this to form the
control stick
assembly.
7
A
Now you need
another part A.
13
Bolt 2nd & 5th holes
3rd bolt here
MIDDLE
ON TOP
L
AT BACK
Use three 6mm bolts
Now make the left wing.
to make the right
To join the wings you
wing so it is 11 holes
will need two parts L.
long.
18
D
H
Bolt parts D and H
Then bolt down inside
together with a 6mm
bolt then add part E.
middle hole of part L.
C
D
E
F
x8
x3
x3
x4
K
J
Nuts & bolts
x3
x7
4
3
A
G
L
C
Now gather these
Assemble them to the
parts to make the
control stick like this.
cockpit. Use four
12mm bolts.
9
8
Join it over the back
Note that the bolts go
of the cockpit with
four 6mm bolts.
14
19
6mm bolt
the cockpit (in the
G
x2
TO SEE DETAIL REFER TO
THE LARGE PICTURE ON
SEPARATE A5 SHEET.
H
I
x3
x8
5
Bolt
Bolt
Bolt
G
L & A
L & C
C & A
Here is the view from
Use 12mm bolts
where shown.
10
Bolt on part I on each
through the end two
using two 6mm bolts.
holes of the cockpit.
15
... using the curved
Bolt each wing onto
the brackets on the
fuselage using a
6mm bolt...
20
Q
E
J
Here are the next
parts you will need.
Control stick
assembly
underneath.
I
side of the cockpit
parts L on the
underside of the
plane.
Bolt them together
like this using six
6mm bolts.
Advertisement

Related Manuals for Apples to Pears Fighter Plane Construction Kit


Summary of Contents for Apples to Pears Fighter Plane Construction Kit
- Page 1 Fighter Plane Construction Kit Follow these step by step TO SEE DETAIL REFER TO instructions to build a THE LARGE PICTURE ON fighter plane model. Work SEPARATE A5 SHEET. on a flat surface and lay the parts as shown here.
- Page 2 CONGRATULATIONS, YOU ARE FINISHED! Produced by Apples to Pears Ltd., Stroud, U.K. www.applestopears.com PLEASE KEEP THESE INSTRUCTIONS FOR FUTURE REFERENCE Copyright © Apples to Pears Ltd 2019. RECOMMENDED AGE 8+ WARNING CHOKING HAZARD Small parts, not suitable for children under 3 years.
- Page 3 Fighter Plane Top View Fighter Plane Base View...
Need help?
Do you have a question about the Fighter Plane Construction Kit and is the answer not in the manual?
Questions and answers