
Subscribe to Our Youtube Channel
Related Manuals for Stid L51


Summary of Contents for Stid L51
- Page 1 Installation procedure Hands free reader: L51 - R1x Variant © STId 2010 – NI1023A04 06/07/2010 P. 1 / 13...
-
Page 2: Table Of Contents
Installation procedure Hands free reader: L51 - R1x Variant Characteristics ............................3 Wiring ................................ 4 1. R11 TTL Variant:............................4 2. R12 RS232 Variant Protocol 5C: ....................... 5 3. R13 RS485 Variant Protocol 7S: ....................... 6 III. Calibration ..............................7 Mechanic............................... -
Page 3: Characteristics
Installation procedure Hands free reader: L51 - R1x Variant I. Characteristics Power supply: ....12 VDC Min Consumption: ....0, 3 to 1.1A depending on calibration Communication: ..... ISO2 or Wiegand, Open collector TTL lines ....RS232 Protocol 5C (RS232) .... -
Page 4: Wiring
Installation procedure Hands free reader: L51 - R1x Variant II. Wiring 1. R11 TTL Variant: Connect the power supply (0V, +12V) and the data lines to the host. The maximum distance between the host and the reader is 100m. Recommended cables: Multi-pair shielded cable (diameter min 5mm, max 8mm to ensure water resistance). -
Page 5: R12 Rs232 Variant Protocol 5C
Installation procedure Hands free reader: L51 - R1x Variant 2. R12 RS232 Variant Protocol 5C: +12V Setup Connect the power supply (0V, +12V) and the data lines to the host. The maximum distance between the host and the reader is 15m. -
Page 6: R13 Rs485 Variant Protocol 7S
Installation procedure Hands free reader: L51 - R1x Variant 3. R13 RS485 Variant Protocol 7S: +12V Setup Connect the power supply (0V, +12V) and the data lines to the host. The maximum distance between the host and the reader is 1000m. -
Page 7: Calibration
Installation procedure Hands free reader: L51 - R1x Variant III. Calibration First use • Fit the reader at the desired place • First connect the power supply – wait until the orange led has finished blinking (auto tuning sequence) – leave no tag in the reader field •... - Page 8 Installation procedure Hands free reader: L51 - R1x Variant Tag using Present the tag in front of the reader, perpendicularly, and approach it slowly until the tag is detected. It is not necessary to agitate the tag. Antenne lecteur Antenne lecteur...
- Page 9 Installation procedure Hands free reader: L51 - R1x Variant • Disconnect "Setup" and 0V Power on the reader again: the new configuration is now active © STId 2010 – NI1023A04 06/07/2010 P. 9 / 13...
- Page 10 Installation procedure Hands free reader: L51 - R1x Variant R13 RS485 Variant 7S Protocol Configuration mode Warning: in this mode, the reader automatically changes its address to « FE ». Switching to configuration mode: • Power off the reader, • Connect the configuration pin ("Setup") to the 0V pin. ("Ground").
-
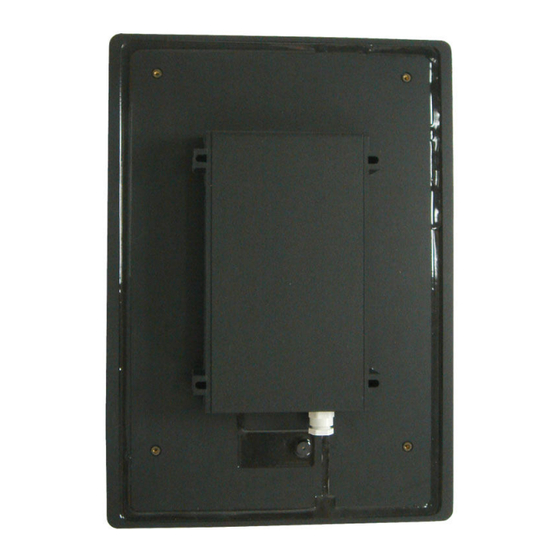
Page 11: Mechanic
Installation procedure Hands free reader: L51 - R1x Variant IV. Mechanic 1. Antenna overview: Assembling: 4 points of fixing, around the electronic case, diam 6 mm pour screw TF (not provided). © STId 2010 – NI1023A04 06/07/2010 P. 11 / 13... -
Page 12: Reader Overview
Installation procedure Hands free reader: L51 - R1x Variant 2. Reader overview Antenne Antenna Fixation de la plaque avant avec cache vis Protection plate fixation Wall fixation Wall fiwation Fixation murale - 3 points 288.00 288.00 40.00 40.00 144.00 144.00 Plaque avant de propreté... -
Page 13: Reader Installation Examples
Installation procedure Hands free reader: L51 - R1x Variant V. Reader installation examples Ground loop Ground loop © STId 2010 – NI1023A04 06/07/2010 P. 13 / 13...
Need help?
Do you have a question about the L51 and is the answer not in the manual?
Questions and answers