Table of Contents
Advertisement
Quick Links
Advertisement
Table of Contents

Summary of Contents for Advatek Lights PIXLITE 4
- Page 1 ARDWARE ANUAL V1.3...
-
Page 2: Table Of Contents
6.4 - Performing a “Forced Boot” Update..................12 7 – Specifications ..........................14 7.1 - Operating Specifications ......................14 7.2 - Mechanical Specifications ......................15 8 – Troubleshooting ..........................16 PixLite 4 V1.1 User Manual V1.3 © 2015 Advatek Lighting Pty Ltd... - Page 3 8.2 - No Status/Power LEDs On ......................16 8.3 - Other Issues ..........................16 8.4 – Reset To Factory Defaults ......................17 9 - Warranty and Service........................18 PixLite 4 V1.1 User Manual V1.3 © 2015 Advatek Lighting Pty Ltd...
-
Page 4: Introduction
PixLite 4 features an output capacity of up to 16 universes of either multicast/unicast E1.31 or Art- net data, in addition to a single DMX512 universe output (17 universes of data total.) This combined with an advanced feature set and easy-to-use configuration utility makes PixLite 4 an excellent choice for your pixel lighting application. -
Page 5: Safety Notes
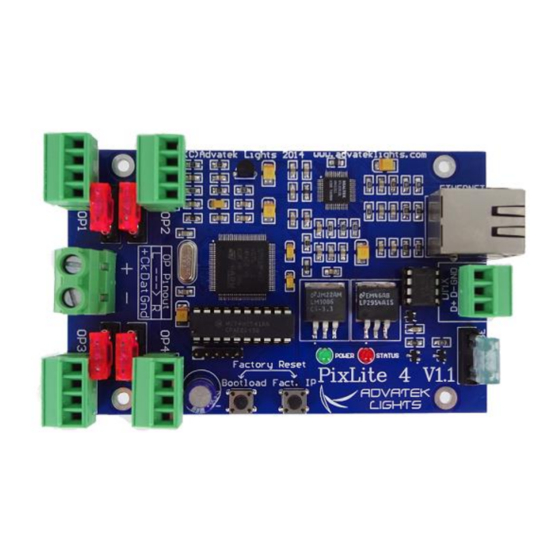
The total maximum allowable current through the board is 30 Amps. 4x Pixel Outputs Ethernet Jack Power Input DMX512 Output Logic Fuse Figure 1 PixLite 4 V1.1 User Manual V1.3 © 2015 Advatek Lighting Pty Ltd... -
Page 6: Output Fuses
The logic circuitry is protected by a 1A mini blade fuse. This is located on the lower right-hand edge of the board. 3.3 - Control Data Control data to the PixLite 4 is achieved via the via the single horizontal Ethernet jack. The controller supports Streaming ACN (sACN / E1.31) or Art-Net data. 3.4 – Installing Lights The lights can be screwed into the 4 way pluggable screw terminal connectors on each of the four outputs. - Page 7 Note that this can also happen from poor waterproofing when rain shorts the higher voltage onto either of those wires in your pixels/wiring. PixLite 4 V1.1 User Manual V1.3 © 2015 Advatek Lighting Pty Ltd...
-
Page 8: Network Configuration
Figure 3 shows a typical network topology for the PixLite 4 controller(s) LAN. The host machine connects to a router and then to the PixLite 4 controller(s). If you are only using a few controllers, they can be connected straight to the router. Larger installations will benefit from using a network switch between the router and controllers. -
Page 9: Ip Addressing
Once you can successfully discover the controller in the Assistant, we recommended setting the controller to a static IP address other than the default. Figure 4 shows a screenshot of typical computer network settings to communicate with a PixLite 4 for the first time without a router. -
Page 10: Forcing The Default Ip Address
IP settings to what you prefer. After changing the settings or if you power the controller off and on again, the controller will revert to using the saved settings. PixLite 4 V1.1 User Manual V1.3 © 2015 Advatek Lighting Pty Ltd... -
Page 11: Operation
20 fps at the low end and up to 100 fps at the higher end. 5.3.2 – DMX512 Output The PixLite 4 provides a DMX512 output which can be accessed by a pluggable screw terminal connector. The hardware layer on which the DMX 512 protocol operates is the RS485 electrical communications standard. -
Page 12: Hardware Test Pattern
6.1 - Physical Setup To perform a firmware upgrade, ensure that you have your PixLite 4 controller connected to the LAN network as per section 3.1.1. 6.2 - Obtaining New Firmware The latest firmware is available from the Advatek Lights website at the following link: http://www.advateklights.com/resources... -
Page 13: Performing A "Forced Boot" Update
“bootloader” in the firmware column. Double clicking on it will bring up the file browse window (as shown in Figure 5). 4. Click browse to locate the firmware file. PixLite 4 V1.1 User Manual V1.3 © 2015 Advatek Lighting Pty Ltd... - Page 14 6. Power the board down again 7. Apply power again and the board should now be operating with the new firmware. PixLite 4 V1.1 User Manual V1.3 © 2015 Advatek Lighting Pty Ltd...
-
Page 15: Specifications
7 – Specifications 7.1 - Operating Specifications The table below specifies the recommended operating conditions for a PixLite 4 controller. PARAMETER VALUE/RANGE UNITS Absolute Max Voltage V DC Recommended Voltage 5-12 V DC Max Capacity Logic Current Consumption (@ 5V) -
Page 16: Mechanical Specifications
7.2 - Mechanical Specifications The controller’s dimensions are shown in Figure 6 below. Figure 6 PixLite 4 V1.1 User Manual V1.3 © 2015 Advatek Lighting Pty Ltd... -
Page 17: Troubleshooting
If you can’t resolve your problem with the help of our knowledgebase, you can open a support ticket here for assistance: http://www.advateklights.com/support PixLite 4 V1.1 User Manual V1.3 © 2015 Advatek Lighting Pty Ltd... -
Page 18: Reset To Factory Defaults
2. Power up the board. 3. Wait for both LEDs to flash together. 4. Release both buttons. 5. Power cycle (turn power off, wait 5 seconds then turn it on again). PixLite 4 V1.1 User Manual V1.3 © 2015 Advatek Lighting Pty Ltd... -
Page 19: Warranty And Service
You may then either return the device to a local distributor or return it to us directly for warranty services. The PixLite 4 control board is supplied with a full 3 year factory warranty. PixLite 4 V1.1 User Manual V1.3...
Need help?
Do you have a question about the PIXLITE 4 and is the answer not in the manual?
Questions and answers