Advertisement
Available languages
Available languages
Quick Links
Flowhood 5
Scott Health & Safety Oy
P.O.BOX 501
FI-65101 Vaasa, Finland
TECHNICAL SUPPORT & SALES
Tel. +358 (0)6 3244 543 or 544 or 535
TEKNINEN TUKI JA MYYNTI
Puh. (06) 3244 536 tai 537
Fax +358 (0)6 3244 591
fin-sales@tycoint.com
www.scottsafety.com
Ref. No. 009919
Edition A 05/2004
Instructions for Use
ENGLISH
Gebrauchsanleitung
DEUTSCH
Instructions d'utilisation
FRANÇAIS
1
6
11
Advertisement

Summary of Contents for Tyco SCOTT Flowhood 5
- Page 1 Instructions for Use ENGLISH Gebrauchsanleitung DEUTSCH Instructions d’utilisation FRANÇAIS Flowhood 5 Scott Health & Safety Oy P.O.BOX 501 FI-65101 Vaasa, Finland TECHNICAL SUPPORT & SALES Tel. +358 (0)6 3244 543 or 544 or 535 TEKNINEN TUKI JA MYYNTI Puh. (06) 3244 536 tai 537 Fax +358 (0)6 3244 591 fin-sales@tycoint.com www.scottsafety.com...
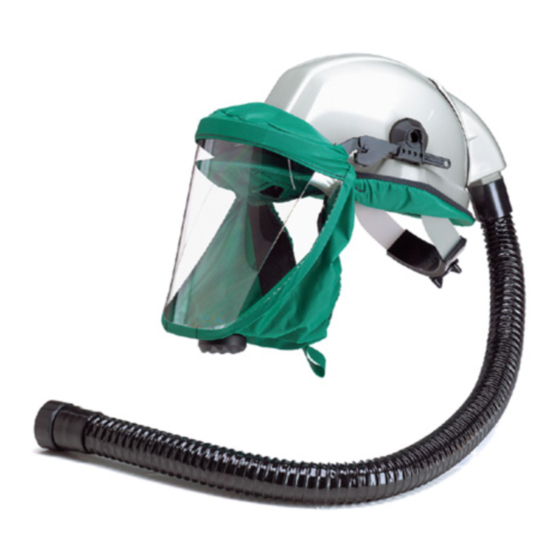
- Page 2 ENGLISH Pivot arm Face seal Visor (polycarbonate) Exhalation valve disc + seat Helmet shell Brim trim Hose Head harness a) Headband b) Crown strap Sweatband Spare parts Accessories 064297 Hose PU FL3/5/25 (3 pcs) 063780 Blower device Proflow2, complete 064513 Visor PC FL5 anti-mist 064024 Blower device Proflow2 SC, complete...
- Page 3 MARKINGS Helmet shell Protector or PSP manufacturer Tuffmaster II helmet type Tornado 6 device type CE mark 0121 notified body protective performance class prEN 12941 conforms to European standard EN 166 conforms to European standard EN 175 conforms to European standard EN 397 1996-1 helmet Certification, date and level of protection 50 –...
- Page 4 Helmet Flowhood 5 064286 EC Type-examined by Berufsgenossenschaftliches Institut für Arbeitssicherheit, D- 53754 Sankt Augustin, Germany, ID: 0121. 1. General o The helmet Flowhood 5 is designed to be used together with a powered blower device and filters to protect the respiratory system and face against hazardous gases and particles. o The Flowhood 5 consists of a helmet, a visor and a breathing hose.
- Page 5 3. Start-up See Instructions for Use of the blower device to be used and of the filters. Only use Pro2000 filters. o Check intactness of helmet and breathing hose. o Check intactness of visor+face seal. • Fix the breathing hose of the helmet tightly to the blower device. •...
- Page 6 Replacing the exhalation valve • Pull the valve cover from the valve and remove the disc. • Insert a new disc ensuring that it lies flat on the seat. • Align the valve cover with the slots and snap it in its place. Replacing the pivot arms •...
- Page 7 DEUTSCH Hebelarm Randdichtung Sichtscheibe (Polykarbonat) Ausatemventilscheibe und Sitz Helmschale Helmrahmen Atemschlauch Kopfbänderung a) Kreuzverband b) Kopfband Stirnpolster Ersatzteile Zusatzausstattung 064297 Atemschlauch PU FL3/5/25 (3 St) 063780 Gebläseeinheit Proflow2, komplett 064513 Sichtscheibe PC FL5, unbereift 064024 Gebläseeinheit Proflow2 SC, komplett + Randddichtung FL5 063581 Gebläseeinheit Proflow3, komplett 064295...
- Page 8 MARKIERUNGEN Helmschale Protector oder PSP Hersteller Tuffmaster II Helmtyp Tornado 6 Gerätetyp CE-Genehmigungszeichen 0121 Prüforgan Schutzklasse prEN 12941 entspricht EN Standard EN 166 entspricht EN Standard EN 175 entspricht EN Standard EN 397 1996-1 Helmprüfbescheinigung mit Datum und Schutzstufe 50 – 60 cm Größe -10 –...
- Page 9 Helm Flowhood 5 064286 EG-Baumustergeprüft durch Berufsgenossenschaftliches Institut für Arbeitssicherheit, D- 53754 Sankt Augustin, Deutschland, Kenn-Nr.: 0121. 1. Allgemeines o Der Helm Flowhood 5 wird zusammen mit einem batteriebetriebenen Gebläse und Filter verwendet, um Atmungsorgane und Gesicht vor gas- und partikelförmigen Schadstoffen zu schützen.
- Page 10 3. Inbetriebnahme Siehe Gebrauchsanleitungen für das Gebläsegerät und die Filter. Es dürfen nur Pro2000 Filter verwendet werden. o Überprüfen den Zustand und die Unversehrtheit des Helms und des Atemschlauchs. o Überprüfen daß die Sichtscheibe+Randdichtung unversehrt ist. • Den Atemschlauch vom Helm sicher an das Gebläsegerät drehen. •...
- Page 11 Austausch des Ausatemventils • Ventildeckel ziehen und die Ventilscheibe entfernen. • Neue Ventilscheibe einlegen, so daß sie flach auf dem Sitz aufliegt. • Ventildeckel in die Positionierschlitzen richten, dann den Deckel in das Ventil einrasten. Austausch des Hebelarms • Den Hebelarm mit der seitliche Klemme lösen, und dieser dann vom Drehzapfen abziehen. Neuen Hebelarm auf den Drehzapfen führen und mit der Klemme sichern.
- Page 12 FRANÇAIS Pivot-bras Joint du bord Visière (polycarbonate) Disque et siège de soupape expiratoire Casquel Bordure Tuyau respiratoire Harnais a) Serre-tête b) Sangle de tête Coussinet frontal Pièces de rechange Accessoires 064297 Tuyau PU FL3/5/25 (3 pc) 063780 Appareil ventilateur Proflow2, complet 064513 Visière PC FL5, anti-buée 064024...
- Page 13 MARQUAGE Casque Protector ou PSP fabricant Tuffmaster II type de casque Tornado 6 type d’appareil marque CE 0121 institut de test classe de protection prEN 12941 conforme à la norme europpéenne EN 166 conforme à la norme europpéenne EN 175 conforme à...
- Page 14 Casque Flowhood 5 064286 Examen CE de type par l'organisme Berufsgenossenschaftliches Institut für Arbeits-sicherheit, D- 53754 Sankt Augustin, Allemagne, ID: 0121. 1. Généralités o Le casque Flowhood 5 est destiné à l’utilisation avec l’appareil ventilateur motorisé et les filtres pour protéger les voies respiratoires et le visage contre les gaz et les particules nocives. o The Flowhood 5 comprend un casque, une visière et un tuyau respiratoire.
- Page 15 3. Mise en service Voir les instructions d’utilisation de l’appareil ventilateur et du filtre. Utiliser uniquement des filtres Pro2000. o Vérifier l’état et l’intégrité du casque et le tuyau respiratoire. o Vérifier l’état et l’intégrité de la visière+joint du bord. •...
- Page 16 Remplacement de la soupape expiratoire • Détacher le couvercle de la soupape expiratoire et enlever le disque. • Inserer un nouveau disque, et vérifier que le disque reste aplati dans le siège. • Aligner le couvercle dans les encoches et enclenchez-le en place. Remplacement des pivot-bras •...
Need help?
Do you have a question about the SCOTT Flowhood 5 and is the answer not in the manual?
Questions and answers