Advertisement
Quick Links
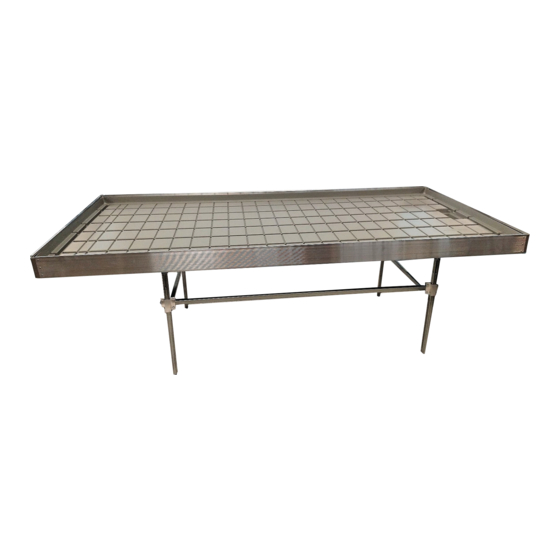
EBB & FLOW BENCH ASSEMBLY INSTRUCTIONS
TOOLS NEEDED FOR ASSEMBLY
" WRENCH
7/16
" SOCKET
7/16
WE RECOMMEND AN IMPACT
GUN FOR LARGER JOBS
Call 815-991-5010 or email us at sales@innova vegrowersequipment.com if you have any ques ons
Complete Instruc onal Guide
POP RIVET TOOL
Pop
Riveter
WE RECOMMEND A
PNEUMATIC RIVETER FOR
LARGER QUANTITIES
POWER DRILL
FOR BENCHES LARGER THAN 5'
CAULK GUN
Caulk Gun
MALLET
Mallet
INNOVATIVEGROWERSEQUIPMENT.COM
LEVEL
Level
TAPE MEASURE
Advertisement

Related Manuals for Innovative EBB & FLOW

Summary of Contents for Innovative EBB & FLOW
- Page 1 EBB & FLOW BENCH ASSEMBLY INSTRUCTIONS Complete Instruc onal Guide TOOLS NEEDED FOR ASSEMBLY ” WRENCH CAULK GUN 7/16 LEVEL POP RIVET TOOL Level Riveter WE RECOMMEND A Caulk Gun PNEUMATIC RIVETER FOR LARGER QUANTITIES ” SOCKET MALLET 7/16 POWER DRILL TAPE MEASURE WE RECOMMEND AN IMPACT FOR BENCHES LARGER THAN 5’...
-
Page 2: Parts List
EBB & FLOW BENCH ASSEMBLY INSTRUCTIONS PARTS LIST CONFIRM ALL PARTS ARE PRESENT BEFORE STARTING INSTALLATION LOAD BEARINGPLUG SQUARE TO SQUARE CLAMP POP RIVET FLAT WASHER BENCH CORNER 20 BOLT & NUT BENCH GLUE BENCH FILTER TEK SELF TAPPING SCREWS STRINGER PIPE INSERT SIDE RAIL JOINER PLATE ONLY USE ON BENCHES OVER 27 FT... - Page 3 EBB & FLOW BENCH ASSEMBLY INSTRUCTIONS BENCH TRAYS TRAY GLUE IS USED TO SEAL TRAYS TOGETHER A7 END TRAY MIDDLE TRAY END TRAY WITH DRAIN MOLDING FOR LONGER BENCHES PARTS INCLUDED WITH MAX ROLL TABLES CONFIRM ALL PARTS ARE PRESENT BEFORE STARTING INSTALLATION ANIT TIP / MAX ROLL HEADER TAP CON SCREWS SAFETY CHAINS...
- Page 4 EBB & FLOW BENCH ASSEMBLY INSTRUCTIONS FOLLOW INSTRUCTIONS BELOW CONT. STEP #1 Lay out the stringer pipe and leg support pieces (B1) on the ground as shown in the picture below. STEP #2 Stand up one of the leg supports (B1) on end and rest the (ridged end up as shown in Figure 1) end of the stringer pipe on the bar connec ng...
- Page 5 EBB & FLOW BENCH ASSEMBLY INSTRUCTIONS FOLLOW INSTRUCTIONS BELOW CONT. STEP #3 Take two clamps (A1) and line them up perpendicular to one another (outside one ver cally and inside one horizontal) ***When lined up place the screws (A6) through the holes facing inward and screw in the nuts (A6) from the inner por on of the frame as shown in Figure 2 FIGUIRE 2...
- Page 6 EBB & FLOW BENCH ASSEMBLY INSTRUCTIONS FOLLOW INSTRUCTIONS BELOW CONT. STEP #5 Now stand up the leg support on the opposite end of the frame and a ach the clamps on each corner on that side as well. Then stand up any leg supports in the middle of the frame and repeat the steps again un l the frame is complete (shown on Figure 4a &...
- Page 7 INSTRUCTIONS FOR INNOVATIVE ARCHIVAL ROLLING BENCHES FOLLOW INSTRUCTIONS BELOW CONT. STEP #7 Insert the flat washers (A3) in the bolts of the pre-assembled headers (B2) and slide the bolts through the opening of the crimped end of the leg supports (B1 –...
- Page 8 EBB & FLOW BENCH ASSEMBLY INSTRUCTIONS FOLLOW INSTRUCTIONS BELOW CONT. STEP #9 ***FOR MAX ROLL TABLES ONLY - Now, take the rolling pipe and slide them through the opening of the swinging bar a ached to the an - p (S1) on one end of the table and push it through the opening at the other end of the table (see Figures 9, 10, 11) Note: if the bench is over 24’...
- Page 9 EBB & FLOW BENCH ASSEMBLY INSTRUCTIONS FOLLOW INSTRUCTIONS BELOW CONT. STEP #10 Next, take the end frames (E1) and lay them across the rolling pipe on each of the table (Figure 12a and Figure 12b ) FIGUIRE 12a FIGUIRE 12b STEP #11 Lay out the bench cross bars (B3) over the rolling pipe equally spaced across the bench as shown in Figures 13a, 13b...
- Page 10 EBB & FLOW BENCH ASSEMBLY INSTRUCTIONS FOLLOW INSTRUCTIONS BELOW CONT. STEP #12 Bench corners (A5) should now be riveted to the END aluminum pieces using the pop rivets (A2). Figure 14a shows one of the bench corners before its connected to the aluminum end piece with the pop rivets in the holes.
- Page 11 EBB & FLOW BENCH ASSEMBLY INSTRUCTIONS FOLLOW INSTRUCTIONS BELOW CONT. STEP #13 Now take the side rail (longer) aluminum pieces and insert the bench cross bar (B3) ends into the slot lined along the aluminum piece. On benches 5’ or wider you will have to connect the end frames (E1) as well.
- Page 12 EBB & FLOW BENCH ASSEMBLY INSTRUCTIONS FOLLOW INSTRUCTIONS BELOW CONT. STEP #14 Rivet aluminum side rail to bench cross bars (B3) in the pre-punched and pre-drilled holes using the pop rivets (A2). Repeat this on the other side of the table. (See Figures below).
- Page 13 INSTRUCTIONS FOR INNOVATIVE ARCHIVAL ROLLING BENCHES FOLLOW INSTRUCTIONS BELOW CONT. STEP #15 Now rivet the end aluminum pieces with corners (A5) to the aluminum sides Call 815-991-5010 or email us at sales@innova vegrowersequipment.com if you have any ques ons INNOVATIVEGROWERSEQUIPMENT.COM...
- Page 14 EBB & FLOW BENCH ASSEMBLY INSTRUCTIONS FOLLOW INSTRUCTIONS BELOW CONT. STEP #16 Only for benches 5’ or wider – Drill tek screws (A11) through end frame (E1) on the short end of the alumi- num side. Keep in mind there are no pre-drilled holes on this end and you will have to use a power drill to drive through the aluminum and end frame.
- Page 15 EBB & FLOW BENCH ASSEMBLY INSTRUCTIONS FOLLOW INSTRUCTIONS BELOW CONT. STEP #18 ON BENCHES WITH MAXROLL HEADERS ONLY - Next, ensure the table is level and then you will want to screw the safety chains (S3) into all legs with an - p headers on them.
-
Page 16: Gluing Instructions
EBB & FLOW BENCH TRAY GLUING INSTRUCTIONS GLUING INSTRUCTIONS DO NOT GLUE IN BETWEEN THE TRAYS ONLY GLUE ON TOP OF SEAM WHEN TRAYS MEET SHOWN IN PICTURE TOOLS NEEDED FOR ASSEMBLY Caulk Gun Razor/Knife Addi onal glue availabel for purchase at innova vegrowersequipment.com online store. - Page 17 EBB & FLOW BENCH TRAY GLUING INSTRUCTIONS GLUING INSTRUCTIONS CONT. DO NOT GLUE IN BETWEEN THE TRAYS ONLY GLUE ON TOP OF SEAM WHEN TRAYS MEET SHOWN IN PICTURE STEP #3 Run a bead of glue filling up the 1/8” gap you le , allow extra to run down the main drainage channel.
- Page 18 Bench filter. * SCREEN FOR BULKHEAD FITTING BULKHEAD FITTING BENCH FILTER VISIT THE INNOVATIVE GROWERS EQUIPMENT YouTube PAGE FOR STEP BY STEP VIDEO INSTRUCTIONS. h ps://www.youtube.com/channel/UCXjy4c2QDWEOUFKgJZsDZxQ Call 815-991-5010 or email us at sales@innova vegrowersequipment.com if you have any ques ons...
Need help?
Do you have a question about the EBB & FLOW and is the answer not in the manual?
Questions and answers