Table of Contents
Advertisement
Quick Links
ProtoNode FPC-N34 and ProtoNode FPC-N35
Start-up Guide
For Interfacing Weil-McLain Products:
Unity 1.0 Control, SlimFit 1000-2000 Series 1 (SF_SOLA)
To Building Automation Systems:
BACnet MS/TP, BACnet/IP, Modbus TCP/IP, Metasys N2 and LonWorks
APPLICABILITY & EFFECTIVITY
Explains ProtoNode hardware and how to install it.
The instructions are effective for the above as of October 2020.
Document Revision: 8.D
Web Configurator
Template Revision: 72
Advertisement
Table of Contents

Subscribe to Our Youtube Channel
Related Manuals for Weil-McLain ProtoNode FPC-N34


Summary of Contents for Weil-McLain ProtoNode FPC-N34
- Page 1 ProtoNode FPC-N34 and ProtoNode FPC-N35 Start-up Guide For Interfacing Weil-McLain Products: Unity 1.0 Control, SlimFit 1000-2000 Series 1 (SF_SOLA) To Building Automation Systems: BACnet MS/TP, BACnet/IP, Modbus TCP/IP, Metasys N2 and LonWorks APPLICABILITY & EFFECTIVITY Explains ProtoNode hardware and how to install it.
- Page 2 Thank you for purchasing the ProtoNode for Weil-McLain. Please call Weil-McLain for technical support of the ProtoNode product. MSA Safety does not provide direct support. If Weil-McLain needs to escalate the concern, they will contact MSA Safety for assistance. Support Contact Information:...
- Page 3 (Section 4.2) 7. If using a serial field protocol: Connect the ProtoNode FPC-N34 3 pin RS-485 port to the field protocol cabling, (Section 4.3) or connect the ProtoNode FPC-N35 2 pin LonWorks port to the field protocol cabling. (Section 4.4) 8.
-
Page 4: Table Of Contents
FPC-N34: Setting the Baud Rate for BMS Network ..............14 3.5.3.1 Baud Rate DIP Switch Selection ..................14 Interfacing ProtoNode to Devices ....................15 ProtoNode FPC-N34 and FPC-N35 Showing Connection Ports ..........15 Serial Device Connections to the ProtoNode ................16 4.2.1 Biasing the RS-485 Device Network ..................17 4.2.2... - Page 5 Appendix B.5.1.2. Edit Users ......................50 Appendix B.5.1.3. Delete Users ....................... 51 Appendix B.5.2. Change FieldServer Password ................. 52 Appendix C. Vendor Information – Weil-McLain ..................53 Appendix D. “A” Bank DIP Switch Settings ................... 54 “A” Bank DIP Switch Settings ..................54 Appendix E.
- Page 6 Figure 7: Baud Rate DIP Switches ......................14 Figure 8: BMS Baud Rate ........................... 14 Figure 9: ProtoNode FPC-N34 (Top) and ProtoNode FPC-N35 (Bottom) ..........15 Figure 10: Device and Power Connections ....................16 Figure 11: RS-485 Biasing Switch on the ProtoNode N34 (Left) and ProtoNode N35 (Right) ....17 Figure 12: RS-485 End-Of-Line Termination Switch on the ProtoNode N34 (Left) and ......
-
Page 7: Certifications
Weil-McLain ProtoNode Start-up Guide CERTIFICATIONS BTL Mark – BACnet ® 1 Testing Laboratory The BTL Mark on ProtoNode is a symbol that indicates that a product has passed a series of rigorous tests conducted by an independent laboratory which verifies that the product correctly implements the BACnet features claimed in the listing. -
Page 8: Introduction
NOTICE: The FPC-N34 for Weil-McLain products comes shipped with the Unity 1.0 profile already set as an active profile with the default settings to match the Unity 1.0 control and set for BACnet MS/TP. - Page 9 Weil-McLain ProtoNode Start-up Guide FPC-N35 Connectivity Diagram: The ProtoNode can connect with the SMC Cloud. The SMC Cloud allows technicians, the OEM's support team and MSA Safety's support team to remotely connect to the ProtoNode. The SMC Cloud provides the following capabilities for any registered devices in the field: •...
-
Page 10: Setup For Protonode
Weil-McLain ProtoNode Start-up Guide SETUP FOR PROTONODE Record Identification Data Each ProtoNode has a unique part number located on the side or the back of the unit. This number should be recorded, as it may be required for technical support. The numbers are as follows:... -
Page 11: Configuring Device Communications
Weil-McLain ProtoNode Start-up Guide Configuring Device Communications 3.3.1 Confirm the Device and ProtoNode COM Settings Match • Any connected serial device MUST have the same baud rate, data bits, stop bits, and parity settings as the ProtoNode. • Figure 4 specifies the device serial port settings required to communicate with the ProtoNode. -
Page 12: Selecting The Desired Protocol Configuration
Selecting the Desired Protocol Configuration NOTE: The instructions in this section are for the BMS side protocol. • ProtoNode FPC-N34 units use the “S” bank of DIP switches (S0 – S3) to select the protocol configuration. See the table in... -
Page 13: Bms Network Settings: Mac Address, Device Instance And Baud Rate
Weil-McLain ProtoNode Start-up Guide BMS Network Settings: MAC Address, Device Instance and Baud Rate 3.5.1 BACnet MS/TP (FPC-N34): Setting the MAC Address for BMS Network • Only 1 MAC Address is set for ProtoNode regardless of how many devices are connected to ProtoNode. -
Page 14: 3.5.2 Bacnet (Fpc-N34): Calculating The Default Device Instance
BMS for BACnet MS/TP. • The ProtoNode baud rate for Metasys N2 is set for 9600. DIP switches B0 – B3 are disabled for Metasys N2 on the ProtoNode FPC-N34. • DIP switches B0 – B3 are disabled on the ProtoNode FPC-N35 (LonWorks). -
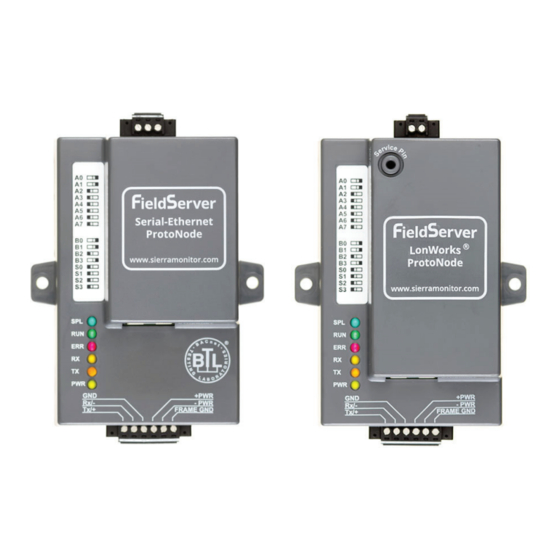
Page 15: Interfacing Protonode To Devices
Weil-McLain ProtoNode Start-up Guide INTERFACING PROTONODE TO DEVICES ProtoNode FPC-N34 and FPC-N35 Showing Connection Ports Figure 9: ProtoNode FPC-N34 (Top) and ProtoNode FPC-N35 (Bottom) Page 15 of 58... -
Page 16: Serial Device Connections To The Protonode
Serial Device Connections to the ProtoNode ProtoNode 6 Pin Phoenix connector: • The 6 pin Phoenix connector is the same for ProtoNode FPC-N34 and FPC-N35 (LonWorks). • Pins 1 through 3 are for RS-485 devices. Use standard grounding principles for RS-485 GND •... -
Page 17: 4.2.1 Biasing The Rs-485 Device Network
Weil-McLain ProtoNode Start-up Guide 4.2.1 Biasing the RS-485 Device Network NOTE: Bias Resisters are defaulted to the ON position. If biasing is already set in the network, follow instructions below to turn biasing to the OFF position. • An RS-485 network with more than one device needs to have biasing to ensure proper communication. -
Page 18: 4.2.2 End Of Line Termination Switch For The Rs-485 Device Network
Weil-McLain ProtoNode Start-up Guide 4.2.2 End of Line Termination Switch for the RS-485 Device Network • On long RS-485 cabling runs, the RS-485 trunk must be properly terminated at each end. • The ProtoNode has an end of line (EOL) blue jumper. The default setting for this blue EOL switch is OFF with the jumper straddling the pins closest to the inside of the board of the ProtoNode. -
Page 19: Serial Network (Fpc-N34): Wiring Field Port To Rs-485 Network
Weil-McLain ProtoNode Start-up Guide Serial Network (FPC-N34): Wiring Field Port to RS-485 Network • Connect the RS-485 network wires to the 3-pin RS-485 connector on ProtoNode as shown below Figure Use standard grounding principles for RS-485 GND • See Section for information on connecting to an Ethernet network. -
Page 20: Lonworks (Fpc-N35): Wiring Lonworks Devices To The Lonworks Terminal
Weil-McLain ProtoNode Start-up Guide LonWorks (FPC-N35): Wiring LonWorks Devices to the LonWorks Terminal • Wire the LonWorks device network to the ProtoNode LonWorks Terminal. Use approved cable per the FT-10 installation guidelines LonWorks has no polarity. Figure 15: LonWorks Terminal... -
Page 21: Power-Up Protonode
Weil-McLain ProtoNode Start-up Guide Power-Up ProtoNode Check power requirements in the table below: Power Requirement for ProtoNode External Gateway Current Draw Type ProtoNode Family 12VDC/AC 24VDC/AC 30VDC FPC – N34 (Typical) 170mA 100mA 80mA FPC – N34 (Maximum) 240mA 140mA 100mA FPC –... -
Page 22: Connect The Pc To The Protonode
Weil-McLain ProtoNode Start-up Guide CONNECT THE PC TO THE PROTONODE Connecting to the ProtoNode via Ethernet Connect a Cat-5 Ethernet cable (straight through or cross-over) between the local PC and ProtoNode. Ethernet Port Figure 18: Ethernet Port Location 5.1.1 Changing the Subnet of the Connected PC The default IP Address for the ProtoNode is 192.168.1.24, Subnet Mask is 255.255.255.0. -
Page 23: Setup Web Server Security
Weil-McLain ProtoNode Start-up Guide SETUP WEB SERVER SECURITY Navigate to the IP Address of the ProtoNode on the local PC by opening a web browser and entering the IP Address of the ProtoNode; the default Ethernet address is 192.168.1.24. NOTE: If the IP Address of the ProtoNode was changed, the assigned IP Address can be discovered using the FS Toolbox utility. -
Page 24: Figure 21: Warning Expanded Text
Weil-McLain ProtoNode Start-up Guide • Additional text will expand below the warning, click the underlined text to go to the IP Address. In Figure 21 example this text is “Proceed to 10.40.50.94 (unsafe)”. Figure 21: Warning Expanded Text • When the login screen appears, put in the Username (default is “admin”) and the Password (found on the label of the FieldServer). -
Page 25: Select The Security Mode
Weil-McLain ProtoNode Start-up Guide Select the Security Mode On the first login to the FieldServer, the following screen will appear that allows the user to select which mode the FieldServer should use. Figure 23: Security Mode Selection Screen NOTE: Cookies are used for authentication. -
Page 26: 6.2.1 Https With Own Trusted Tls Certificate
Weil-McLain ProtoNode Start-up Guide 6.2.1 HTTPS with Own Trusted TLS Certificate This is the recommended selection and the most secure. • Once this option is selected, the Certificate, Private Key and Private Key Passphrase fields will appear under the mode selection. -
Page 27: Configure The Protonode
Weil-McLain ProtoNode Start-up Guide CONFIGURE THE PROTONODE Set Configuration Parameters • On the Web Configurator page, the configuration parmeters are listed. Figure 25: Web Configurator Showing Configuration Parameters NOTE: Protocol specific parameters are only visible when the associated protocol is selected via S-bank DIP switch (Section 3.4). -
Page 28: Selecting Profiles For Devices Connected To Protonode
Weil-McLain ProtoNode Start-up Guide Selecting Profiles for Devices Connected to ProtoNode • In the Web Configurator, the Active Profiles are shown below the Configuration Parameters. The Active Profiles section lists the currently active device profiles, including previous Web Configurator additions. The Unity 1.0 profile for BACnet MS/TP is loaded as active by default. -
Page 29: Verify Device Communications
Weil-McLain ProtoNode Start-up Guide • To add an active profile to support a device, click the Add button under the Active Profiles heading. Select a profile from the drop-down menu field that appears underneath the Current profile column. • Once the Profile for the device has been selected from the drop-down list, enter the value of the device’s Node-ID which was assigned in Section 3.3.2. -
Page 30: Change Protonode Com Settings
Weil-McLain ProtoNode Start-up Guide Change ProtoNode COM Settings • In the Web Configurator, the ProtoNode COM Settings are the first parameters displayed. Figure 29: Web Configurator ProtoNode COM Settings NOTE: The ProtoNode default setting for the Modbus RTU serial baud rate is 19200 and the default stop bits setting is 1. -
Page 31: Bacnet: Setting Node_Offset To Assign Specific Device Instances
Weil-McLain ProtoNode Start-up Guide BACnet: Setting Node_Offset to Assign Specific Device Instances • Follow the steps outlined in Section to access the ProtoNode Web Configurator. • Node_Offset field shows the current value (default = 50,000). The values allowed for a BACnet Device Instance can range from 1 to 4,194,303 •... -
Page 32: Ethernet Network: Setting Ip Address For The Field Network
Weil-McLain ProtoNode Start-up Guide Ethernet Network: Setting IP Address for the Field Network • Follow the steps outlined in Section to access the ProtoNode Web Configurator. • To access the FS-GUI, click on the “Diagnostics & Debugging” button in the bottom right corner of the page. -
Page 33: Figure 34: Changing Ip Address Via Fs-Gui
Weil-McLain ProtoNode Start-up Guide • From the FS-GUI landing page, click on “Setup” to expand the navigation tree and then select “Network Settings” to access the IP Settings menu. (Figure Figure 34: Changing IP Address via FS-GUI • Modify the IP Address (N1 IP Address field) of the ProtoNode Ethernet port. -
Page 34: How To Start The Installation Over: Clearing Profiles
Weil-McLain ProtoNode Start-up Guide How to Start the Installation Over: Clearing Profiles • Follow the steps outlined in Section to access the ProtoNode Web Configurator. • At the bottom-left of the page, click the “Clear Profiles and Restart” button. •... -
Page 35: Lonworks (Fpc-N35): Commissioning Protonode On A Lonworks Network
Weil-McLain ProtoNode Start-up Guide LONWORKS (FPC-N35): COMMISSIONING PROTONODE ON A LONWORKS NETWORK Commissioning may only be performed by the LonWorks administrator. Commissioning ProtoNode FPC-N35 on a LonWorks Network During the commissioning process, the LonWorks administrator may prompt the user to hit the service pin on the ProtoNode FPC-N35 at a specific point (this step occurs at different points of the commissioning process for each LonWorks network management tool). -
Page 36: Figure 36: Sample Of Fserver.xif File Generated
Weil-McLain ProtoNode Start-up Guide • Open a web browser and go to the following address: [IP Address of ProtoNode]/fserver.xif Example: 192.168.1.24/fserver.xif • If the web browser prompts to save the file, save the file onto the PC. If the web browser displays the xif file as a web page, save the file onto the local PC as “fserver.xif”. -
Page 37: Appendix A. Troubleshooting
Weil-McLain ProtoNode Start-up Guide Appendix A. Troubleshooting Lost or Incorrect IP Address • Ensure that FieldServer Toolbox is loaded onto the local PC. Otherwise, download the FieldServer-Toolbox.zip via the Sierra Monitor website’s Software Downloads. • Extract the executable file and complete the installation. -
Page 38: Viewing Diagnostic Information
Weil-McLain ProtoNode Start-up Guide Viewing Diagnostic Information • Type the IP Address of the ProtoNode into the web browser or use the FieldServer Toolbox to connect to the ProtoNode. • Click on Diagnostics and Debugging Button, then click on view, and then on connections. -
Page 39: Check Wiring And Settings
Weil-McLain ProtoNode Start-up Guide Check Wiring and Settings • No COMS on Modbus RTU side. If the Tx/Rx LEDs are not flashing rapidly then there is a COM issue. To fix this, check the following: Visual observations of LEDs on the ProtoNode (Appendix A.4) -
Page 40: Led Diagnostics For Communications Between Protonode And Devices
Weil-McLain ProtoNode Start-up Guide LED Diagnostics for Communications Between ProtoNode and Devices See the diagram below for ProtoNode FPC-N34 and FPC-N35 LED Locations. Diagnostic LEDs Description The SPL LED will light if the unit is not getting a response from one or more of the configured devices. -
Page 41: Take A Fieldserver Diagnostic Capture
Weil-McLain ProtoNode Start-up Guide Take a FieldServer Diagnostic Capture When there is a problem on-site that cannot easily be resolved, perform a Diagnostic Capture before contacting support. Once the Diagnostic Capture is complete, email it to technical support. The Diagnostic Capture will accelerate diagnosis of the problem. -
Page 42: Appendix A.5.1. Taking A Capture With Older Firmware
Weil-McLain ProtoNode Start-up Guide Appendix A.5.1. Taking a Capture with Older Firmware If the FieldServer firmware is from before November 2017, the Diagnostic Capture can be done by downloading the FieldServer Toolbox software but network connections (such as Ethernet and Wi-Fi) cannot be captured (if a network diagnostic is needed take a Wire Shark capture). - Page 43 Weil-McLain ProtoNode Start-up Guide Select “Full Diagnostic" from the drop down menu NOTE: If desired, the default capture period can be changed. Click on the Start Diagnostic button Wait for the capture period to finish and the Diagnostic Test Complete window will appear •...
-
Page 44: Appendix B. Additional Information
Weil-McLain ProtoNode Start-up Guide Appendix B. Additional Information Update Firmware To load a new version of the firmware, follow these instructions: 1. Extract and save the new file onto the local PC. 2. Open a web browser and type the IP Address of the FieldServer in the address bar. -
Page 45: Internet Browser Software Support
Weil-McLain ProtoNode Start-up Guide Internet Browser Software Support The following web browsers are supported: • Chrome Rev. 57 and higher • Firefox Rev. 35 and higher • Microsoft Edge Rev. 41 and higher • Safari Rev. 3 and higher NOTE: Internet Explorer is no longer supported as recommended by Microsoft. -
Page 46: Appendix B.4.1. Change Security Mode
Weil-McLain ProtoNode Start-up Guide Appendix B.4.1. Change Security Mode • Click Security in the Navigation panel. Figure 43: FS-GUI Security Setup • Click the Mode desired. 6.2.1 If HTTPS with own trusted TLS certificate is selected, follow instructions in Section •... -
Page 47: Appendix B.4.2. Edit The Certificate Loaded Onto The Fieldserver
Weil-McLain ProtoNode Start-up Guide Appendix B.4.2. Edit the Certificate Loaded onto the FieldServer NOTE: A loaded certificate will only be available if the security mode was previously setup as HTTPS with own trusted TLS certificate. • Click Security in the Navigation panel. -
Page 48: Change User Management Settings
Weil-McLain ProtoNode Start-up Guide Change User Management Settings • From the FS-GUI page, click Setup in the Navigation panel. • Click User Management in the navigation panel. NOTE: If the passwords are lost, the unit can be reset to factory settings to reinstate the default unique password on the label. -
Page 49: Appendix B.5.1.1. Create Users
Weil-McLain ProtoNode Start-up Guide Appendix B.5.1.1. Create Users • Click the Create User button. Figure 46: Create User Window • Enter the new User fields: Name, Security Group and Password. User details are hashed and salted NOTE: The password must meet the minimum complexity requirements. An algorithm automatically checks the password entered and notes the level of strength on the top right of the Password text field. -
Page 50: Appendix B.5.1.2. Edit Users
Weil-McLain ProtoNode Start-up Guide Appendix B.5.1.2. Edit Users • Click the pencil icon next to the desired user to open the User Edit window. Figure 47: Setup Users • Once the User Edit window opens, change the User Security Group and Password as needed. -
Page 51: Appendix B.5.1.3. Delete Users
Weil-McLain ProtoNode Start-up Guide Appendix B.5.1.3. Delete Users • Click the trash can icon next to the desired user to delete the entry. Figure 49: Setup Users • When the warning message appears, click Confirm. Figure 50: User Delete Warning... -
Page 52: Appendix B.5.2. Change Fieldserver Password
Weil-McLain ProtoNode Start-up Guide Appendix B.5.2. Change FieldServer Password • Click the Password tab. Figure 51: FieldServer Password Update via FS-GUI • Change the general login password for the FieldServer as needed. NOTE: The password must meet the minimum complexity requirements. An algorithm automatically checks the password entered and notes the level of strength on the top right of the Password text field. -
Page 53: Appendix C. Vendor Information - Weil-Mclain
Weil-McLain ProtoNode Start-up Guide Appendix C. Vendor Information – Weil-McLain Find the “Weil-McLain Vendor Mappings” document at www.weil-mclain.com for the complete point list for all the devices referenced in this manual. Only the protocols listed as supported for this FieldServer are supported (see Section 2.1). -
Page 54: Appendix D. "A" Bank Dip Switch Settings
Weil-McLain ProtoNode Start-up Guide Appendix D. “A” Bank DIP Switch Settings “A” Bank DIP Switch Settings Address Address Page 54 of 58... - Page 55 Weil-McLain ProtoNode Start-up Guide Address Address Page 55 of 58...
- Page 56 Weil-McLain ProtoNode Start-up Guide Address Address Page 56 of 58...
-
Page 57: Appendix E. Reference
Weil-McLain ProtoNode Start-up Guide Appendix E. Reference Specifications ProtoNode FPC-N34 ProtoNode FPC-N35 One 6-pin Phoenix connector with: One 6-pin Phoenix connector with: RS-485 port (+ / - / gnd) RS-485 port (+ / - / gnd) Power port (+ / - / Frame-gnd) -
Page 58: Appendix F. Limited 2 Year Warranty
Weil-McLain ProtoNode Start-up Guide Appendix F. Limited 2 Year Warranty MSA Safety warrants its products to be free from defects in workmanship or material under normal use and service for two years after date of shipment. MSA Safety will repair or replace any equipment found to be defective during the warranty period.
Need help?
Do you have a question about the ProtoNode FPC-N34 and is the answer not in the manual?
Questions and answers