Table of Contents
Advertisement
Quick Links
STAINLESS STEEL PORTABLE TUMBLE DRYER
ITEM: 99816
OWNER'S MANUAL AND SAFETY INSTRUCTIONS
SAVE THIS MANUAL: KEEP THIS MANUAL FOR SAFETY WARNINGS, PRECAUTIONS, ASSEMBLY,
OPERATING, INSPECTION, MAINTENANCE AND CLEANING PROCEDURES. WRITE THE PRODUCT'S
SERIAL NUMBER ON THE BACK OF THE MANUAL NEAR THE ASSEMBLY DIAGRAM (OR MONTH
AND YEAR OF PURCHASE IF PRODUCT HAS NO NUMBER)
FOR QUESTIONS PLEASE CALL OUR CUSTOMER SUPPORT: 909.628.0880 MON-FRI 9AM TO 3PM PST
Advertisement
Table of Contents

Related Manuals for Barton 99816

Summary of Contents for Barton 99816
- Page 1 STAINLESS STEEL PORTABLE TUMBLE DRYER ITEM: 99816 OWNER’S MANUAL AND SAFETY INSTRUCTIONS SAVE THIS MANUAL: KEEP THIS MANUAL FOR SAFETY WARNINGS, PRECAUTIONS, ASSEMBLY, OPERATING, INSPECTION, MAINTENANCE AND CLEANING PROCEDURES. WRITE THE PRODUCT’S SERIAL NUMBER ON THE BACK OF THE MANUAL NEAR THE ASSEMBLY DIAGRAM (OR MONTH AND YEAR OF PURCHASE IF PRODUCT HAS NO NUMBER) FOR QUESTIONS PLEASE CALL OUR CUSTOMER SUPPORT: 909.628.0880 MON-FRI 9AM TO 3PM PST...
-
Page 2: Important Safety Information
IMPORTANT SAFETY INFORMATION GENERAL SAFETY WARNINGS Read all safety warnings and instructions. Failure to follow the warnings and instructions may result in fire, electric shock and/or serious injury. Save all warnings and instructions for future reference. SAFETY The warnings, precautions, and instructions discussed in this instruction manual cannot cover all possible conditions and situations that may occur. - Page 3 IMPORTANT SAFETY INFORMATION DO NOT place the dryer on horizontal ground. DO NOT place on the carpet as this will block the intake. There should be at least 10cm between the dryer and the walls. DO NOT wash directly with water, thinner, gasoline or alcohol. DO NOT use a spray cleaner to clean the interior of the dryer, clean with a damp cloth instead.
-
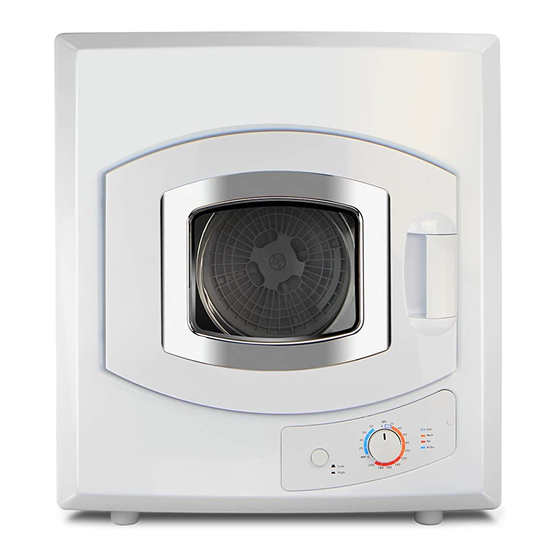
Page 4: Features And Specifications
FEATURES AND SPECIFICATIONS FEATURES Lightweight Portable Great for apartments, condos and lofts See-through window Wall mounting kit included Features auto dry and timed settings Coordinates great with small washers Can be plugged into any 110V outlet Dimensions: 27.6” H x 23.6” W x 17.1” D Wattage: 1400W... -
Page 5: Parts Diagram
PARTS DIAGRAM DOOR GASKET DOOR DRUM AIR INTAKE WINDOW SHROUD TIME SELECTOR KNOB HEAT SELECTOR KNOB EXHAUST VENT CASING BACK COVER... -
Page 6: Installation
INSTALLATION BEFORE USING YOUR APPLIANCE Check to make sure you have all the parts necessary for operation. Allow at least 5 inches of space between the sides of the appliance. Put laundry into the dryer evenly. Uneven laundry may cause noise and vibration. Before drying, check all pockets. - Page 7 INSTALLATION 4. Align hanging hooks and fasten screws tightly. 5. Install exhaust pipe as per Fig. 3 6. Using 3x16mm screws (provided) to fix the outlet in place firmly. 7. Using 4x12mm screws to fix the 2 wall hanging bracket. Fig.
-
Page 8: Electrical Connection
INSTALLATION AND OPERATION ELECTRICAL CONNECTION: This appliance must be grounded. In the event of an electrical short circuit, the grounding plug reduces the risk of electric shock by providing an escape wire for electric current. This appliance is equipped with a power cord that has a grounding wire with a grounding plug. -
Page 9: Operation
OPERATION CONTROL PANEL FUNCTIONS: HEAT SELECTOR BUTTON: Select “High Heat” for items that are particularly bulky or large quantities. Select “Low Heat” for delicate items such as silk, nylon etc. DRYING PROGRAM SELECTOR: There are five drying combinations available: cool, Anti-wrinkle, Warm, Hot and Dry. DRYING TIME REFERENCE: ** LOAD WEIGHTS AND DRYING TIMES ARE APPROXIMATE ** SORTING FABRICS: For best results, clothes should be sorted properly. -
Page 10: Fabric Care Chart
OPERATION FABRIC CARE CHART: CLEANING THE EXTERIOR: Wipe the dryer surfaces, including the control panel with a soft cloth and non-abrasive household detergent. UNPLUG THE POWER CORD PRIOR TO ANY CLEANING: Removing the lint filters, remove by pulling outward using the four grip holes in the filter assembly. -
Page 11: Maintenance
MAINTENANCE The filter assembly consists of three parts. A. Exhaust Vent Shroud B. Lint Filter C. Exhaust Filter Separate each of the above parts and clean the individual pieces using a soft brush or vacuum cleaner. DO NOT damage the filters. Separate each of the above parts and clean the individual pieces using a soft brush or vacuum cleaner. -
Page 12: Please Read The Following Carefully
WARRANTY PLEASE READ THE FOLLOWING CAREFULLY THE MANUFACTURER AND/OR DISTRIBUTOR HAS PROVIDED THE PARTS LIST AND ASSEMBLY DIAGRAM IN THIS MANUAL AS A REFERENCE TOOL ONLY. NEITHER THE MANUFACTURER OR DISTRIBUTOR MAKES ANY REPRESENTATION OR WARRANTY OF ANY KIND TO THE BUYER THAT HE OR SHE IS QUALIFIED TO MAKE ANY REPAIRS TO THE PRODUCT, OR THAT HE OR SHE IS QUALIFIED TO REPLACE ANY PARTS OF THE PRODUCT.
Need help?
Do you have a question about the 99816 and is the answer not in the manual?
Questions and answers