Table of Contents
Advertisement
Quick Links
Advertisement
Table of Contents

Summary of Contents for Vega TL-11
- Page 1 TEMPERATURE LOGGER VEGA TL-11 User Manual www.vega-absolute.ru...
- Page 2 Vega TL-11 / User Manual Document Information Title Vega TL-11 temperature logger Document type Manual - Translation from Russian Document number V02-TL11-01 Revision and date 03 – 07 September 2020 This document applies to the following products: Product name Type number...
-
Page 3: Table Of Contents
5 COMMUNICATION PROTOCOL ............................23 Sensor TL-11 transmits the following types of packets ....................23 VEGA TL-11 sensor receives packets of the following types ..................25 6 STORAGE AND TRANSPORTATION REQUIREMENTS ...................... 27 7 CONTENT OF THE PACKAGE ..............................28 8 WARRANTY .................................... -
Page 4: Introduction
The necessary stage for the network deploying including a big quantity of end devices is a radio planning work with nature experiments Vega-Absolute OOO reserves the right to make changes to the manual related to the improvement of equipment and software, as well as to eliminate typos and inaccuracies, without prior notice. -
Page 5: Description And Operation
LoRaWAN network. TL-11 is powered by a 6400 mAh built-in battery with service life up to 10 years, provided data transmitted once a day. -
Page 6: Functional
The internal clock is set automatically when device connected to the "Vega LoRaWAN Configurator" via USB, also adjustable via LoRaWAN. FUNCTIONAL Vega TL-11 temperature sensor is class A device (LoRaWAN classification) and has the following features: o Temperature measurement in range of -55… +100 °С... -
Page 7: Specification
Vega TL-11 / User Manual 2 SPECIFICATION Main USB-port micro-USB, type B Operating temperatures -40…+85 °С Measurement temperatures -55…+100 °С ±0.5 ºС in range -10…+40 ºС Accuracy of temperature measurement ±1 ºС in range -55…+100 ºС Temperature sensor type RT103F3950AFA0-401... -
Page 8: Operation
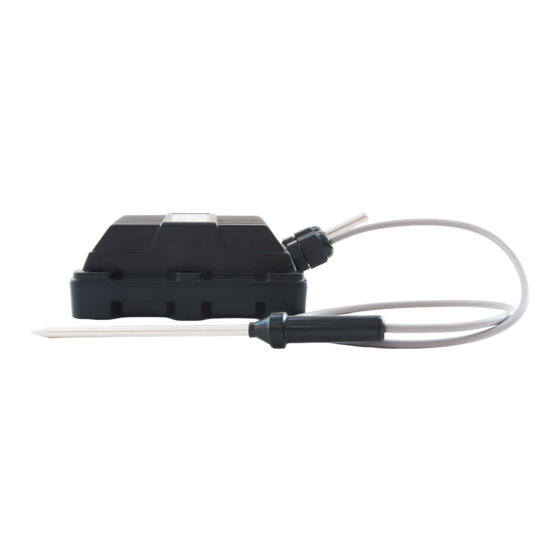
Temperature logger has a two contact pairs. One pair (“Therm1” and “ ” contacts) is for connect to built-in thermistor, another one is for external probe (“Therm2” and “ ” contacts). You should configure sending data parameters in “Vega LoRaWAN Configurator” application. Revision 03 - 07 September 2020... -
Page 9: Device Sensors
Vega TL-11 / User Manual DEVICE SENSORS Tamper is located on the board top. Should the tamper triggering, the device sends a corresponding message to the LoRaWAN network. Tamper Revision 03 - 07 September 2020... -
Page 10: Indication
Vega TL-11 / User Manual INDICATION The device has one red LED located on the board. Indication is only used during device activation step in the LoRaWAN network and when operation modes are switch. LED location on the board Meaning... -
Page 11: Initial Startup
Vega TL-11 / User Manual INITIAL STARTUP Vega TL-11 is constantly ON, but can operate in a special "Storage" mode, designed for storage and transportation. The device does not regularly transmit data to the network in this mode. Before use switch the device from the “Storage” mode by the button pressing. -
Page 12: Connecting Via Usb
Vega TL-11 / User Manual CONNECTING VIA USB Vega TL-11 adjusted with the "Vega LoRaWAN Configurator" application (See part 4). USB port is located on the board Before connecting the device to the computer for the first time, you must install the driver for the COM port stsw-stm32102, which can be downloaded from iotvega.com. - Page 13 Vega TL-11 / User Manual In this window, you need to click Next, then Install, and then the installation will begin. When the installation is completed successfully, the following screen appears: After pressing Finish the driver is ready for operation, - it is possible to connect the device via USB.
-
Page 14: Vega Lorawan Configurator
Next, the work of the application is considered in the “Expert” mode. INTERFACE OF THE APPLICATION The "Vega LoRaWAN Configurator" application does not require the special installation. When the executable file is launched, the window for working with the application appears. -
Page 15: Connection To The Device
For the connection to the device, perform the following steps: 1. Connect the USB cable to the device. 2. Start the "Vega LoRaWAN Configurator" application. 3. Click the "Connect" button in the menu on the left. The application automatically recognizes the type of device, and the device selection menu becomes inactive. -
Page 16: Device Info" Tab
Vega TL-11 / User Manual After making the necessary changes to the settings, you should click the "Apply settings" button and only then disconnect from the device with the "Disconnect" button. “DEVICE INFO” TAB The "Device info" tab displays information about the device, its status, and the data needed to register the device in the LoRaWAN network. - Page 17 Vega TL-11 / User Manual Join network button - launch the LoRaWAN network connection procedure with the previously selected ABP or OTAA method. If the device is already connected to the network, reconnection procedure will occur. Link check (not displayed in the "Simple" mode) - when pressed, the device sends a special signal to the LoRaWAN network, in response to which the network informs it of the number of gateways that received this signal and the signal quality.
-
Page 18: Lorawan Settings" Tab
Vega TL-11 / User Manual “LORAWAN SETTINGS” TAB The "LoRaWAN Settings" tab allows you to configure various parameters of the LoRa network. Region - allows you to select RU-868, EU-868 or specify a custom frequency plan. In the device frequency plan, only those channels are active by default, on which sending requests for connection to the network (join channels). - Page 19 Vega TL-11 / User Manual This frequency plan allows you to set up to 16 channels, as well as the frequency and speed of the second receiving window. The first three channels and the second receiving window parameters are mandatory. Without these parameters the custom frequency plan will be considered empty Activation type –...
- Page 20 Vega TL-11 / User Manual Join accept delay 1 (not displayed in the "Simple" mode) – sets the time that the device will open the first receiving window to receive confirmation for the join request from the LoRaWAN network while OTAA mode active. The second window always opens after 1 second after the first.
- Page 21 Vega TL-11 / User Manual TX power (not displayed in the "Simple" mode) – the device RF transmitter power is adjusted to this value when sending packets to the LoRaWAN network. This option can be changed by the network server.
-
Page 22: Vega Tl-11" Tab
Vega TL-11 / User Manual «VEGA TL-11» TAB The “Vega TL-11” tab contains the settings of the connected device. Current state – displays the current parameters of the device - the internal temperature of the device and the battery level. -
Page 23: Communication Protocol
Main parameters uint8_t If thermistor is not connected to the TL-11 in the «Temperature» field of the corresponding thermistor will be sent an -1000 value for breakage or fault indication. In case of thermistor short circuit will be sent an -1270 value "Main parameters"... - Page 24 Vega TL-11 / User Manual 2. Packet with time correction request, sent every seven days on LoRaWAN port 4 Size in bytes Field description Data type 1 byte Packet type, this packet == 255 uint8 4 bytes Time of the modem at a moment of the packet...
-
Page 25: Vega Tl-11 Sensor Receives Packets Of The Following Types
Vega TL-11 / User Manual VEGA TL-11 SENSOR RECEIVES PACKETS OF THE FOLLOWING TYPES 1. Real-time clock adjustment – send by application on LoRaWAN port 4 Size in bytes Field description Data type 1 byte Packet type, this packet = 255... - Page 26 Vega TL-11 / User Manual Table of ID of TL-11 parameters and these possible values ID of Description Data Possible values parameter length Confirmed uplinks 1 byte 1 – confirmed 2 – unconfirmed Adaptive data rate 1 byte 1 – on 2 –...
-
Page 27: Storage And Transportation Requirements
Vega TL-11 / User Manual 6 STORAGE AND TRANSPORTATION REQUIREMENTS Vega TL-11 shall be stored in the original packaging in heated room at temperatures +5°С to +40°С and relative humidity less than 85%. The device shall be transported in covered freight compartments of all types at any distance at temperatures -40°C to +85°C. -
Page 28: Content Of The Package
Vega TL-11 / User Manual 7 CONTENT OF THE PACKAGE Vega TL-11 device is delivered complete with: Temperature logger Vega TL-11 – 1 pc. Factory certificate – 1 pc. Revision 03 - 07 September 2020... -
Page 29: Warranty
Vega TL-11 / User Manual 8 WARRANTY The warranty period for the device is 3 years from the date of sale. The manufacturer is obligated to provide repair services or replace the failed device during the entire warranty period. The consumer undertakes to comply with the terms and conditions of transportation, storage and operation specified in this user manual. - Page 30 Vega TL-11 / User Manual vega-absolute.ru Operation Manual © Vega-Absolute OOO 2019-2020 Revision 03 - 07 September 2020...
Need help?
Do you have a question about the TL-11 and is the answer not in the manual?
Questions and answers