Table of Contents
Advertisement
Quick Links
Advertisement
Table of Contents

Summary of Contents for WRND ProSeries MPPT
- Page 1 WRND MPPT ProSeries USER MANUAL...
-
Page 3: Table Of Contents
TABLE OF CONTENT INSTALLATION..................3 CHARGING STAGES.................5 START-UP SCREEN..................6 HOME SCREEN..................7 MAIN MENU....................8 LOG HISTORY....................9 STATISTICS....................9 SETTINGS....................11 SETTING: FLOAT CHARGING...............11 SETTING: BOOST CHARGING..............12 SETTING: EQUALIZE CHARGING............13 CHANGE CODE..................14 WARRANTY....................17... -
Page 4: Installation
INSTALLATION... - Page 5 Use the four mounting holes to fix the MPPT in an upright positon allowing for convection cooling across the fins. Also, be sure not to block any of the fins of vents of the MPPT. An internal temperature sensor will protect the MPPT from overheating, but performance may be limited if the MPPT is not allowed to vent to the surrounding area.
-
Page 6: Charging Stages
CHARGING STAGES The WRND MPPT charge controllers employ three basic charging stages: Stage 1 – Bulk charging (‘PPT’ or ‘PPL’ indicated on LCD) Stage 2 – Boost or Equalize charging (‘Bst’ or ‘Equ’ indicated on LCD) Stage 3 – Float charging (‘Flt’ indicated on LCD) NOTE: The unit will often jump back and forth between Stage 1 and Stage 2/3. -
Page 7: Start-Up Screen
START-UP SCREEN When power is connected to the unit it should briefly display a start- up screen similar to the one above. The model number in this instance is WMP2404A which indicates this unit is a 12/24V, 40A unit. This code will be different for other models according to the following table: WMP2404A –... -
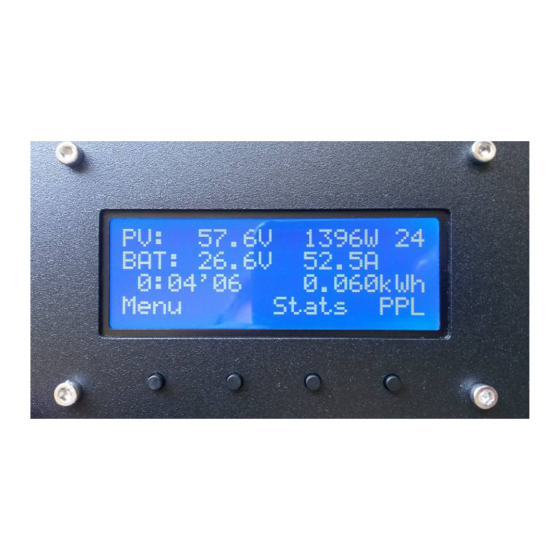
Page 8: Home Screen
HOME SCREEN PANEL VOLTAGE (Shown above as ‘PV: 33.3V’): Is the voltage of the PV panel as measured at the PV terminals of the MPPT. This reading will display ‘---‘ if the voltage is less than the battery voltage. POWER (Shown above as ‘245W’): Displays the power (in Watt) being converted from the panels into the batteries and is calculated as the battery voltage x the battery current. -
Page 9: Main Menu
‘Menu’: Indicates the function of the button below it and will enter the main menu if pressed. ‘Stats’: Is a short cut key to the STATISTICS menu. STATE INDICATORS (Shown above as ‘PPL’): – No input voltage, power circuit in off state PPT –... -
Page 10: Log History
LOG HISTORY Shown below: the run time (‘0h04’), maximum solar panel power (‘PV 248Wmx’), maximum battery voltage (‘Bat 13.1Vmx’), minimum battery voltage (’12.2Vmin’), kWh (‘0.011kWh’) and ampere hour charge (‘0.9Ah’) for the current day is automatically saved before the start of a new day and stored to the top of the log history. - Page 11 These value can be reset at any time but note that this information will be permanently lost. The second screen gives the total days the MPPT has completed along with the total kWh for those days. These values can not be reset and will be retained even if the MPPT looses power.
-
Page 12: Settings
SETTINGS Various operating parameters may be set by the user is order to achieve optimum system performance. These parameters are contained in the settings menu. To access this menu go to: MENU > SETTINGS. The user will now be prompted to enter a 5 digit code the default code is 00000 (all zeros). -
Page 13: Setting: Boost Charging
In order for this to work a optional battery temperature sensor needs to be installed. It is only necessary to install this sensor in certain instances. For more information please contact WRND. Press the NEXT key to select the menu function to change. -
Page 14: Setting: Equalize Charging
The boost charging setting determines the parameters used to fully charge the battery on a daily basis. Boost charging will commence once the battery voltage reaches the limit set below as ‘Boost volt 14.4V’. The unit will maintain this voltage for a given time (shown below as ‘Boost for 2h00’) or until the minimum charging current (shown below as ‘BstEqu end at 1.0A’) is reached. -
Page 15: Change Code
The amount of time the unit charges in equalize mode is defined and shown below as ‘Equalize for 1h00’). When the count down is done the equalization routine is complete and MPPT will revert to using the boost or float charging limit. Press the ‘Next’... - Page 16 If the new code is lost the MPPT will have to be sent back to WRND to reset – all information will be lost. This service and all costs involved will be for the...
- Page 17 Thank you for your purchase Enjoy the product...
-
Page 18: Warranty
Any other event not foreseeable by WRND. WRND’s liability for any defective Product, or any Product part, shall be limited to the repair or replacement of the Product, at WRND’s discretion. WRND does not warrant or guarantee workmanship performed by any person or firm installing its Products. - Page 19 DAMAGES. IF YOU ARE A CONSUMER THAT PURCHASED THIS PRODUCT IN A MEMBER STATE OF THE EUROPEAN UNION, YOU MAY HAVE ADDITIONAL STATUTORY RIGHTS UNDER DIRECTIVE 1999/44/EC. THESE RIGHTS MAY VARY FROM EU MEMBER STATE TO EU MEMBER STATE. SOME STATES (OR JURISDICTIONS) MAY NOT ALLOW THE EXCLUSION OR LIMITATION OF WARRANTIES OR DAMAGES, SO THE ABOVE EXCLUSIONS OR LIMITATIONS MAY NOT APPLY TO YOU.
Need help?
Do you have a question about the ProSeries MPPT and is the answer not in the manual?
Questions and answers