Advertisement
Quick Links
SCOUT
Congratulations on becoming a Scout
Cart® owner.
You will come to identify
Scout by its fine engineering, precise
construction, quality materials and ease of
use. You will love the many ways Scout
Cart® enhances your daily life, saving you
valuable time and energy. Please read this
User Guide to learn about key features
and for your safety and long-term
enjoyment of the Scout Cart®.
CAUTION:
Scout Cart® is not
designed to transport children. DO
NOT ALLOW CHILDREN to ride on the
frame or in the baskets.
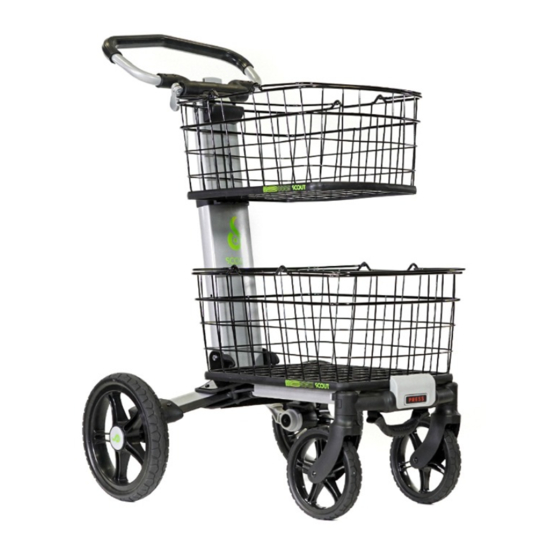
Handle
Frame Release
Telescoping
Frame
Main Frame
Rear Wheels
Attaching the Rear Wheels
Leave the frame in the folded position to attach the rear
wheels. Each rear wheel has a metal pin protruding from the
center hub (Fig. 1.) Insert the wheel pin into the pin
receptor located on the rear wheel arm (Fig. 2). Do the same
with the second rear wheel.
Figure 1
If the pin does not slide easily into the receptor, press the
wheel release button near the attachment point (Fig. 3).
Then push the wheel into place.
Attaching the Front Wheels
Attach the front wheels by
i n s e rt i n g t h e f ro n t w h e e l
assembly into the receptor on
the frame (Fig. 4).
Button
Upper Basket
(Small)
Basket
Base
Lower
Basket
Front Wheel
Assembly
Figure 2
Figure 3
Figure 4.
1
Advertisement

Summary of Contents for Scout Scout Cart
- Page 1 Figure 2 Figure 3 Figure 1 use. You will love the many ways Scout Cart® enhances your daily life, saving you If the pin does not slide easily into the receptor, press the valuable time and energy. Please read this wheel release button near the attachment point (Fig.
- Page 2 Locking the Folded Frame Figure 6. Lock the folded frame to store the Scout Cart® in a standing position. After folding the frame, grasp the handle near the thumb lever and pull the telescoping section forward until the upper basket hook (Fig.