Table of Contents
Advertisement
Quick Links
Dual Mini Sequencer Operating Instructions
Playing Sequences
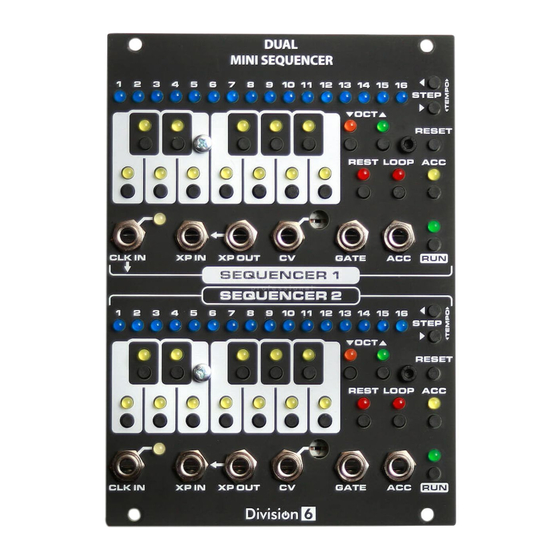
Push RUN to start playing a sequence. The RUN LED will light to tell you that you are in Run
mode. Push it again to pause. The sequencer steps can be programmed while paused.
Push RESET to stop the sequence, go to step 1, and enter Ready mode. The STEP LED will blink
to let you know that you are in Ready mode. This means that when you press RUN again, the
sequencer will play step 1 on the next clock pulse instead of skipping it and going to step 2.
Advertisement
Table of Contents

Summary of Contents for Division 6 Dual Mini Sequencer
- Page 1 Dual Mini Sequencer Operating Instructions Playing Sequences Push RUN to start playing a sequence. The RUN LED will light to tell you that you are in Run mode. Push it again to pause. The sequencer steps can be programmed while paused.
- Page 2 If you want to start on a different step, you can use the STEP LEFT and STEP RIGHT buttons to pick a different one. While in Ready mode, you can use the note/keyboard buttons to manually play tunes without messing up the sequence you have stored in memory. Gate timing will follow your button presses.
- Page 3 Clock While the sequencers are much more useful when driven by an external clock, they do include internal clocks. They are active when the sequencers are first powered on, but are disabled when an external clock pulse is received. To reactivate the internal clock, you can press and hold the RESET button for about 2 seconds (this soft-resets the sequencer).
- Page 4 Of course, if you have more sequencers (or even other devices), you can daisy-chain as many as you want. Calibration You can use the trim pot next to each CV OUT jack to calibrate the sequencers to 1 volt per octave.
- Page 5 C4 (Highest Octave) = 4.000V C3 (Higher Octave) = 3.000V C2 (Middle Octave) = 2.000V C1 (Lower Octave) = 1.000V C0 (Lowest Octave) = 0.000V The outputs of the sequencer are buffered, so they should maintain their voltages even when loaded down by another module.
-
Page 6: Selecting A Sequence
Version 2 Instructions beyond this point refer to new features found in version 2 of the sequencer firmware. You can tell if you have v2 by watching the sequencer’s boot light show; after it lights each row of LEDs sequentially, it will light the step 2 LED then the step 10 LED (for v2.0) before the clock LED starts blinking. -
Page 7: Programming A Sequence
Selecting a Song If the entire row of black keys is lit while displaying SONG/SEQUENCE SELECT, you are in SONG mode. The sequencer has 5 song memories available, which can be used to string together up to 16 sequences in any order. Each song step contains one sequence. When running and the current sequence has completed, the sequencer will advance to the next song step and play the sequence it contains. - Page 8 To program a SLUR on a step, hold down the REST button, then press the desired NOTE button for that step. Both the REST and NOTE LEDs will light. Gate Timing When you first program a note into a step, the gate timing is set to the default mode where the gate follows the timing of the clock.
- Page 9 On (Stays on for entire duration of step and doesn’t drop before the next step) • On w/ Drop (Stays on for most of step, but drops briefly before the next step) • Gate Follow (Timing follows gate timing for the step) •...
-
Page 10: Internal Clock
to. Hold the two buttons for about 1 second; the note LEDs will flash to let you know when the copy has been performed. The copy always goes from the FIRST -> SECOND button you press! • You can’t copy songs to sequences or sequences to songs •... -
Page 11: Auto Advance
The internal clock uses the PIC microcontroller’s built-in oscillator for timing, so it may not be super-accurate. We still recommend using an external clock if you’re doing something that is timing-critical. PROG/RESET Button The RESET button now has an additional function (or rather a bunch of them). It is used in conjunction with some of the other buttons on the sequencer to enable and disable various modes (as indicated by the text in the white rectangles for more common functions). - Page 12 When this mode is enabled and the sequencer is running (and not displaying SONG/SEQUENCE SELECT), You can use the note keys to temporarily transpose your entire sequence up or down. Hold down the PROG/RESET button, then tap the LOOP/LIVE XPOSE button to cycle through the different LIVE TRANSPOSE modes: On, root key at top of keyboard •...
- Page 13 If you use the RUN button to pause the sequencer then start it again, whatever transpose amount you set will be retained. If you press RESET to go back to the beginning of the sequence then the transpose amount will be cleared. There are a few other buttons that work in LIVE TRANSPOSE mode that might come in handy during a live performance: REST: Makes the next step a REST (one time only)
-
Page 14: Clock Out
With 1X disabled, the sequencer will loop internally at the end of a sequence (or song) without needing to receive a gate pulse in XP IN. It will still respond to incoming pulses, however. RUN/RESET This is another mode you can enable for XP IN. In this mode, the sequencer starts when XP IN goes high and resets when it goes low.

Need help?
Do you have a question about the Dual Mini Sequencer and is the answer not in the manual?
Questions and answers