
Summary of Contents for Sealweld SuperGun
- Page 1 Owner's Manual - Original Instructions Doc. No. 100005 Rev 0 Sealweld SuperGun® By Sealweld Corporation Content Page i Owner’s Manual - Sealweld SuperGun®...
- Page 2 The information in this manual is intended as a guide only. Read our Disclaimer on page 29. Always consult the valve manufacturers recommended maintenance procedures. Sealweld®, ValvePro® and FLOW WOLF® are registered trademarks and/or patents of Sealweld Corporation. MADE IN CANADA Revised 4/24/2014 Content ...
-
Page 3: Table Of Contents
Personal Safety ....................5 High Pressure Hose ..................5 Operating Instructions Release Valve Fundamentals ................6 How to Operate a SuperGun ................6 Loading Instructions How to Load a SuperGun ................9 Prepare for Loading ...................... 9 To Load a Cartridge ....................10 With an EZ-LOADER .................. -
Page 4: Introduction
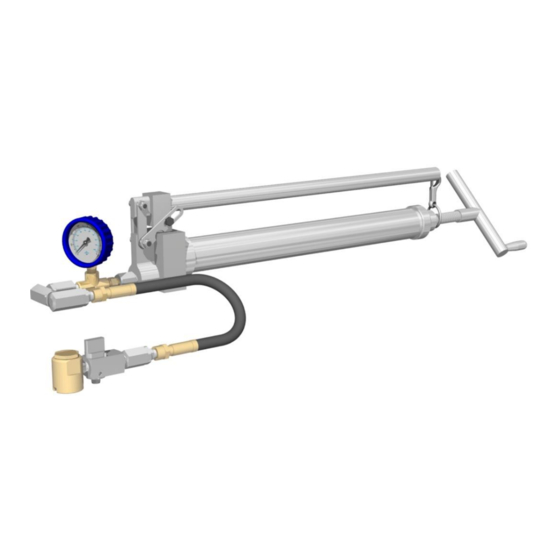
The SuperGun ships with an 18 inch (46 cm) long hose, buttonhead coupler and high pressure gauge. It is ready to load and use right out of the box. The working principle is simple; turn the crank in to prime the SuperGun, the Introduction ... - Page 5 Once the valve line pressure is exceeded product will begin to flow into the valve. When a sufficient quantity of product has been injected the SuperGun may be removed by opening the release valve then slipping off the giant buttonhead coupler from the buttonhead fitting.
-
Page 6: Technical Data
The piston can generate up to 15,000 PSI (1000 bar), but only a small volume of product is pressurized at a time. The SuperGun comes with an 18inch (46 cm) high pressure hose assembly with a 15,000PSI gauge. -
Page 7: Safety Considerations
SuperGun is not in use. See on page 21. Do not use a pump if it has been damaged. Use a mild solvent & clean cloth to keep the SuperGun in clean operating condition. NEVER carry the SuperGun by its Handle #5 unless it has been latched and secured. -
Page 8: Personal Safety
Personal Safety WARNING! Stay alert. Do not use the SuperGun while tired or under the influence of alcohol, drugs or medications. Dress properly. Always wear approved Personal Protective Equipment (PPE). Do not wear loose clothing or jewellery. Contain long hair. Keep your hair, clothing and gloves away from moving parts. -
Page 9: Operating Instructions
Release Valve #13G. How to Operate a SuperGun The SuperGun operator should be familiar with the working principals and the mechanical limitations of the pipeline valve being serviced. Before operating the SuperGun, read and remember the “... - Page 10 To prime the SuperGun, turn the Primer Rod Crank #12 clockwise until it becomes difficult to turn. IMPORTANT! Over-tightening the Primer Rod Crank #12 can damage and/or collapse the Primer Rod Assembly #9. 3. Inspect the Giant Buttonhead Coupler #13H for damage and contaminates. Clean using a mild solvent and a clean cloth if required before attaching to a fitting.
- Page 11 12. Repeat this procedure as required for each valve to be serviced. When the SuperGun is not in use always relieve the internal pressure by turning the Primer Rod Crank #12 counter-clockwise at least three turns and set the Release Valve #13G to the closed position to prevent product from escaping.
-
Page 12: Loading Instructions
End Cap #10 and the Primer Rod Crank #12. The SuperGun can be loaded from either a cartridge or bag. It can also be loaded with a stick type product. It is designed to hold up to 16 ounces (470 ml) in the Sealant Barrel #8. -
Page 13: To Load A Cartridge
The use of cartridge type lubricant, sealants and cleaners has been found to greatly reduce the risk of product contamination and trapped air in any pump. The SuperGun can be loaded with or without the use of the Sealweld EZ-LOADER®. The EZ-LOADER was designed to make loading of cartridges quick and easy. -
Page 14: Without An Ez-Loader
The image above contains an Ngrain model with an animation showing the EZ-LOADER procedure. 15. Wipe any excess product from the outside of the SuperGun with a mild solvent and a clean cloth. The SuperGun is now ready for use. -
Page 15: To Load A Bag Or Stick Type Product
Handle #5 until the new product is seen extruding from the Giant Buttonhead Coupler #13H. This will take approximately 50 strokes. 12. Wipe any excess product from the outside of the SuperGun with a mild solvent and a clean cloth. The SuperGun is now ready for use. -
Page 16: Care And Maintenance
1. Carefully follow all operating instructions and the provided below. 2. Keep all threaded connections tight. 3. Use a mild solvent or penetrating fluid and a clean lint free cloth to keep the SuperGun clean. 4. Replace or repair any leaking or failed components. “Troubleshooting”... -
Page 17: Supergun Maintenance
IMPORTANT! Use care when using a vise or pipe vise in the following procedures. Over tightening these vises can damage or distort parts and result in additional costly repairs. Tighten only enough to secure the SuperGun or part in the vise. -
Page 18: Primer Rod Assembly Removal And Repair
3. Turn the Primer Rod Crank #12 counter-clockwise at least three full turns to release internal pressure on the Primer Rod Assembly #9. 4. Carefully place the SuperGun into a vise by the Head #6 and disconnect the Handle Clasp #11. 5. Remove the Sealant Barrel #8 from the Head #6. - Page 19 21. Inspect all parts for wear and damage and replace as required. Measure the length of Spring #9F. It should measure approximately two inches (5 cm). If not, it has collapsed and needs to be replaced. Care and Maintenance Page 16 Owner’s Manual- Sealweld SuperGun®...
- Page 20 Sealant Barrel #8 until the Leather Cup #9D is flush with the end of the Sealant Barrel #8. The head assembly end of the Sealant Barrel #8 is the end of the barrel with the most threads. Care and Maintenance Page 17 Owner’s Manual- Sealweld SuperGun®...
-
Page 21: Piston Cartridge Assembly Replacement
3. Turn the Primer Rod Crank #12 counter-clockwise at least three full turns to release internal pressure on the Primer Rod Assembly #9. 4. Screw the SuperGun into a vise by the Head #6 with the Handle #5 up. 5. Remove the Fulcrum Bolt #3F and Nylock Nut #3D. -
Page 22: Hose Assembly Replacement
Assembly parts can also be bent through mishandling or careless use. The Linkage Assembly Kit #R-SG-17 contains all the replacement parts you will need to extend the service life of the SuperGun. To disassemble the Linkage Assembly #3, follow these steps: 1. - Page 23 2. Open Release Valve #13G; check the High Presure Gauge Assembly #13C to make sure all hose pressure is relieved from the SuperGun. 3. Place the SuperGun into a vise by the Sealant Barrel #8 with the Handle #5 up and the Fulcrum Link #3E facing towards you.
-
Page 24: Pressure Gauge Replacement
They are also design so the pins or bolts protrude slightly out the ends of the Nylock Nuts #3D. 6. Place the Handle #5 over the SuperGun and position the two Harness Links #3A so the Handle Bushing #3G is in-between the Handle Pin #3B holes and slide in the Handle Pin #3B. - Page 25 Primer Rod Assembly #9. 4. Connect the Handle #5 to the Handle Clasp #11. 5. Clean off any product or contaminants such as sand or dirt from the SuperGun and the Giant Buttonhead Coupler #13H. NOTE: Some operators have been known to place an old glove or a plastic bag over the Giant Buttonhead Coupler #13H before storing to reduce contamination.
-
Page 26: Parts Guide
Parts Guide Parts Illustration Parts Guide Page 23 Owner’s Manual- Sealweld SuperGun®... -
Page 27: Parts List
Parts List Sealweld SuperGun® - Complete G-SGUN-C Illustration # Description Order Part # Qty. Req'd FLOW WOLF® Check Valve Nut R-SG-16 Check Valve Spring R-SG-01A Ball - 1/2” R-SG-16A Linkage Assembly R-SG-17 Harness Links R-SG-17A Handle Pin R-SG-17B1 Head Pin... -
Page 28: How To Order Supergun Parts
SuperGun Pump Hose Assembly - Complete H-S-HOSE Adapter – 1/4” Male X 1/4” Male H-AD-4M4M High Pressure TEE 1/4” F X 1/4” F X 1/4” F H-T-444 High Pressure Gauge Assembly – 15,000 PSI H-GD-01C ‘Z’ Swivel 1/4” Male X 1/2” - 27 Male H-SV-Z1 Extra High Pressure Hose - 18"... - Page 29 Fulcrum Bolt Handle Bushing Primer Rod Assembly Repair Kit R-SG-19 This kit contains all the parts you will need to replace the Sealant Barrel #8 internal moving parts in the SuperGun. Illustration # Description Qty. Req'd End Nut Bonded Seal - 3/8"...
-
Page 30: Troubleshooting
® use right out of the box. It is not necessary to test a brand new SuperGun however the SuperGun should be tested periodically to assure all parts are working BEFORE working on a valve under pressure. - Page 31 2. Prime the SuperGun by turning the Primer Rod Crank #12 clockwise until it becomes difficult to turn. Do not over tighten. If Primer Rod Crank #12 does not become difficult to turn it could indicate the Primer Rod Assembly #9 is damaged.
- Page 32 11. Attach the Handle Clasp #11 to Handle #5 and turn the Primer Rod Crank #12 counter-clockwise at least three full turns to relieve internal pressure. This completes the test. If you made it through all 11 steps without incident your SuperGun is in perfect working condition.
-
Page 33: Warranty
Sealweld Corporation and its affiliates will not be liable for direct, indirect (including, but not limited to any loss of business or anticipatory profits), incidental, or consequential damages resulting from your reliance on the information contained herein, even if the information was false, misleading, or in contravention to law, statute, or regulation, and even if Sealweld Corporation or any of its affiliates has been advised of the possibility of such. -
Page 34: Ec Declaration Of Conformity
Basic concepts, general principles for design – Part 1 EN_ISO 12100-1 Basic concepts, general principles for design – Part 2 EN_ISO 12100-2 Manufacturer: Distributor Europe: Sealweld Corporation - Canada Multimetaal Maintenance B.V. _________________ ____________________ Signature Signature Warranty Page 31 Owner’s Manual- Sealweld SuperGun®... -
Page 35: Contact Information
1-403-236-0043 1-403-236-5487 EMAIL support@valvepro.com http://www.valvepro.com Multimetaal Maintenance B.V. Scheepmakersweg 23 1786 PD DEN HELDER Postbus 703 1780 AS Den Helder THE NETHERLANDS PHONE +31 (0) 223-611120 +31 (0) 223-611125 EMAIL info@multimetaal.com http://www.multimetaal.com/ Warranty Page 32 Owner’s Manual- Sealweld SuperGun®...
Need help?
Do you have a question about the SuperGun and is the answer not in the manual?
Questions and answers