Table of Contents
Advertisement
Available languages
Available languages
MANUALE DI ISTRUZIONI
INSTRUCTIONS FOR USE
BEDIENUNGSANLEITUNG
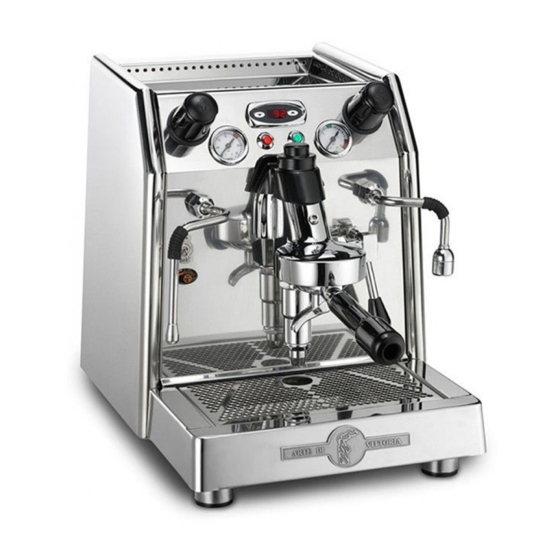
JUNIOR EXTRA
OPTION
TCI: CONTROLLO TEMP. INDIPENDENTE (SAVE ENERGY SYSTEM)
TCI: INDEPENDENT TEMP. CONTROL (SAVE ENERGY SYSTEM)
TCI: UNABHÄNGIGE TEMPERATURKONTROLLE (SAVE ENERGY SYSTEM)
CAPPUCCINATORE NERO
BLACK CAPPUCCINO MAKER
CAPPUCCINO - SCHÄUMER SCHWARZ
ATTACCO A RETE IDRICA
DIRECT WATER CONNECT
DIREKTEN WASSERANSCHLUSS
ADATTATORE CIALDE
POD ADAPTER
ADAPTER FÜR KAFFEEPADS
Advertisement
Table of Contents

Summary of Contents for BFC srl JUNIOR EXTRA
- Page 1 MANUALE DI ISTRUZIONI INSTRUCTIONS FOR USE BEDIENUNGSANLEITUNG JUNIOR EXTRA OPTION TCI: CONTROLLO TEMP. INDIPENDENTE (SAVE ENERGY SYSTEM) TCI: INDEPENDENT TEMP. CONTROL (SAVE ENERGY SYSTEM) TCI: UNABHÄNGIGE TEMPERATURKONTROLLE (SAVE ENERGY SYSTEM) CAPPUCCINATORE NERO BLACK CAPPUCCINO MAKER CAPPUCCINO - SCHÄUMER SCHWARZ ATTACCO A RETE IDRICA...
- Page 2 IL PRODOTTO NON PUO’ ESSERE AVVIATO ALLO SMALTI- MENTO NEL NORMALE CICLO DI RACCOLTA RIFIUTI, MA SMALTITO NEI CENTRI AUTORIZZATI. THE PRODUCT CANNOT BE DISPOSED OF AS NORMAL WASTE, BUT MUST BE TAKEN TO AN AUTHORIZED DISPOSAL CENTRE. DAS PRODUKT DARF NICHT DEM NORMALEN ABFALLKREIS- LAUF ZUGEFÜHRT WERDEN, SONDERN IST IN AUTORISIER- TEN ZENTREN ZU ENTSORGEN.
- Page 3 INDICE / INDEX ITALIANO ______________________________________________ Avvertenze di sicurezza Controindicazione d’uso Presentazione Accessori in dotazione Installazione Accensione macchina Erogazione caffè Erogazione vapore e acqua calda Manutenzione Mini addolcitore a resine Informazioni pratiche e suggerimenti Dichiarazione di conformità ENGLISH ______________________________________________ 10-18 Safety warnings Precautionary measures Introduction Accessories supplied...
-
Page 4: Avvertenze Di Sicurezza
MACCHINE PER CAFFÈ ESPRESSO MANUALE di ISTRUZIONE 1. AVVERTENZE DI SICUREZZA ◆ Prima di collegare la macchina accertarsi che i dati di targa siano rispondenti a quelli della rete di distribuzione elettrica. Collegare l’apparecchio solo a impianto e prese di corrente aventi portata minima di 10 A e dotate di efficiente messa a terra e salvavita. - Page 5 2. CONTROINDICAZIONE D’USO Le macchine sono destinate ad uso esclusivamente alimentare per cui é vietato l’impiego di liquidi o materiali di altro genere che possano generare pericoli e inquinare gli erogatori. Questo apparecchio è destinato all’uso domestico e applicazioni simili, ad esempio: aree di ristoro per il personale di uffici, negozi e/o altri ambienti di lavoro; aziende agricole; utilizzo da parte di clienti di alberghi, motel o altri ambienti a carattere residenziali; negli ambienti tipo bed and breakfast. Il costruttore declina ogni responsabilità per danni a persone o cose dovuti ad uso improprio, errato o irragionevole e a riparazioni effettuate da personale non qualificato.
-
Page 6: Accessori In Dotazione
4. ACCESSORI IN DOTAZIONE Filtro una tazza Filtro cieco Filtro due tazze 2 Molle fermafiltro Baccuccio una tazza Beccuccio due tazze Pressino Mini addolcitore 2 Portafiltri Spazzolino di pulizia Cucchiaino dosatore... -
Page 7: Installazione
5. INSTALLAZIONE Prima di azionare l’interruttore di accensione generale ON/OFF (3) verso l’alto, si rac- comanda di caricare con acqua la tanica posteriore posta sotto la griglia portatazze (11). 1) Togliere l’imballo, verificando all’istante l’integrità della macchina e che non abbia subito danni. 2) Posizionare l’apparecchio sopra un tavolo o bancone robusto ed in piano, vicino ai punti di colle- gamento elettrico ed idraulico. -
Page 8: Accensione Macchina
in dotazione). Infine mettere l’addolcitore in fase di lavoro e verificare che non ci siano delle perdite. Per un uso ottimale dell’apparecchio, verificare che la pressione di alimentazione idrica superi 1 bar (100 kPa) e sia inferiore a 6 bar (600 kPa). Nel caso la pressione in entrata dell’acqua superi i 6 bar, si consiglia l’utilizzo di un riduttore di pressione. -
Page 9: Manutenzione
5) Azionare la leva manuale (8), laterale al gruppo, verso l’alto. 6) Al raggiungimento della quantità di caffè desiderata, fermare l’e- rogazione azionando la leva manuale (8) verso il basso. 7) Se si desidera fare altri caffè, togliere il portafiltro (9) ruotandolo da destra a sinistra e vuotare i fondi di caffè. Ripetere poi le opera- zioni sopra elencate. 8) Per ottenere due caffè, utilizzare il portafiltro (9) a due uscite con due dosi del cucchiaino dosatore. 9) Acquistando l’apposito adattatore (option), è possibile utilizzare anche la cialda di caffè preconfezionata da 7 grammi o 14 grammi, rispettivamente per una o due tazze di caffè (Foto 3). - Page 10 6- Sostituire il filtro cieco nel portafiltro con il filtro corretto e fare un espresso da eliminare. ◆ Le parti esterne della macchina devono essere pulite con un panno umido e non utilizzare mai de- tersivi o sostanze abrasive. Non pulire la macchina con getti d’acqua. ◆ Per pulire il portafiltro ed i cestelli del filtro, preparare in un contenitore di plastica o acciaio inox una soluzione con acqua calda e detergente, ed immergerli nella soluzione per almeno 30 minuti. Sciac- quarli con acqua pulita. Una frequente pulizia consentirà di ottenere un caffè dolce, oltre a prolungare la durata della vostra macchina per caffè.
- Page 11 resta costantemente pulita. ◆ Per gustare un ottimo caffè: - acquistare una buona miscela di caffè in grani. - conservare il caffè in grani in un luogo asciutto. - macinare il caffè in grani tutte le volte che si desidera un caffè. - dosare e pressare leggermente la macinatura per renderla più omogenea. ◆ Per ottenere un caffè bollente: - lasciare sempre inserito il portafiltro, con relativo filtro vuoto, nel gruppo erogatore caffè. - sciaquare il portafiltro ed il filtro con acqua bollente premendo l’interruttore caffè. - con la stessa acqua bollente pre-riscaldare le tazze. ◆ Per ottenere un buon cappuccino: - utilizzare un recipiente alto e stretto riempito per circa metà di latte. - immergere la lancia vapore per 1 cm.
-
Page 12: Dichiarazione Di Conformità
DICHIARAZIONE DI CONFORMITÀ Prodotto : ◆ Macchine per caffè espresso Modello : ◆ 1 GR VI B.F.C. srl dichiara sotto la propria responsabilità, che il prodotto soddisfa per progettazione e costru- zione i requisiti della direttiva: 1) DIRETTIVA BASSA TENSIONE 2006/95/CE (ex 93/68/CEE) La conformità è stata verificata con l’ausilio delle seguenti norme armonizzate: CEI EN 60335-1 / CEI EN 60335-2-14 / CEI EN 60335-2-14⁄A1 CEI EN 60335-2-15 / CEI EN 60335-2-15⁄A1 / CEI EN 60335-2-15⁄A2... -
Page 13: Safety Warnings
ESPRESSO COFFEE MACHINES INSTRUCTIONS for USE 1. SAFETY WARNINGS ◆ Check that the data on the machine corresponds to that of the electrical supply network, before connecting the equipment. Only connect the appliance to an efficiently earthed power socket having a minimum capacity of 10A, and fitted with an RCD. ◆ If the plug supplied is unsuitable for your power socket, have the plug replaced by a qualified elec- trician. ◆ Adaptors, multiple sockets and /or extensionsmust not be used. ◆ When in doubt, request a detailed diagram of the supplied power from a qualified electrician. -
Page 14: Precautionary Measures
2. PRECAUTIONARY MEASURES This machine may only be used with foodstuffs. It cannot be used for liquids or any other kind of product that could damage and pollute it. This appliance is intended to be used in household and similar applications such as: staff kitchen areas in shops, offices and other working environments; farm houses; by clients in hotels, motels and other residential type environments; bed and breakfast type environments. The manufacturer cannot be held responsible for damage to people or things caused by unsuitable, erroneous or irrational use and by unauthorised repair. 3. INTRODUCTION This booklet is a guide to rapid and easy use and maintenance of coffee machines. -
Page 15: Accessories Supplied
4. ACCESSORIES SUPPLIED One - cup filter Blind filter Two - cups filter 2 Filter - retaining springs One - cup spout Two - cups spout Coffee tamper Mini water softener 2 Filter holders Cleaning brush Measuring spoon... -
Page 16: Installation
5. INSTALLATION Before lifting the main ON/OFF switch (3) fill the rear water tank under the cup shelf (11). 1) Remove the coffee machine from its parcking and check that it has not been damaged. 2) Place the appliance on a stable top, close to the mains sockets and water line connections. Check that the voltage of your mains supply corresponds to that indicated in the technical specifica- tions. 3) Remove the upper cover grid (11), take out the water tank (located inside the machine) and rinse it (Photo 1). 4) Fill the tank with approx. -
Page 17: Coffee Delivery
on the water softener and check for any leaks. For optimal use of the appliance, check that the water supply pressure exceeds 1 bar (100 kPa) and be less than 6 bar (600 kPa). If the incoming water pres- sure exceeds 6 bar, we recommend to use a pressure reducer. 3) Fill the tank with approx. -
Page 18: Maintenance
7) If you want to make more coffee remove the filter holder (9) by turning it from right to left and empty out the used grounds. Repeat the above operations. 8) To obtain 2 coffees, use the 2-cup filter holder (9) with two meas- uring spoonfuls. 9) If the optional adapter is fitted, you can also use pre-packaged cof- fee pods (7gr or 14 gr), which make one cup and two cups of coffee respectively (Photo 3). Always remember to clean the filters thoroughly when changing from ground to pod coffee. Take care when using the coffee maker. The high temperatures of the steam nozzle (6), hot water nozzle (7) and chromed filtering unit (14) could cause burns. - Page 19 ◆ Clean the external parts of the machine with a damp cloth. Never use detergents or abrasive sub- stances. Do not use jets of water to clean the machine. ◆ To clean the filter holder and the filters, leave them to soak for at least 30 minutes in a solution of hot water and detergent prepared in a plastic or stainless steel container. Rinse them with clean water. Frequent cleaning allows a smooth coffee to be obtained as well as prolonging the life of your coffee maker.
- Page 20 - grind the coffee beans fresh when you make coffee. - measure and press the ground cofffe slightly to pack it more uniformly. ◆ For boiling hot cofffe: - leave the filter holder with the empty empty filter in the coffee distribution unit at all times. - rinse the filter holder and filter with boiling hot water by pressing the coffee switch. - use the same boiling water to pre-heat the cups. ◆ For a delicious cappuccino: - use a tall narrow milk pitcher half full. - immerse the steam nozzle 1 cm into the milk. - open the steam tap with the knob. ◆...
-
Page 21: Declaration Of Conformity
DECLARATION OF CONFORMITY Product : ◆ Espresso coffee machines Types : ◆ 1 GR VI B.F.C. srl declare here with on our own responsability that the above - metioned product meets the requirements of the Directive: 1) LOW VOLTAGE DIRECTIVE 2006/95/CE (ex 93/68/CEE) Confromity has been controlled with the aid of the following harmonized standards: CEI EN 60335-1 / CEI EN 60335-2-14 / CEI EN 60335-2-14⁄A1 CEI EN 60335-2-15 / CEI EN 60335-2-15⁄A1 / CEI EN 60335-2-15⁄A2... - Page 22 ESPRESSOMASCHINEN BEDIENUNGSANLEITUNG 1. SICHERHEITSHINWEISE ◆ Vor Anschluss der Espressomaschine überzeugen Sie sich bitte davon, dass die auf dem Typenschild angegebenen Daten mit denen des am Aufstellungsort verfügbaren Stromnetzes übereinstimmen. Das Gerät nur an eine Netzsteckdose anschließen, welche eine Mindeststromstärke von 10A besitzt, und mit einer funktionstüchtigen Erdung ausgerüstet und einem Schutzschalter abgesichert ist.
- Page 23 2. UNZWECKMÄSSIGER GEBRAUCH Die Espressomaschine darf nur für den bestimmungsgemäßen Gebrauch eingesetzt werden, es ist ver- boten andere Flüssigkeiten zu verwenden, durch die Gefahren entstehen und welche die Auslässe kon- taminieren können. Dieses Gerät ist für den Einsatz in häuslichen und vergleichbaren Umgebungen bestimmt wie: Personalküchen in Geschäften, Büros und sonstige Arbeitsbereiche; Bauernhöfe; Ver- wendung durch Hotel- und Motelkunden sowie in sonstigen Wohnbereichen; Beherbergungsbetriebe (z.B.
-
Page 24: Mitgeliefertes Zubehör
4. MITGELIEFERTES ZUBEHÖR Sieb für eine Tasse Blindsieb Sieb für zwei Tassen 2 Klemmfedern Auslauf für eine Tasse Auslauf für zwei Tassen Pressstempel Granulatfilter 2 Siebträgern Reinigungsbürste Messlöffel... - Page 25 5. INSTALLATION Vor dem ersten Betätigen des Hauptschalters ON/OFF (3) nach oben, empfehlen wir, den Tank, der sich unter dem Warmhaltefach für die Tassen (11) befindet, mit Wasser zu befüllen. 1) Entfernen Sie die Verpackung und kontrollieren Sie umgehend die Unversehrtheit des Gerätes. 2) Positionieren Sie das Gerät auf einer ebenen und tragfähigen Fläche, in der Nähe der Stromquelle bzw.
- Page 26 Zum Anschluss an das Wassernetz, rufen Sie einen qualifizierten Techniker. Der Techniker soll durch den Ausgestatteten Flexschlauch (3/8“) die Verbindung für der Wasser Ladung an dem Reiniger (nicht in der Ausstattung der Maschine vorgesehen) verbinden. Zuletzt den Wasserkreislauf öffnen und sich vergewissern, daß kein Wasser an den Verbindungsstellen austritt. Für die optimale Nutzung des Ge- rätes, den Wasserdruck, der zwischen 1 bar (100 kPa) und 6 bar (600 kPa) liegen muss, prüfen.
-
Page 27: Wartung
2) Den Kaffee mit dem geeigneten Pressstempel anpressen. 3) Den Siebträger (9) in die Kaffee-Brühgruppe (14) von links nach rechts drehend bis zur Arretierung desselben einsetzen. 4) Eine Tasse unter den Siebträger (9) stellen. 5) Den manuellen Abgabehebel (8), an der Seite der Kaffee-Brüh- gruppe, nach oben umlegen. 6) Nach dem Erreichen der gewünschten Kaffeemenge, die Abgabe durch Umlegen des Hebels (8) nach unten beenden (Ausgangsstellung). 7) Um weiteren Kaffee zuzubereiten, den Siebträger (9) von rechts nach links drehen und die Kaffeereste entsorgen. Wiederholung der oben aufgeführten Vorgänge. 8) Für die Abgabe von 2 Kaffee den Siebträger (9) mit 2 Ausläufen mit zwei Dosierlöffeln gefüllt benutzen. - Page 28 3- Aktivieren Sie, wie bei der Kaffeezubreitung, die Abgabe für 10 Sekunden, danach für 10 Sekun- den schließen. Fünfmal wiederholen. Wasser mit Schaum vermischt wird aus dem Auslassventil in die Tropfschale freigesetzt. 4- Den Siebträger herausnehmen. Die Kaffee-Brühgruppe (13) einschalten und den Siebträger mit dem warmen Wasser aus der Kaffee-Brühgruppe (13) ausspülen. Abgabe beenden. 5- Den Siebträger wieder in die Kaffee-Brühgruppe (13) einrasten. Zum Spülen den Vorgang unter Punkt 3 ohne Reinigungsmittel wiederholen. 6- Ersetzen Sie den Blindfilter im Siebträger mit einem richtigen Filter und bereiten Sie einen Espres- so zu, den Sie verwerfen. ◆ Die äußeren Gehäuseteile der Maschine werden mit einem weichen, leicht feuchten Tuch gereinigt. Verwenden Sie keine Reinigungs- bzw.
- Page 29 welcher über oder unter dem empfohlenen liegt, sind periodische Kontrollen und eine entsprechende Reinigung der Hydraulikleitungen durch technisches Personal angebracht. In Abhängigkeit von der geographischen Lage und einer möglichen Zeitraum der Inakti- vität, es ist empfohlen, eine spezifische Reinigungs der Hydraulikkreislauf von qualifizier- tem Personal auszuführen. ◆ Um bestmögliche Ergebnisse zu erzielen, müssen Sie gemahlenen Kaffee für die Bar verwenden, der einem präzisen Mahlgrad entspricht. Ihrem Röster oder Geschäft sollten Sie nicht nur Ihre Lieblings- mischung nennen, sondern auch diese Mahlangabe machen.
- Page 30 KONFORMITÄTSERKLÄRUNG Produkt : ◆ Espressomaschine Modell : ◆ 1 GR VI B.F.C. srl erklärt hiermit als Verantwortlicher, dass das Produkt hinsichtlich Konzeption und Kon- struktion die Anforderungen der folgenden Richtlinien erfüllt: 1) NIEDERSPANNUNGSRICHTLINE 2006/95/CE (ex 93/68/CEE) Die Konformität wurde anhand der folgen harmonisierten Normen geprüft: CEI EN 60335-1 / CEI EN 60335-2-14 / CEI EN 60335-2-14⁄A1 CEI EN 60335-2-15 / CEI EN 60335-2-15⁄A1 / CEI EN 60335-2-15⁄A2 2) EMV RICHTLINIE...
Need help?
Do you have a question about the JUNIOR EXTRA and is the answer not in the manual?
Questions and answers