Table of Contents
Advertisement
Quick Links
Advertisement
Table of Contents

Related Manuals for Avnet SmartEdge

Summary of Contents for Avnet SmartEdge
- Page 1 SmartEdge Industrial IoT Gateway User Guide Version 1.1, 12/2019...
-
Page 2: Revision History
SmartEdge Industrial IoT Gateway User Guide REVISION HISTORY V1.0 Initial Release 20190820 V1.1 Update formatting, links, content 20191217 http://www.element14.com/gateway Page 2... -
Page 3: Table Of Contents
SmartEdge Industrial IoT Gateway User Guide TABLE OF CONTENTS REVISION HISTORY INTRODUCTION / OVERVIEW 1.1. IMPORTANT SAFETY INFORMATION 1.2. INTERNAL SYSTEM VIEW 1.3. PACKING LIST HARDWARE DESCRIPTION 2.1. BLOCK DIAGRAM 2.2. SPECIFICATIONS RASPBERRY PI 3 CORE STORAGE MEDIUM INPUT POWER ENVIRONMENTAL DIMENSIONING &... - Page 4 SmartEdge Industrial IoT Gateway User Guide 3.1. POWER INPUT 3.2. INTERFACES USB 2.0 ETHERNET RESET BUTTON HDMI ONBOARD DIGITAL I/O ONBOARD RS232/485 CANBUS INTERNAL MPCIE SLOT INTERNAL RASPBERRY PI HAT EXPANSION SLOT 3.3. FUNCTION SELECTION JUMPERS RS232/485 JUMPER CANBUS JUMPER WATCHDOG JUMPER 3.4.
- Page 5 SmartEdge Industrial IoT Gateway User Guide 4.4. DIFFERENCES FROM STANDARD RASPBERRY PI CUSTOM BOARD TYPE eMMC UPDATE PROCEDURE ON BOARD PERIPHERALS IOTCONNECT DETAILS 5.1. USAGE VIEW SENSORS OTA UPDATES 5.2. CONFIGURING THE IOTCONNECT SDK DEFAULT WIFI ACCESS POINT CREDENTIALS MODIFY LOCAL CONFIGURATION EXAMPLE 5.3.
- Page 6 SmartEdge Industrial IoT Gateway User Guide GET WIFI ACCESS POINT LISTING SET WIFI CLIENT SSID & PSK GET WIFI CLIENT CONNECTION STATUS SET NEW IOTCONNECT CREDENTIALS START IOTCONNECT SDK AND DISABLE REST API & WIFI AP READ IOTCONNECT SDK CONFIGURATION...
-
Page 7: Introduction / Overview
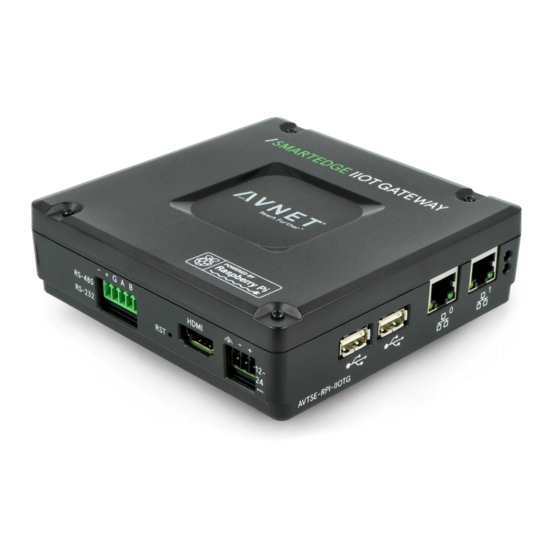
User Guide 1. INTRODUCTION / OVERVIEW The Avnet SmartEdge Industrial IoT Gateway connects your sensors and other devices to the cloud. This allows you to view status and control connected devices on a customizable web portal from any internet connected location. -
Page 8: Packing List
SmartEdge Industrial IoT Gateway User Guide 1.3. PACKING LIST Avnet SmartEdge IIoT Gateway System Parts Kit: Extension ring: install to increase height of enclosure for Raspberry Pi HATs DIN rail mount with screws: install with flat head screws ... -
Page 9: Hardware Description
SmartEdge Industrial IoT Gateway User Guide 2. HARDWARE DESCRIPTION 2.1. BLOCK DIAGRAM GPIO GPIO RS232/ FCTRY RESET GPIO Serial XTAL XTAL Controller Controller 14.7456M 16.00M J8 GPIO 40pin chip DUAL microUSB WiFi 802.11 b/g/n Bluetooth 4.2 2.4GHz band DUAL USB Hub/... -
Page 10: Environmental
Selectable timeout (1-255 seconds) TRUSTED PLATFORM MODULE (TPM) & SECURE BOOT SLB9670 TCG 2.0 Trusted Platform Module Secure Boot Option when used with Avnet's Image REAL-TIME CLOCK (RTC) WITH BATTERY BACKUP PCF8563 real-time clock BR1225 backup battery http://www.element14.com/gateway... -
Page 11: External Connections
SmartEdge Industrial IoT Gateway User Guide 2.3. EXTERNAL CONNECTIONS DC-INPUT 12VDC - 24VDC +/- 10% Recommended Wire: 18-24AWG Solid or 18-22AWG Stranded Install Protective Earth Wire DC-IN Terminal Block Connections Symbol Signal Name Protective Earth GND 0V (GND) -
Page 12: Isolated Canbus
SmartEdge Industrial IoT Gateway User Guide ISOLATED CANBUS WARNING! DO NOT INSTALL DCIN PLUG INTO CANBUS PORT! THIS WILL DESTROY THE CANBUS DRIVER AND TERMINATION RESISTOR! MCP2515 CAN Controller Recommended Cable: Shielded Twisted Pair, 120ohm impedance (Belden 3105A) ... -
Page 13: Internal Expansion
SmartEdge Industrial IoT Gateway User Guide 2.4. INTERNAL EXPANSION USB HEADER 2x4 header with two USB ports for optional internal USB devices Specially designed HATs can use USB USB Header (J12) Signal Name Signal Name Vbus Vbus USB1-... -
Page 14: Hat Expansion Slot
SmartEdge Industrial IoT Gateway User Guide HAT EXPANSION SLOT Support for standard Raspberry Pi HAT boards Both HAT and mPCIe card can be installed (check for any interference) Standard device-tree overlays can be used Enclosure expansion ring can increase the enclosure height ... - Page 15 SmartEdge Industrial IoT Gateway User Guide Raspberry Pi HAT Expansion Connector (J8) Signal Name Signal Name 3.3Vout 5Vout I2C1_SDA (GPIO2) 5Vout I2C1_SCL (GPIO3) GPIO4 GPIO14 GPIO15 GPIO17 GPIO18 GPIO27 GPIO22 GPIO23 3.3Vout GPIO24 GPIO10 GPIO9 GPIO25 GPIO11 GPIO8 GPIO7 ID_SD (GPIO0)
-
Page 16: Usage
3. USAGE For basic operation, the Avnet SmartEdge IIoT Gateway requires a power connection along with internet access. A mobile App can be used to connect the Gateway to the IoTConnect cloud solution, and create a new user account to access it. -
Page 17: Onboard Rs232/485
SmartEdge Industrial IoT Gateway User Guide ONBOARD RS232/485 You can use the onboard RS232/485 interface as a serial console, Modbus RTU interface, or other serial usages. The RS-232/RS-485 port is configured by default for 2-wire RS-485 operation with termination enabled. On board jumpers can reconfigure the port for full duplex or RS-232 signaling. -
Page 18: Function Selection Jumpers
SmartEdge Industrial IoT Gateway User Guide 3.3. FUNCTION SELECTION JUMPERS The RS232/485, CANBUS, and WATCHDOG have internal jumpers to set bus signaling, termination, function, etc. The lid must be removed to access these jumpers. Jumper locations RS232/485 settings CANbus Watchdog... -
Page 19: Rs232/485 Jumper
SmartEdge Industrial IoT Gateway User Guide RS232/485 JUMPER Term [default installed]: Install to enable RS422/485 bus termination (bus should be terminated on both ends only) Shdn: Install to shutdown the transceiver (disable) Slew: Install to use slow slew rate. This reduces EMI emissions but limits maximum bandwidth ... -
Page 20: Iotconnect Cloud Enrollment
Follow this installation process to connect your Avnet SmartEdge IIoT Gateway to the cloud. Connect your SmartEdge Gateway to your Ethernet network, if available, by using one of the two Ethernet Ports. If using wireless, this will be set up in a later step using the mobile App. - Page 21 7. To add a device, tap lower right symbol , "IotGateway_xxxxxxxx". WiFi Password is then tap "Add Device" + "IoTConnect" (case sensitive) 10. After a minute, your device should appear in 9. Optionally, connect your SmartEdge the Device List Gateway to your local WiFi network http://www.element14.com/gateway Page 21...
- Page 22 SmartEdge Industrial IoT Gateway User Guide 12. Tap the sensor to view sensor readings 11. Tap your device to see the device details http://www.element14.com/gateway Page 22...
-
Page 23: Image Update
SmartEdge Industrial IoT Gateway User Guide 3.5. IMAGE UPDATE The onboard eMMC storage device can be mounted as a drive on another PC. This will allow re-imaging the Gateway. REQUIREMENTS Linux or Windows PC USB Type A plug to microUSB plug data cable (charger cables without data signals will not work) ... -
Page 24: Writing A New Image Or Saving Existing
Write the image to the Gateway using an image writing tool. Important: if not using balenaEtcher, you must unzip the image prior to writing. 3.6. SYSTEM CUSTOMIZATION The SmartEdge IIoT Gateway system can be extended with additional hardware or software as needed for your application. HARDWARE CUSTOMIZATION The standard Pi HAT expansion connector opens up a wide variety of ready-made hardware solutions. - Page 25 The gateway has the NodeRed project baseline installed on the system. By default the service is not started. Additional NodeRed modules will be provided for the device, as they are currently being developed by Avnet. For more information on NodeRed and how to use it, refer to the following link: https://nodered.org/docs/getting-...
-
Page 26: Software Configuration
4. SOFTWARE CONFIGURATION 4.1. AVNET IMAGE The unit comes pre-loaded with a special version of Raspbian. Due to differences in the Avnet SmartEdge IIoT Gateway compared with a standard Raspberry Pi, standard Raspbian images won't boot without modification. See section 4.4 for details. -
Page 27: Secure Boot
The Gateway has an optional one-time "switch" to enable a secure boot feature Once enabled, the processor will ensure only Avnet signed boot files are executed by the processor. Other files will cause the boot process to halt without explanation (unit will appear dead!) ... -
Page 28: Other Software
It is important to understand these differences if trying to build your own kernel for the Gateway. CUSTOM BOARD TYPE The addition of eMMC required creation of a new Pi board type called "custom". The Avnet SmartEdge IIoT Gateway uses this type. In response, the Raspberry Pi boot firmware searches for "/boot/bcm2710-rpi-custom.dtb" and "/boot/dt-blob.bin"... -
Page 29: On Board Peripherals
ON BOARD PERIPHERALS The Avnet SmartEdge IIoT Gateway has several onboard peripherals that a standard Pi does not. Many of these peripherals connect to the SPI2 bus on the higher GPIOs, freeing up the GPIOs on the HAT for usage. -
Page 30: Iotconnect Details
5.2. CONFIGURING THE IOTCONNECT SDK As an initial step, you should configure your Gateway using the mobile App "Avnet IoTConnect" for iOS and Android. See section 3.4 for configuration steps. One sensor, CpuTemperature, is enabled by default and reported to the cloud. -
Page 31: Example
SmartEdge Industrial IoT Gateway User Guide For the CloudSDKDefault options, you should add the section names [CloudSDKDefaultObject<xxx>] sequentially numbered and update the DefaultObjectCount in the CloudSystemControl section accordingly EXAMPLE You can add/modify the python code in user_functions.py. The user_callbackMessage(msg) receives COMMANDS from the cloud and user_Initialize() is called when the SDK starts to contain any custom initialization code. -
Page 32: Steps Required
SmartEdge Industrial IoT Gateway User Guide STEPS REQUIRED Find the IP addresses for the connected Gateway(s) Read /DeviceID to get the device's serial number. You can use this to select the files needed for that device. If you are unsure just issue the REST command to all IP addresses and if it responds then proceed with that Device ID. -
Page 33: References
WPC (India) SRRC (China) SIMPLIFIED EU DECLARATION OF CONFORMITY Hereby, Avnet Inc., declares that SmartEdge IIoT Gateway is in compliance with Directive 2014/53/EU. The full text of the EU declaration of conformity is available at the following internet address: element14.com/gateway... - Page 34 SmartEdge Industrial IoT Gateway User Guide Article 3.1 (b) electromagnetic compatibility EN 301 489-1 V2.1.1: electromagnetic compatibility (EMC) standard for radio equipment and services; Part 1: Common technical requirements EN 301 489-17 V3.1.1: electromagnetic compatibility (EMC) standard for radio equipment and services; Part 17: Specific conditions for broadband data transmission systems ...
-
Page 35: Schematic References
SmartEdge Industrial IoT Gateway User Guide 6.2. SCHEMATIC REFERENCES CANBUS RS232/RS485 http://www.element14.com/gateway Page 35... -
Page 36: Pcie & Sim Socket
SmartEdge Industrial IoT Gateway User Guide PCIe & SIM SOCKET DIGITAL I/O http://www.element14.com/gateway Page 36... -
Page 37: Rest Api Documentation
6.3. REST API DOCUMENTATION When the Gateway is in configuration mode, it exposes a network API used by the mobile App to set up the Gateway. Instead of the mobile App, this API can be used to configure multiple Gateways directly. If connected over WiFi AP, the default <ipaddress>... - Page 38 SmartEdge Industrial IoT Gateway User Guide GET WIFI CLIENT CONNECTION STATUS GET http://<ipaddress>:8080/WiFiClientConnectionStatus Possible Response: "WiFi client IP": "<wifi_ipaddress, netmask, etc>"} SET NEW IOTCONNECT CREDENTIALS '{"cpid":"<myCpid123dddd4567>","username":"<myname@email.com>","password":"<myp@$ $>"}' http://<ipaddress>:8080/IOTNewCPID Possible Response: "Response": {1,-1} START IOTCONNECT SDK AND DISABLE REST API & WIFI AP PUT '{""}'...
- Page 39 SmartEdge Industrial IoT Gateway User Guide 6.4. ERRATA Please see the github repositories (section 4.1) for updates, bug list, etc. 6.5. TRADEMARKS & NOTICES TRADEMARKS Raspberry Pi is a trademark of the Raspberry Pi Foundation. NOTICES The provided software and firmware are subject to the following disclaimer.
Need help?
Do you have a question about the SmartEdge and is the answer not in the manual?
Questions and answers