
Subscribe to Our Youtube Channel
Related Manuals for Smartek ST-80N

Summary of Contents for Smartek ST-80N
- Page 1 Powerful Steam Brush Model # ST‐80N Operating Instructions Thank You for purchasing our Smartek Deluxe Clothes Shaver Read all instructions carefully before using this item ...
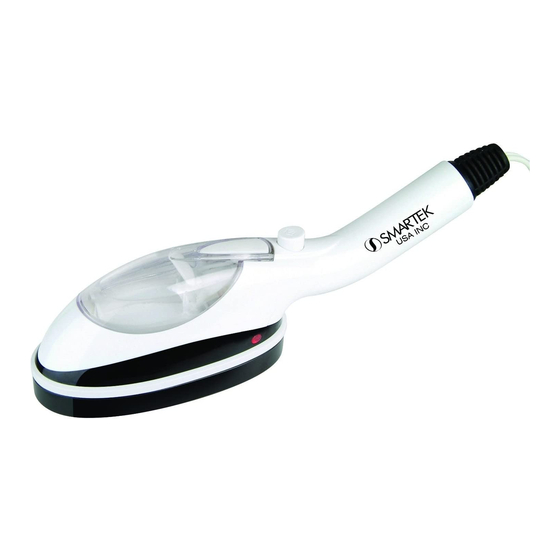
- Page 2 PARTS IDENTIFICATIONS: 1. Water Plug 2. Water Tank 3. Handle 4. Protection Tube for Cord 5. Steam Button 6. Heating Plate 7. Lint Brush 8. Release Button for Lint Brush 9. Crease/ pleating Brush 10. Release Button for Crease Brush 11. Bristle Brush 12. Release Button for Bristle Brush 13. Small Brush 14. Cup Cup identification diagram CAN YOU PLEASE PROVIDE ACCORDINGLY ...
- Page 3 REPARATIONS FOR USE: 1. Select appropriate brush (Lint, Crease, or Bristle) for use. Insert the Lint Brush by snapping into place. Insert the Crease Brush by fitting its tabs into the square openings at the bottom of the plate and pushing the Brush upward till it clicks into place. 2. Pull the rubber Water Plug to open the Water Tank. 3. Fill tank with water by using the Water Cup. Replace plug. ...
- Page 4 INSTRUCTION FOR USE: Lint Brush: For delicate fabrics, such as silk, wool, cotton and velvet, use the Lint Brush. Place wrinkled clothing on a clothes hanger. Gently glide the steamer (in a vertical position, if possible) over the wrinkled areas while holding the item of clothing with your free hand. Press and release the Steam Button at regular intervals. Follow the same instructions for hung curtains or upholstery. Crease Brush: For pleats or trousers’ creases, use the Crease Brush. Pull back on the curved handle at the bottom of the Crease Brush. Place the pleat or trousers’ crease between the Crease Brush and Heating Plate, and slide the steamer up and down to set the crease. Press and release the Steam Button at regular intervals. Bristle Brush: For rougher fabrics, such as heavy coats or drapery, use the Bristle Brush. Slide the steamer (in a vertical position, if possible) over the wrinkled areas. Press and release the Steam Button at regular intervals. ...
- Page 5 AFTER USE: 1. Unplug the unit and allow the unit to cool completely. If you do not intend to use the appliance within a short period of time, it is recommended that you drain the water. 2. Remove the Lint Brush by pressing down on the Release Button. Remove the Crease Brush by pressing on the white Release button. Always wait for steamer to cool before removing brush. Cleaning the Steamer 1. When the appliance is completely cool, wipe its surface with a moist cloth. 2. Use a pin to clean the steam holes. ...
- Page 6 SAFETY INSTRUCTIONS 1. Do not leave the unit unattended when in use, particularly by or near children. 2. Do not immerse the appliance in water. 3. Do not use detergents or chemical solutions to clean the steamer. 4. Do not touch steaming surface while in use, or turn steaming surface toward yourself or others. Inadvertent pressing on the steam button may occur, which, in turn, may cause burns. 5. Keep cord away from hot surfaces to prevent damage. 6. If the steamer becomes damaged, do not attempt to disassemble it. Take it to an authorized service center. ...
- Page 7 1 Year Limited Warranty Smartek warrants this product free from defects in material and workmanship for 1 year from date of purchase. This warranty does not cover improper installation, misuse, abuse or neglect on part of the owner. Warranty is also invalid in any case that the product is taken apart or serviced by an unauthorized service station. For questions or comments please contact us toll free: (888)380‐2111 Via email info@smartekusa.com ...
Need help?
Do you have a question about the ST-80N and is the answer not in the manual?
Questions and answers