Advertisement
HDPLEX Passive NUC Kit Installation Quick Guide
Check all of the following items are included in the HDPLEX Passive NUC kit package. The
installation would require accessories from H1 fanless PC case installation kit as well.
Install the USB 3.0 Cable using M3*8mm screw from H1 PC case installation kit to the NUC I/O plate.
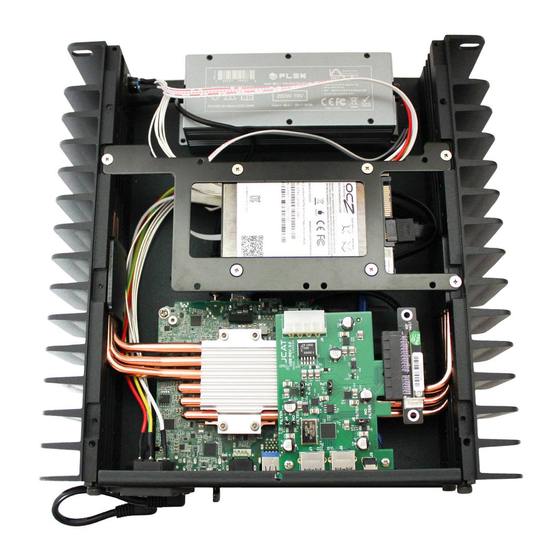
If you are using HDPLEX internal 80W/200W AC-DC power supply for NUC, install the 6PIN Molex
female to 5.5/2.5mm DC Jack self-lock cable.
Advertisement
Table of Contents

Summary of Contents for HDPlex Passive NUC Kit
- Page 1 HDPLEX Passive NUC Kit Installation Quick Guide Check all of the following items are included in the HDPLEX Passive NUC kit package. The installation would require accessories from H1 fanless PC case installation kit as well. Install the USB 3.0 Cable using M3*8mm screw from H1 PC case installation kit to the NUC I/O plate.
- Page 2 Install the NUC I/O plate to the internal side of H1 Thin ITX backplate using four M3*5mm screws and PCI dust cover bracket using one E. Make sure the NUC I/O plate is on the internal side and matches your NUC I/O layout. Install four 17mm copper studs to the H1 case bottom plate.
- Page 3 M3x6mm from H1 installation kit to the four copper stud with NUC CPU facing upwards. Install HDPLEX Thin ITX backplate to the H1 two side panel using four M5 CUP Head HEX screws from H1 package. Install H1 PC case PWR cable to the 2.54mm-2mm adapter. Plug the USB 3.0 into either one of the NUC front USB 3.0 port and install USB 3.0 ear to the I/O plate using two M3*8mm from H1...
- Page 4 Apply a thin layer of thermal paste to the NUC CPU top surface and NUC Heatsink copper base bottom surface. Please use four M2.5*8mm for 8th Gen NUC square 35*35mm mounting or one M2.5*12mm plus two M2.5*10mm flat head screws for three-point triangle mounting. Using the incorrect type or length of M2.5 screws will cause conflict with SODIMM memory or heatpipes.
- Page 5 Apply a thin layer of thermal paste to the NUC copper base groove and heatpipe groove on both side panels using the dumbbell tool from the H1 installation kit. Install six heatpipes and black plate to both side panels using M3*14mm screws from H1 CPU heatsink system to lock heatpipe to both side panels.
- Page 6 Install the PCIE Riser cable (M.2 to PCIE riser cable is not included in the HDPLEX Passive NUC kit). Since M.2 socket provides 3.3V only, for PCIE card which needs 5V, please use the FDD to SATA power cable included with the M.2 to PCIE riser to get 5V from NUC SATA power output. If your PCIE card needs 12VDC, you would need to find a 12VDC source.
Need help?
Do you have a question about the Passive NUC Kit and is the answer not in the manual?
Questions and answers