Table of Contents
Advertisement
Quick Links
Audiothingies
Congratulations and thanks for purchasing
Features
12-Bit MULTIMODE MODULATED DELAY with TAP and MIDI sync
Vintage style MULTIMODE MODULATED REVERB
STEREO I/Os + MIDI Input + 2x ASSIGNABLE CV inputs
ANALOG DRY signal path with hardware KILL DRY
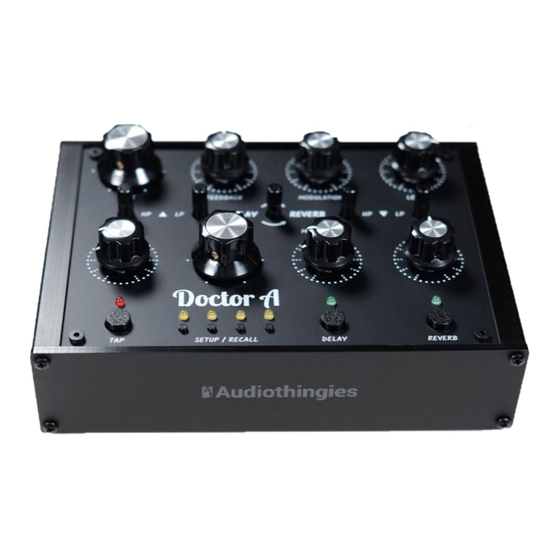
Front panel
1
Delay time (0 to 1000 ms)
2
Delay feedback amount
3
Delay modulation amount
4
Delay output level
5
Delay feedback high-pass frequency
6
Delay feedback low-pass frequency
7
Delay to reverb send level
8
Reverb output high-pass frequency
9
Reverb output low-pass frequency
10 Reverb predelay time (0 to 100 ms)
11 Reverb decay amount
12 Reverb modulation amount
13 Reverb output level
14 Delay tap tempo switch
15 Setup/Recall buttons
16 Delay on/off switch
17 Reverb on/off switch
QUICKSTART MANUAL V1.0
Advertisement
Table of Contents

Related Manuals for Audiothingies Doctor A

Summary of Contents for Audiothingies Doctor A
- Page 1 Audiothingies QUICKSTART MANUAL V1.0 Congratulations and thanks for purchasing Features 12-Bit MULTIMODE MODULATED DELAY with TAP and MIDI sync Vintage style MULTIMODE MODULATED REVERB STEREO I/Os + MIDI Input + 2x ASSIGNABLE CV inputs ANALOG DRY signal path with hardware KILL DRY...
- Page 2 Rear panel 9V DC input 3+4 Audio inputs 7+8 CV inputs (0 to 5V) MIDI input 5+6 Audio outputs NB: Always use the provided 9V DC adapter A word of warning before using Make sure your monitoring system is turned off before powering on or off your is capable of very high output levels, especially with high delay feedback level reaching auto-oscillation, so please take care of your ears while operating Secondary parameters...
- Page 3 Changing the Delay mode ACCESS & EXIT: Hold DELAY (Delay LED will blink when activated) Use the 4 SETUP/RECALL buttons to switch modes, the corresponding LED will blink to show the currently active mode. The available modes are: ● ○ ○ ○ Lo-Fi 8-bit delay ○...
- Page 4 LED/Button Function LED OFF LED Blinking ● ○ ○ ○ Input Stereo input Dual mono input ○ ● ○ ○ Output (wet signal) Stereo output Dual mono output ○ ○ ● ○ CV1 input disabled CV1 input enabled ○ ○ ○ ● CV2 input disabled CV2 input enabled TIP: Both CV inputs can be assigned to 1 parameter.
Need help?
Do you have a question about the Doctor A and is the answer not in the manual?
Questions and answers