Table of Contents
Advertisement
Quick Links
Advertisement
Table of Contents

Subscribe to Our Youtube Channel
Summary of Contents for Galaxy Audio CHECK MATE CM-C200
- Page 1 ®...
-
Page 3: Table Of Contents
CONTENTS Title Page 1. Safety Information………………………….. 1 Environment Conditions………………………………… 1 Maintenance & Cleaning………………………………...1 Safety symbols…………………………………………... 1 2. Description ……………….….………………2 3. Features……………………..…..…………… 2 4. Specifications………..……..………………..2 Output sound pressure levels………………………….. 2 Output frequency………………………………………… 2 Reference conditions……………………………………. 2 Influence of ambient conditions………………………… 2 Total Harmonic Distortion(THD)………………………...2 Accuracy of sound pressure level………………………... -
Page 4: Safety Information
1. Safety Information Read the following safety information carefully before attempting to operate or service the meter. Use the meter only as specified in this manual; otherwise, the protection provided by the meter may be impaired. Environment Conditions Altitude up to 6562ft. (2000 meters) Relative humidity 90% max. -
Page 5: Features
3. Features Conforms to ANSI S1.40-1984 and IEC 60942-2003 Class 2. Calibration levels of 94dB and 114dB. Fits the 1-inch and 1/2-inch diameter microphones. 4. Specifications Output sound pressure levels: 94dB and 114dB re 20 uPa under reference conditions. Output frequency: 1000Hz +/- 2% Reference conditions: Temperature: 74ºF (23ºC) Relative humidity: 50%... -
Page 6: Dimensions
The calibrator should not be operated when the green LED turns to red, which means that the battery voltage has fallen below acceptable range. Dimensions: 4.4"(L) x 2.4"(W) x 1.7"(H), (L) x 63 (W) x 44 Weight: approx. .41lbs. (186.4g) (including battery) Operating conditions: 32 –... -
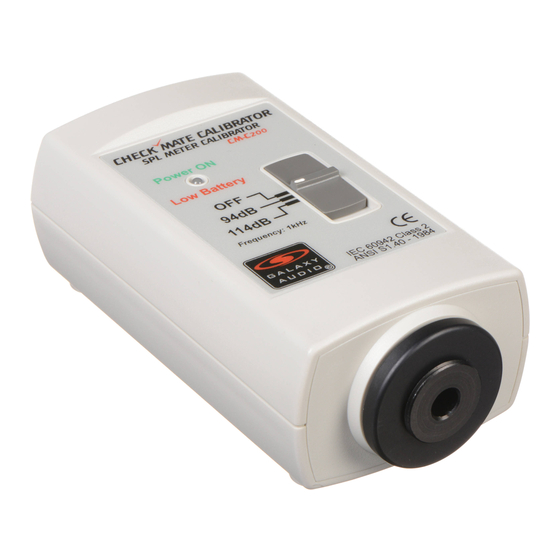
Page 7: Nomenclature And Function
5. Nomenclature And Functions Power and low battery indicator LED. Power and output level select switch. Transducer assembly 1-inch cavity for microphone insertion. 1/2-inch microphone adapter. Battery cover. -
Page 8: Operating Preparation
6. Operating Preparation (1) Remove battery cover and install a 9V Battery in the battery compartment. (2) To quickly check the operation of the sound level calibrator: Slide the power switch from OFF to the 94dB position and listen for the 1 kHz audible tone. A green LED indicates a good battery. - Page 9 If 94dB is selected on the calibrator, then choose a level range on the instrument under test to a range having 100dB as it’s upper limit. If 114dB is selected on the calibrator, choose a range with an upper limit of 120dB. The instrument may be set to FAST or SLOW response and C or A weighting.
- Page 12 ®...
Need help?
Do you have a question about the CHECK MATE CM-C200 and is the answer not in the manual?
Questions and answers