
Related Manuals for Omlet Autodoor


Summary of Contents for Omlet Autodoor
- Page 1 Autodoor Anleitung zur Demontage Guide de démontage Gebruiksaanwijzing voor demontage Guida allo smontaggio Instruktioner för nedmontering Disassembly Guide Afmontering instruktioner Demonteringsanvisning Instrukcja demontażu...
- Page 2 Please follow the instructions carefully to disassemble and reassemble your Autodoor. If you are cleaning the Autodoor do not use a pressure washer. Use a soft cloth or brush and where necessary water with a pet safe disinfectant to clean. Pay particular attention to the Keep Dry notices throughout the manual to protect the electronic parts from water damage.
- Page 3 Følg anvisningerne omhyggeligt, når du demonterer og tilslutter din Autodoor-automatiske husdør igen. Hvis du skal rengøre din Autodoor, kan du ikke bruge højtryksrenser. Brug en blød klud eller blød børste og om nødvendigt vand med et kæledyrsvenligt desinfektionsmiddel til at rengøre. Vær særlig opmærksom på ‘Hold tør!’...
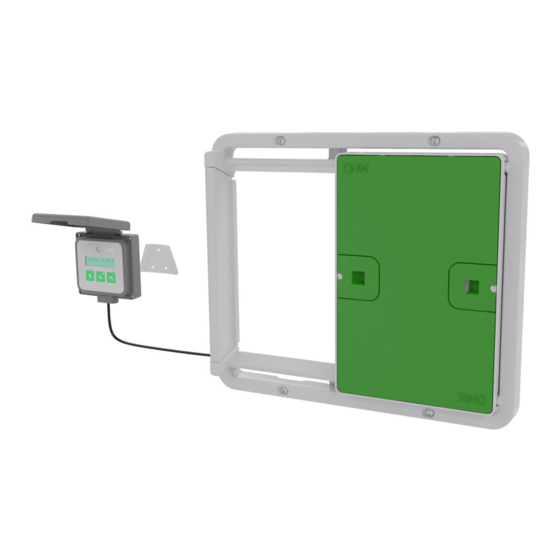
- Page 4 You will need... DE Das werden Sie benötigen · FR Ce dont vous aurez besoin · NL Ook heeft u nodig... · IT Avete anche bisogno di... · SE Du behöver också… DK Du skal også bruge... · NO Du trenger også ... · PL Będziesz potrzebować Pet Safe Disinfectant ·...
- Page 5 Retaining Bracket Screw M4 0.7x25mm 800.0007 Retaining Bracket 014.1152 Keep the Parts safe until Step 21 · DE Legen Sie die Teile bis Schritt 21 beiseite · FR Mettez ces pièce de côté pour l’étape 21 · NL Leg de onderdelen opzij tot stap 21 ·...
- Page 6 Fascia Machine Screw M4 0.7x20mm 800.0221 Keep the Parts safe until Step 7 · DE Legen Sie die Teile bis Schritt 7 beiseite · FR Mettez ces pièce de côté pour l’étape 7 · NL Leg de onderdelen opzij tot stap 7 ·...
- Page 7 800.0221...
- Page 8 800.0125...
- Page 9 Frame DE Rahme · FR Cadre · NL Frame · IT Cornice · SE Ram · DK Ramme · NO Dørkarm · PL Rama Self-Tapping Screw 3.5x8mm 800.0125 Keep the Parts safe until Step 12 · DE Legen Sie die Teile bis Schritt 12 beiseite ·...
-
Page 10: Safety Sensor
800.0125 Safety Sensor DE Sicherheitssensor · FR Détecteur d’obstacle · NL Veiligheidssensor · IT Sensore di Sicurezza · SE Säkerhetssensor DK Sikkerhedssensor · NO Sikkerhetssensor · PL Detektor Nacisku Safety Sensor Screw Cap Cover 014.1152 Keep the Parts safe until Step 18 ·... - Page 11 Self-Tapping Screw 3.5x8mm 800.0125 Washer 800.0278 Keep the Parts safe until Step 17 · DE Legen Sie die Teile bis Schritt 17 beiseite · FR Mettez ces pièce de côté pour l’étape 17 · NL Leg de onderdelen opzij tot stap 17 ·...
- Page 12 014.1160 810.1090 800.0278 014.1152 800.0125...
- Page 13 Motor Case DE Motorgehäuse · FR Carter moteur · NL Motorbehuizing · IT Cassa del Motore · SE Motorväska · DK Motorhuset · NO Motorhuset PL Obudowa silnika Machine Screw M4 12mm 800.0146 Keep the Parts safe until Step 20 ·...
- Page 14 800.0146 800.0007 800.0125...
- Page 15 · DE Schliessen Sie die Tür wieder an. Sie wird sich automatisch kalibrieren · FR Reconnectez la Porte Automatique à son boîtier. Elle se recalibrera d’elle-même · NL Sluit de Autodoor weer aan. Deze zal herkalibreren · IT Ricollegate nuovamente la porta. Si ricalibrerà da sola ·...
- Page 16 © Copyright Omlet Ltd. 2019 Please Reuse, Design Registered, Patent Pending Omlet is a Registered Trademark of Hebe Studio Ltd. Compost, Autodoor is a Registered Trademark of Hebe Studio Ltd. Recycle. 820.1733A Instruction Manual Auto Door Red Mite Deep Cleaning Guide 16/01/2020...
Need help?
Do you have a question about the Autodoor and is the answer not in the manual?
Questions and answers