
Subscribe to Our Youtube Channel
Summary of Contents for Dranetz DranXperT
- Page 1 Quick Reference Guide Dranetz 1000 New Durham Road, Edison, New Jersey 08818 Telephone 1-800-372-6832 or 732-287-3680 Fax 732-248-1834 www.dranetz.com...
- Page 2 No part of this book may be reproduced, stored in a retrieval system, or transcribed in any form or by any means—electronic, mechanical, photocopying, recording, or otherwise—without prior written permission from the publisher, Dranetz, Edison, NJ 08818-4019. Printed in the United States of America.
- Page 3 ADVERTENCIA Una conexión incorrecta de este instrumento puede producir la muerte, lesiones graves y riesgo de incendio. Lea y entienda este manual antes de conectar. Observe todas las instrucciones de instalación y operación durante el uso de este instrumento. La conexión de este instrumento a un sistema eléctrico se debe realizar en conformidad con el Código Eléctrico Nacional (ANSI/NFPA 70-2020) de los E.E.U.U., además de cualquier otra norma de seguridad correspondiente a su establecimiento.
- Page 4 WARNUNG Der falsche Anschluß dieses Gerätes kann Tod, schwere Verletzungen oder Feuer verursachen. Bevor Sie dieses Instrument anschließen, müssen Sie die Anleitung lesen und verstanden haben. Bei der Verwendung dieses Instruments müssen alle Installation- und Betriebsanweisungen beachtet werden. Der Anschluß dieses Instruments muß in Übereinstimmung mit den nationalen Bestimmungen für Elektrizität (ANSI/NFPA 70-2020) der Vereinigten Staaten, sowie allen weiteren, in Ihrem Fall anwendbaren Sicherheitsbestimmungen, vorgenommen werden.
- Page 5 Caution, refer to accompanying documents (this manual). Alternating current (AC) operation of the terminal or device. Direct current (DC) operation of the terminal or device. Earth (ground) terminal Power switch Safety Precautions The following safety precautions must be followed whenever any type of voltage or current connection is being made to the instrument.
-
Page 6: Table Of Contents
Start Monitoring ............... 44 Stop Monitoring ............... 45 VIEWING RECORDED DATA ..........46 Copying Data from DranXperT ........46 Opening Data in Dran-View XP ........46 Standard Accessories ............. 48 Optional Accessories ............49 ... -
Page 7: Introduction
DranXperT data is fully compatible with Dran-View XP Windows software, which is a free, unlicensed, ‘lite’ version of our popular Dran- View 7 PRO software. DranXperT data can also be viewed using the full versions of Dran-View 7 PRO or Enterprise. -
Page 8: Getting Started
GETTING STARTED IMPORTANT NOTICE Charge Battery Before Use Always charge the battery fully before using the instrument! The instrument will fully charge its internal battery in approximately 15 hours. The instrument will always operate on the AC power source (when available) and is designed to do so regardless of the state of charge of the battery. -
Page 9: Connecting To The Power Source
Connecting to the Power Source Power The DranXperT AC adapter can be powered by a 50/60 Specifications Hz, 15W, 90-264V AC power input source. CAUTION Always set the power switch to the off position before connecting or disconnecting the input power cable. - Page 10 Step Action Connect the AC adapter/battery charger plug to the DC input of the instrument Connect the appropriate power cord for the voltage rating of the instrument to the AC adapter/battery charger. Plug the AC adapter into an AC power source Press the momentary On/Off power switch to turn the instrument on.
-
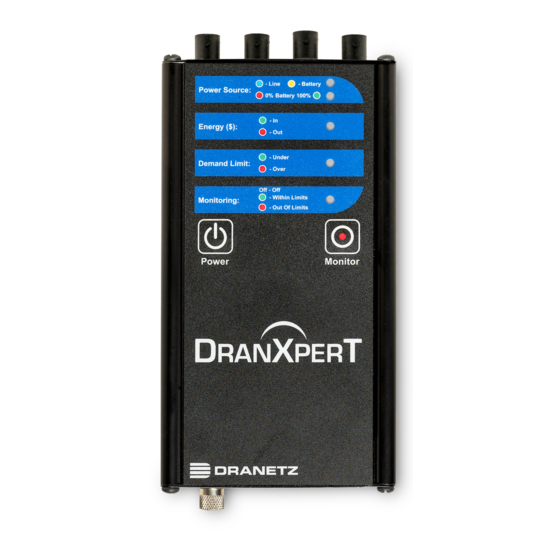
Page 11: Controls, Indicators And Connectors
Controls, Indicators and Connectors Top View... - Page 12 Power Button – press to turn the instrument power ON or OFF Monitoring Button – press and hold for approximately 5 seconds until a single beep is heard to turn monitoring ON or OFF Monitoring Status – LED status indicator Monitoring Off: LED = OFF (No LED) Monitoring Limits Within Trigger Limits: LED = GREEN Monitoring Limits Out of Trigger Limits: LED = RED...
- Page 13 Top End Panel View This section describes the top end panel view of DranXperT. Voltage Inputs – use to connect the circuit voltage to the instrument channels A, B, C, and N using safety cables with banana connectors. See section Connecting the Voltage and Current Connectors for circuit connection details.
- Page 14 Bottom End Panel View This section describes the bottom end panel view of DranXperT Ground Terminal – earth (ground) terminal reference connection to maintain accurate measurements. DC Power Input –external AC adapter/battery charger input. Ethernet – Wired Ethernet (RJ45) network connector.
-
Page 15: Connecting To Dranxpert
Password: Dranetz Notes when using the default IP address: If you intend to use DranXperT directly connected to a computer, or on a small (un-routed) private network, it may be sufficient to use the default instrument IP address. Note that your computer must be configured for use on the same network (192.168.0.xxx) as DranXperT. -
Page 16: Connecting Via Wired Ethernet Connection
Connecting via Wired Ethernet Connection The steps below show how to connect to DranXperT via a wired Ethernet connection. Step Action Connect an Ethernet cable between your computer and the Ethernet port at the rear panel of the instrument. An Ethernet cross-over cable may be needed if the computer cannot auto- detect direct cabling. - Page 17 Step Action When finished entering the username and password, click the OK button. The DranXperT Home Page will then be displayed. Result: The following screen is displayed.
-
Page 18: Making Measurement Connections
Making Measurement Connections WARNING Death, serious injury, or fire hazard could result from improper connection of this instrument. Read and understand the warnings in the beginning of this guide before connecting this instrument. ADVERTENCIA Una conexión incorrecta de este instrumento puede producir la muerte, lesiones graves y riesgo de incendio. -
Page 19: Measurement Connectors For Dranxpert
Measurement Connectors for DranXperT DranXperT has three (3) voltage and four (4) current channels which can be used to measure a wide variety of circuit types. DranXperT comes with a voltage cable set for making voltage connections. Current measurements are made using the optional current probes available from Dranetz. -
Page 20: Connecting Voltage Measurement Cables
Connecting Voltage Measurement Cables Measurement Description: Voltage measurement cables are used to cable set connect to your circuit via safety banana jack connectors and alligator clips. Voltage Rating: Direct connection of all voltage measurement inputs are rated at 600 VRMS max. When measuring voltages greater than 600 VRMS, potential transformers (PTs) or other transducers must be used. -
Page 21: Connecting Current Probes
Correct position of the probe is necessary for correct power measurements, where in-phase voltage and current measurements are necessary. Contact the Dranetz for information on availability and pricing of current probes. The following safety precautions apply to current probe connections. - Page 22 ADVERTENCIA NO UTILIZAR transformadores de corriente sin material aislante al rededor de conductores sin material aislante. Los Transformadores de corriente de este tipo est‡n dise–ados para ser utilizados solamente con conductores con aislamiento elŽctrico. Utilizar transformadores de corriente completamente aislados alrededor de conductores sin aislamiento. AVERTISSEMENT N'EMPLOYEZ PAS les noyaux courants non-isolŽs de sonde autour d'un fil nonisolŽ.
- Page 23 Personal Protective Equipment. To avoid the risk of electric shock or burns, always WARNING connect the earth ground before making any other connections. --------------------------------------------------------------------------------- DranXperT can monitor the following power configurations: Single Phase Split Phase 3 Phase, Four Wire Wye ...
- Page 24 Single Phase When making single phase measurements, use channel A as shown below. The Neutral is chosen as the reference for measurement purposes. You may optionally measure the Neutral current by connecting a current probe to the Neutral conductor and to the N channel current input.
- Page 25 Split Phase When making split phase measurements, use both channels A and C for voltage and current connections. The Neutral is chosen as the reference for measurement purposes. You may optionally measure the Neutral current by connecting a current probe to the Neutral conductor and to the N channel current input.
- Page 26 3 Phase, Four Wire Wye Channels A, B, and C are connected to the voltage and current probes. The neutral is connected to common and is the reference for the three voltage channels. Note that the Neutral current measurement is optional. NOTE Be sure to connect the current probes with the arrow pointing towards the load or an erroneous power reading...
- Page 27 3 Phase, 2 probe Delta The figure below shows the 3 Phase, 2 probe, 2 wattmeter delta connection using phase channels A-B-C. The N channel is connected to phase B as the reference for measurement purposes. Current probes are connected to measure line currents A and C. NOTE Be sure to connect the current probes with the arrow pointing towards the load or an erroneous power reading...
- Page 28 3 Phase, 3 probe Delta The figure below shows the 3 Phase, 3 probe, 2 wattmeter delta connection using phase channels A-B-C. The N channel is chosen as the reference and is connected to phase B for measurement purposes. Current probes are connected to measure line currents A, B and C. Note that the B current probe is connected to measure the B phase current only and is not included as part of the power computations.
-
Page 29: Dranxpert User Interface
DranXperT USER INTERFACE Home/Information Page When first connecting to DranXperT, the Information page will be displayed. This page is also available by selecting Information > Status in the menu. See below. The Information page provides instrument status information, such as the serial number, firmware version, monitoring state, power source/battery charge status, IP address, and current time. -
Page 30: Instrument Settings
Instrument Settings Once you have connected to DranXperT via a web browser, you can view and edit the instrument’s settings as described below. Survey Setup Select Setup > Survey Setup to view/change the current monitoring settings of the instrument. Note that the survey setings can only be modified if monitoring is OFF. If monitoring is ON, you will receive a warning that the survey settings are “view only”. - Page 31 General Survey Name - Enter a name (up to 48 characters) that describes your survey. This name will be inlcuded in the name of the data file recorded. Nominal Frequency – Dropdown selection, either 50 Hz or 60 Hz. Wiring Configuration – Dropdown selections are: Single Phase, Split Phase, Three-Phase Wye, Three-Phase Delta 2 probes, Three-Phase Delta 3 probes.
- Page 32 Current Nominal – Nominal current for use with the current threshold settings below. Settable range is 1 – 65535 IRMSl. Current Probe Full Scale (IRMS) – Full scale of the CT’s being used. Settable range is 1 – 3000. (0.333mVRMS = x amps, x is the full scale). CT Ratio Primary –...
- Page 33 Submit Changes When the Survey Setups have been completed, click the Submit Changes button to save the settings. Click the Discard Changes button to discard the settings. Instrument Setup Select Setup > Instrument Setup to view/change the current instrument setup. These are miscellaneous instrument settings, such as the Ethernet settings, date/time, etc.
- Page 34 Date and Time Note: The time and date of data stored in the DranXperT database is recorded in UTC time. By setting the local time zone offset (below), the data will appear in DranXperT and Dran-View XP in the local time zone.
- Page 35 Database Max DB File Seconds – Set the duration of the data file in hours, days, weeks, or months from a dropdown list. The default setting is 31 days. You can also enter a custom setting in seconds (<1hr). This setting is how long the instrument will record until a new data file is automatically created.
- Page 36 Download Config Select Setup > Download Config to download the instrument settings to your computer. This capability allows you to store a settings template for your surveys that can be uploaded back into the instument for future use. When selecting Download Config, two choices are available: ...
-
Page 37: Real Time Measurements
As shown in the image above, there are 4 steps to upload settings files to the instrument. Each step is highlighted in GREEN as you progress through the process: 1) File Selection – Click the BROWSE button to path to the configuration file to upload. - Page 38 Energy Description Units Channel (wiring dependent) True Energy A, B, C Reactive Energy VArhr A, B, C Apparent Energy VAhr A, B, C True Energy (Fundamental) A, B, C Reactive Energy (Fundamental) VArhr A, B, C Apparent Energy (Fundamental) VAhr A, B, C ...
-
Page 39: Downloading And Managing Data
Select Data > List Files to view the recorded data files in the instrument’s memory. The List Files page allows you to download data recorded by DranXperT to your computer for analysis using Dran-View XP, and to also delete files that are no longer needed. - Page 40 The Zip feature will combine (zip and compress) multiple files into one file for downloading. 3) DranXperT will display a progress window, and when completed, your web browser will prompt you to open or save the zip file.
- Page 41 4) Click Extract to save the DranXperT files to the location chosen in step #3. Note that DranXperT data files are of the file type “.json”. 5) When the above is completed, the DranXperT data is ready to be viewed by Dran-View XP.
-
Page 42: Factory Settings
Then, follow the firmware installation instructions below to update your instrument. Firmware Updates Select Factory > Update Firmware to update DranXperT’s firmware. The page shown below will be displayed. - Page 43 Please contact Dranetz for any assistance. Restore Factory Defaults There may come a time when you need to restore DranXperT’s settings to its factory defaults. There are several options. Select the “Factory” tab, then choose the option below that best fits your needs: ...
- Page 44 No settings or data files are lost when restarting. To restart the instrument, select Factory > Restart. Change Password The default username and password for DranXperT are listed above in the Connecting to DranXperT section. The username cannot be changed, but the password can be changed.
-
Page 45: Start/Stop Monitoring
Monitoring can be started or stopped by using either the membrane keypad or via a web browser. Start Monitoring Once you have configured the DranXperT settings, the next step is to start monitoring. Please do one of the following to start monitoring: Instrument Keypad Press and hold the “Monitoring”... -
Page 46: Stop Monitoring
Stop Monitoring Please do one of the following to stop monitoring. Instrument Keypad Press and hold the “Monitoring” button for approximately 5 seconds until a beep is heard to turn monitoring OFF. The “Monitor” LED will turn OFF when monitoring is stopped. Web Browser Select the Information >... -
Page 47: Viewing Recorded Data
DranXperT data files are stored in a json (JavaScript Object Notation) file format and have a “.json” file extension. Dran-View XP software is used to view and analyze data recorded by DranXperT. In order to do so, you must first copy the DranXperT data files to your computer. Please follow... - Page 48 Once the data file is opened, Dran-View XP will display the data recorded by DranXperT. You can view Time Plots, Event details, and more for analysis and reporting.
-
Page 49: Standard Accessories
ACCESSORIES LIST Standard Accessories The following table lists the standard accessories for DranXperT. Description Part Number External Power Supply (+5V output) and US 115V DRANXPERT-PS-US power cord (universal input External Power Supply power (+5V output) and European DRANXPERT-PS-EU supply and... -
Page 50: Optional Accessories
Optional Accessories The following table lists the optional accessories for DranXperT. Description Part Number Current Probe Accessories Hinged, Split - Core Current Probes. 600V CAT III 0.4 in (10 mm) window size CT-H-5A 0.4 in (10 mm) window size CT-H-20A 0.4 in (10 mm) window size... -
Page 51: Specifications
SPECIFICATIONS* GENERAL Sampling Frequency: 32ksps (recorded and real-time meters), 128 samples per cycle (periodic waveform snapshots) Sag/dip, swell trigger resolution: 1-cycle (uses IEC 61000-4-30 Class S methods) Panel indicators: RGB LEDs for monitoring on/off, energy flow, PQ event indication, battery charging/status, wiring status ... - Page 52 Storage Temperature: 5 to 131 °F (-15 to +55 °C) Operating Temperature: 32 to 113 °F (0 to +45 °C) Humidity: 5% to 95% non-condensing * Notes: Specifications are subject to change without notice Dranetz recommends annual calibration to maintain the specified accuracies...
-
Page 53: Statements And Notices
User replaceable instrument batteries are warranted for a period of one year from the date of invoice. Certain Dranetz branded accessories, such as current transformers and other accessories not manufactured by... - Page 54 Dranetz, 1000 New Durham Road, Edison, New Jersey 08817. Copyright © 2020 Dranetz All Rights Reserved.
- Page 55 Page intentionally left blank...
- Page 56 Published by Dranetz 1000 New Durham Road Edison, NJ 08817 USA Telephone: 1-800-372-6832 or 732-287-3680 Fax: 732-248-1834 Web site: www.dranetz.com Copyright ©2020 Dranetz All rights reserved. P/N QR-DRANXPERT Rev A 10.20.20...
Need help?
Do you have a question about the DranXperT and is the answer not in the manual?
Questions and answers