Advertisement
HY-03DTD Fitting & Configuration
Enabling Dial Tone Disconnect on the HY-03
On the rear panel of the HY-03 is a set of 4 DIP switches. These switches are used to configure the HY-03 in the modes
that you want it to operate. A label on the top panel of the unit shows the orientation of the switches :
To enable the dial tone disconnect option, set switch SW1 to ON. When enabled (ON), the HY-03 will automatically
disconnect from the telephone line when an appropriate dial tone is detected.
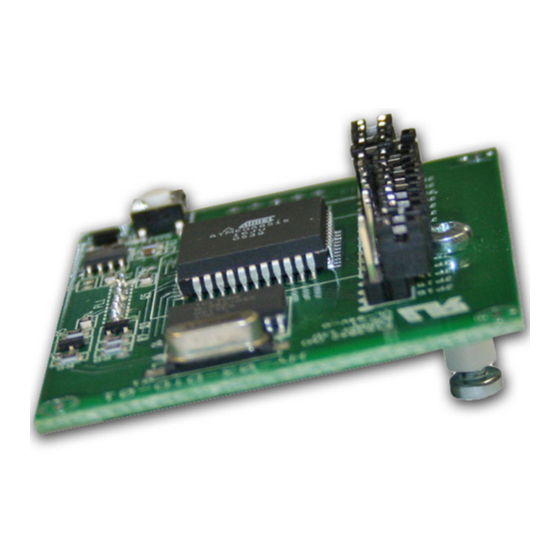
Configuring the Dial Tone Disconnect Board
To configure the dial tone disconnect board, the appropriate jumper(s) JP1-JP16 on the Dial Tone Disconnect PCB must
be fitted to enable detection of the required tone(s) in the country in which the HY-03 is being used, or for the equipment
to which the HY-03 is to be connected. For example, to enable the HY-03 to detect the dial tone in Finland, set the
jumpers for JP1, JP2 and JP3.
See Table 1-1 below for a list of the tones currently implemented.
Country or
Equipment Type
Austria
440Hz
Avaya PBX
400Hz
Belgium
450Hz
Bulgaria
425Hz
Cyprus
350Hz and 450Hz
Czech Republic
425Hz
Denmark
425Hz
Finland
425Hz
France
440Hz
Germany
425Hz
Greece
440Hz
Hungary
440Hz
Iceland
425Hz
India
400Hz
Ireland
400Hz and 450Hz
Israel
400Hz
Italy
425Hz
Italy2
425Hz
Italy PBX
425Hz
Figure 1-1 : Configuration Settings Switches
JP16
Mounting screw
on a pillar
Figure 1-2 : Jumper settings on the HY-03DTD board
Frequencies
Continuous
Cadence
Continuous
Cadence
Continuous
Continuous
Continuous
Continuous
Continuous
Continuous
Continuous
Continuous
Continuous
Cadence
Continuous
Continuous
Cadence
Cadence
Cadence
Sonifex HY-03DTD User Handbook
Plug-in
Header
JP1
Type
-
375ms on, 375ms pause
-
250ms on, 750ms pause,
750ms on, 1000ms pause
-
-
-
-
-
-
-
-
-
750ms on, 750ms pause
-
-
200ms on, 200ms pause,
600ms on, 1000ms pause
200ms on, 200ms pause
500ms (+-20ms) on, 500ms
HY-03DTD Fitting & Configuration
Details
Jumper(s) set on
1
2 + 3 + 4 + 5
2
1 + 2
3
1 + 3
2 + 3
1 + 2 + 3
4
1 + 4
2 + 4
1 + 2 + 4
3 + 4
1 + 3 + 4 + 5
1 + 3 + 4
1 + 4 + 5
2 + 3 + 4
1 + 2 + 3 + 4 + 5
6
JP...
1
Advertisement
Table of Contents

Related Manuals for Sonifex HY-03DTD

Summary of Contents for Sonifex HY-03DTD
- Page 1 JP1, JP2 and JP3. Plug-in Header JP16 Mounting screw on a pillar Figure 1-2 : Jumper settings on the HY-03DTD board See Table 1-1 below for a list of the tones currently implemented. Country or Frequencies Type Details...
- Page 2 Figure 1-3 : HY-03 Preset Controls and Alignments Fit the HY-03DTD board onto the main HY-03 PCB as shown above. Make sure that there is a secure and firm connection between the plug-in headers, and fix the supplied threaded M3 x 12mm pillar between the two boards using the supplied M3 x 6mm pan head posidrive screws (one top and one bottom).
- Page 3 LED and divert button are in the correct place in the front panel. The HY-03 should now automatically detect the dial-tone. If you have any problems, contact technical support on technical.support@sonifex.co.uk V1.03 HY-03DTD handbook ©...
Need help?
Do you have a question about the HY-03DTD and is the answer not in the manual?
Questions and answers