
Summary of Contents for Scolmore ClickSmart RF Pilot
- Page 1 40 Channel Remote Control With OLED Display RF Pilot Installation Manual Make your home smarter with a wireless remote control.
- Page 2 Congratulations on purchasing the RF Pilot handheld remote control. The controller is an element of the Click Smart system. In conjunction with other Click Smart devices the RF Pilot offers you: - Comfortable handheld control - Activation of household appliances and devices - Light dimming and creation of light scenes - Control of blinds/shutters, garage doors, awnings - Activate multiple devices with a single press...
-
Page 3: Before You Start
RF Pilot Installation Manual Before You Start... This manual provides information for the use and installation of the device. The device may only be installed and connected by persons with the required professional qualifications who have become familiarised with this manual and the functions of the device. Trouble-free operation also depends on the previous method of transportation, storage and handling. -
Page 4: Table Of Contents
RF Pilot Installation Manual Content: Programming Menu Before You Start ..........2 Technical Parameters ........4 Initial Setup - Language ......13 Characteristics ..........5 Initial Setup - Date & Time ......14 Overview of Click Smart Devices ....6 Rooms ............15 Device Details ..........8 Receivers .............17 Insertion of Batteries ........8 Receiver Functions ........22 Scenes ............25... -
Page 5: Technical Parameters
Technical Parameters Display Other data Type: Colour OLED Operating 0 .. +55 °C temperature: Resolution: 128 x 128 pixels / 262,144 colours Storage Side ratio: -20 ..+70 °C temperature: Visible surface: 26 x 26 mm Protection: IP20 Backlight: Self-illuminating text Working position: Diagonal: 1.5“... -
Page 6: Characteristics
RF Pilot Characteristics The RF Pilot handheld remote control enables intelligent control of Click Smart receivers. - Sending commands to switching, dimming and blind/shutter receivers - RF Pilot measures and displays the local surrounding temperature - The RF Pilot remote can be programmed with up to 40 receivers - You can rename rooms and receivers/appliances controlled as required - The “Scene”... -
Page 7: Overview Of Click Smart Devices
Overview of Devices Controlled by the RF Pilot Switching Receivers RFSAI-61B RFSC-61 RFSA-62B 16A 230V~ single 2 x 8A 230V~ two 13A 230V~ multifunction channel multifunction plug-in switching receiver channel multifunction switching receiver 6 functions switching receiver with 6 functions on each 3V DC switch input channel 6 functions... - Page 8 Overview of Devices Controlled by the RF Pilot Dimming Receiver Signal Repeater RFDEL-71B RFRF-20/B 160Va 230V~ multifunction Plug-in repeater can extend LED dimming receiver with the range of up to 20 receivers load selection, trim function controlled by the RF Pilot. and switch input Can also be utilised to bypass 7 functions...
-
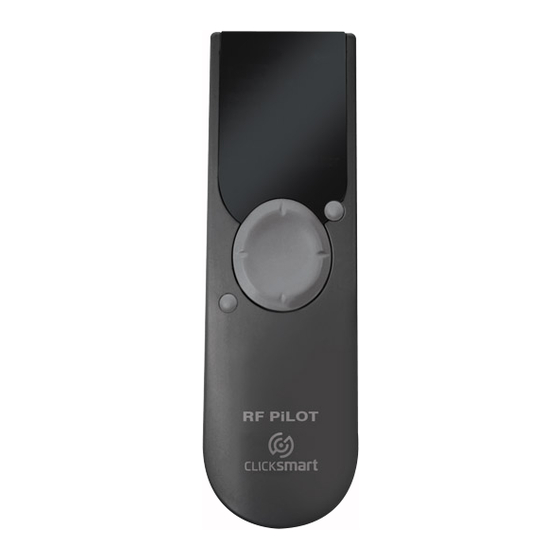
Page 9: Device Details
Device details; Insertion of batteries Device description Battery insertion Remove the battery cover and insert two AAA batteries as shown. Display Control Button T1 Direction Dial Control Button T2 Battery Cover Battery cover RF PILOT Display details - basic display fw V10.0 Date Time... -
Page 10: Basic Steps
Basic Steps for Successful Programming Step 1 - Location of ClickSmart devices Always remember that the radio signal range for RF installations depends on the building structure, materials used and the location of the installed units within the building. Radio frequency signal loss through various construction materials Wooden structures Common glass Brick walls... - Page 11 Basic Steps for Successful Programming Step 2 - Complete the Installation Form - Name of the room (e.g. Lounge) - Description of load to be controlled (e.g. Lamp) - Part No. of receiver (e.g.: RFSAI-61B, ...) Part No. E.g.: RFSAI-61B - Address of receiver (e.g.: 00AAD9, ...) (The Installation Form is supplied with the RF Pilot or can be Address...
- Page 12 Basic Steps for Successful Programming Step 3 - Edit Room Names Step 5 - Assign Receivers Rename the rooms for the locations where the receivers Assign each receiver to the correct room. are installed. The receiver cannot be controlled until it has When assigning the receivers this will ensure they are been assigned.
-
Page 13: Controller Activation
Controller Activation Controller Activation When not being used to control receivers the display goes in to sleep mode - no information is displayed (Fig.1). Press any button briefly to display the Quick Control ‘Favourites’ Screen (Fig.2). Note: The RF Pilot automatically goes in to sleep mode after the last button pressed and the set sleep time has expired, see ‘Display’, Page 36. -
Page 14: Programming Menu
Programming - Initial Setup Language we 01.02.17 12:54 Programming Menu Date and time Actuators To enter the Programming menu (Fig.6) press the left side of the Rooms Rooms Scenes Scenes direction dial together with the T1 button (Fig.5) whilst in the Favourite Favourite Display... -
Page 15: Initial Setup - Date & Time
Programming - Initial Setup Date and Time To move in the Programming menu use up & down on the dial to select Date and time (text in white). Confirm using the T1 button (Fig.1). Here you can set the current time, time format (12/24), date and day of the week. - Using up &... -
Page 16: Rooms
Programming - Rooms Rooms The RF Pilot automatically arranges the names of Rooms 1-10 in order. Within the programming menu, you can rename or reset the name to factory conditions. Once the room is renamed it will replace the room and number in the room menu. In the Programming menu, using up &... - Page 17 Programming - Rooms Rooms Rename - Used to change the room name. Use left & right on the dial to select the letter position (Name:). Use up & down on the dial to select the letter required (_ to 9). To delete a letter press T2.
-
Page 18: Receivers
Programming - Receivers Actuators (Receivers) - Add In the Programming Menu select Actuators to add the receivers installed (Fig.6). Press the T1 button to enter the menu. Add - To add a receiver to the RF Pilot Controller (Fig.7), press T1 button with Add highlighted white. Use up and down on the dial to select the receiver type which you want to add. - Page 19 Programming - Receivers Actuators (receivers) - Assign Assign - Used to allocate a receiver/appliance name to a room, e.g. Actuator 1 (appliance: table lamp) in lounge (Fig.1) (Room Names 1-10 are set as default in the controller). Using up & down on the dial, select the receiver to be assigned (1-40). Confirm using the T1 button (Fig.2) In the next menu, using up &...
- Page 20 Programming - Receivers Actuators (receivers) - Rename Rename - (Fig.6) Used to change the name of the receiver appliance, the name will then be displayed in the menu list under the Room Control function. Using up & down on the dial, scroll through the list to find the receiver to be renamed (1-40). Select using the T1 button (Fig.7).
- Page 21 Programming - Receivers Actuators (receivers) - Range Test & Control Range test - Used to determine the quality of the signal between the RF Pilot and the selected receiver (Fig.1). Use up & down on the dial to select the receiver you want to test. Select using the T1 button (Fig.2).
- Page 22 Programming - Receivers Actuators (receivers) - Remove Remove - Used to delete the receiver from the memory of the RF Pilot (Fig.6). Using up & down on the dial select the receiver to be removed. Confirm using the T1 button (Fig.7). Note: If an actuator/receiver is removed from the controller memory, the relevant position in the receiver list becomes vacant (Fig.8).
-
Page 23: Receiver Functions
Control - Receiver Function we 01.02.17 12:54 we 01.02.17 12:54 Select the required function (highlighted white) using × Turn On Turn On up & down on the direction dial. Turn Off Turn Off Button Button Execute the selected function by pressing T1. Impulse Impulse Delay ON... - Page 24 Control - Receiver Function we 01.02.17 12:54 we 01.02.17 12:54 Select the required function (highlighted white) using × Turn On Turn On up & down on the direction dial. Turn Off Turn Off Brightness: 0% Brightness: 0% Execute the selected function by pressing T1. (If the function Slowly ON Gradual switch ON Slowly OFF...
- Page 25 Control - Receiver Function we 01.02.17 12:54 we 01.02.17 12:54 Select the required function (highlighted white) using × up & down on the direction dial. Down Down Turn up Turn up Execute the selected function by pressing T1. Turn down Turn down Setting Setting...
-
Page 26: Scenes
Programming - Scenes Scenes Scenes - These are used to define the control of multiple receivers using a single button press. In the Programming Menu select Scenes (Fig.1). Press the T1 button to enter the menu. Using up & down on the dial select the name of the Scene you want to edit. Select using the T1 button (Fig.2). - Page 27 Programming - Scenes Scenes - Rename Rename - (Fig.4) Used to change the name of the scene, the name will then be displayed in the menu list under the Scene Control function. Use up & down on the dial to select the letter with left & right to select the letter position. To delete a letter press T2.
- Page 28 Programming - Scenes Scenes - Commands Commands - (Fig.1). (Switching receiver) Assign each command (Command: 1/10, 2/10, 3/10 etc.) (Fig.2) by firstly selecting the room (Fig.3) and then the defined receiver (Fig.4). The receivers function can be selected (Fig.5 - showing switching functions). All the functions created as a command will be executed when the scene is activated.
- Page 29 Programming - Scenes Scenes - Commands (continued) Commands (Dimming receiver) After each receiver and function has been added to a command, the screen will move to the next command (2/10 etc.) automatically (Fig.6). Repeat selecting the room (Fig.7) and receiver (Fig.8). For dimming receivers, the desired lighting level can be selected by using left &...
- Page 30 Programming - Scenes Scenes - Reset Reset Use to delete allocated scenes from the memory. (Fig.6-7). Note: The Scene name will be reset to the default factory setting (Fig. 8). we 01.02.17 12:54 we 01.02.17 12:54 we 01.02.17 12:54 Name: Name: Reading Scene 1...
-
Page 31: Favourites
Programming - Favourite Favourite Favourite - Used to define the ten most frequently used functions, appears in the opening screen after turning off. The favourites act as quick controls without entering further menus. The Favourite could be a single actuator (receiver), an actuator with function or a scene. In Programming select Favourite (Fig.1). - Page 32 Programming - Favourite Favourite - Assign - Actuator Assign - Used to allocate a receiver or scene to the Favourites listing. - Actuator: You can allocate a receiver from a defined room location (Fig.4-6) and choose the function later. The name of the receiver will be shown in the favourites list (Fig.7). we 01.02.17 12:54 we 01.02.17...
- Page 33 Programming - Favourite Favourite - Assign - Actuator With Function - Actuator with function: You can allocate a receiver (from a selected room) and define its function (Fig.1-4). The name of the receiver (actuator / F) will be displayed in the favourites list (Fig.5). we 01.02.17 12:54 we 01.02.17...
- Page 34 Programming - Favourite Favourite - Assign - Scene & Cancel - Scene: You can assign a created scene as a Favourite (receivers assigned to the scene are activated) (Fig.6-8) Cancel - used to delete a Favourite. The Favourite name (highlighted in white) will be reset to factory setting (Fig.9-10). we 01.02.17 12:54 we 01.02.17...
- Page 35 Initial Screen - Quick Control Quick Control Wake up the RF Pilot from sleep mode by pressing any button. The screen will briefly display a list of defined favourite operations / devices (Fig.1). Using up & down on the dial (Fig.2), select the required Favourite action / scene. The chosen Favourite command is then activated in one of two ways: If the Favourite is a scene control element then press the right button to execute it.
- Page 36 Initial Screen - Quick Control Controlling the assigned receiver (without function) Receiver Pressing the directional button left Pressing the directional button right RFSA-6x Switch Off. Switch On. Simulation of the button on the keyring - tilting the roll- Simulation of the button on the keyring - tilting the roll-up RFJA-12 up blinds.
-
Page 37: Display
Programming - Display Display Display - Gives the opportunity to alter the time the screen stays visible before going in to sleep mode (Fig.1 & 2). The time can be adjusted 5 seconds to 30 seconds in 5 second intervals (Fig.3). Press ‘SAVE’... -
Page 38: Device Reset
Programming - Device Reset Device Reset Reset - Resetting the device is used to delete all settings including room and receiver details (Fig.1- 2). The version of the firmware is displayed, the memory is Formatted and the original factory status is restored (Fig.3-4). -
Page 39: Universal Information
Universal information The temperature display is for information only and may be affected by the placement of the controller near heat sources, windows, prolonged time in the hand, etc. Renaming Receivers/Rooms/Scenes - the min. length of the name is 1 character, the max. length is 12 characters. -
Page 40: Important Information
Important information Cleaning and maintenance • Do not immerse the controller or its parts into water or any other liquid! Prevent any liquid from entering into the controller. The device will be damaged. • Clean the surface using a dry clean cloth. Do not use aggressive cleaning products or abrasives as these may damage the controller. -
Page 41: On Screen Warnings
What to do when ... RF Touch Unit Warnings Warnings are displayed in the event of control or signal issues occuring. Warning Troubleshooting Rooms / Scenes / Favourite 10 programmes can be defined to each section Memory full! (when adding actuators) No more than 40 receivers can be added to the device The actuator has already been used. - Page 42 18 Corrig Road, Scolmore International Ltd, Scolmore Park, Landsberg, Sandyford Industrial Estate, Lichfield Road Industrial Estate, Dublin 18, Tamworth, Staffordshire, Ireland B79 7XB D18 WV79 Web: click-smart.com Web: clicklitehouse.ie Tel: +44 (0) 1827 63454 Tel: +353 (1) 2811 122 Fax:...
Need help?
Do you have a question about the ClickSmart RF Pilot and is the answer not in the manual?
Questions and answers