Table of Contents
Advertisement
Quick Links
Advertisement
Table of Contents

Subscribe to Our Youtube Channel
Summary of Contents for LX Navigation iris EFIS Series
- Page 1 iris EFIS User manual...
- Page 2 LX iris EFIS & 8 ] Device manual - LX navigation - May, Tkalska ulica Celje Tel.: Fax.: info@lxnavigation.com www.lxnavigation.com...
-
Page 3: Document Information
LX iris EFIS Document name: LX HUM Document information Document revision: Document information Abstract This document represents the user manual for the LX iris EFIS. The installation manual, data- port and additional info can be found on www.lxnavigation.com. List of applicable products Device Version LX iris EFIS... -
Page 4: Table Of Contents
LX iris EFIS Document name: LX HUM CONTENTS Document revision: Contents Document information Abstract ......... . List of applicable products . - Page 5 LX iris EFIS Document name: LX HUM CONTENTS Document revision: Disabling the indicated airspeed tape ..... Altitude tape ........Barometric pressure setting (BARO) .
- Page 6 LX iris EFIS Document name: LX HUM CONTENTS Document revision: Navigation lines ........6 NavBox line .
- Page 7 LX iris EFIS Document name: LX HUM CONTENTS Document revision: Setup page . Overview ......... 6 .
-
Page 8: Important Notices
This device is warranted to be free from defects in materials or workmanship for two years from the date of purchase. Within this period, LX navigation will, at its sole discretion, repair or replace any components that fail in normal use. Such repairs or replacements will be made at no charge to the customer for parts and labour, the customer shall be responsible for any transportation cost. -
Page 9: Sunburned Display
Some countries do not allow the exclusion of incidental or consequential damages, so the above limitations may not apply to you. LX navigation retains the exclusive right to repair or replace the unit or software, or to offer a full refund of the purchase price, at its sole discretion. -
Page 10: Device Versions And Options
. . . Upgrade iris EFIS to iris EIFS pro Please contact LX navigation or local of cial representative for purchasing the license. iris EFIS pro Is the extended version with PFD page and Setup page and additional navigation pages - APT page (Airport navigation), RTE page (Route navigation), G-Force page, Info page, Logbook page and Airspace page. -
Page 11: Basic Operation
LX iris EFIS Document name: LX HUM Basic operation Document revision: Basic operation Push-rotary knobs and buttons Overview Bezel overview of the device. Figure . Device overview • M X6 black mounting screw ( ) • Left-hand push-rotary knob ( ) •... -
Page 12: Switching The Unit Off
LX iris EFIS Document name: LX HUM Basic operation Document revision: Switching the unit off To turn the unit off, press and hold the left push-rotary knob for seconds. (Marked with the power symbol) Alphanumeric inputs When alphanumeric input is required, a scroll widget will appear on the left side of the display, displaying the available lettering and/or symbols. -
Page 13: File Transfer
LX iris EFIS Document name: LX HUM Basic operation Document revision: .6 File transfer To transfer les to your device, copy the le(s) to the root of provided Micro SD card. Insert it into the slot on the front panel. Use left or right button to move through pages. -
Page 14: Pages
LX iris EFIS Document name: LX HUM User interface Document revision: User interface Pages To move through the pages, use left or right button, described in the section . . . The move- ment though pages is circular, so it doesn’t matter in which direction pilot moves. Pages overview The primary pages represent a row of pages in the graphical user interface, which allow the user to access different information screens and ight parameters. -
Page 15: Pfd Page
LX iris EFIS Document name: LX HUM PFD page Document revision: PFD page Figure . PFD page with all available widgets • Roll Pointer ( ) • Current magnetic heading ( ) • Horizon Line ( ) • + degree left turn ( ) •... -
Page 16: Attitude Indicator
LX iris EFIS Document name: LX HUM PFD page Document revision: Attitude indicator Figure . Attitude indicator on PFD page Attitude and horizon line Attitude is displayed as blue sky and brown ground. The border between the two is separated with a white line representing the horizon. -
Page 17: Indicated Airspeed Tape
LX iris EFIS Document name: LX HUM PFD page Document revision: Indicated airspeed tape Figure . Indicated airspeed tape wid- get with Ground speed (GS) at the top, True airspeed (TAS) in the bottom and Figure 6. ”Show airspeed” is disabled, Airspeed indication in the middle. -
Page 18: Red Cross Over Ground Speed
LX iris EFIS Document name: LX HUM PFD page Document revision: Red cross over Ground speed If there is red cross over GS indication, GPS is not valid. Figure . No Ground speed (GS) means there is a problem with GPS Disabling the indicated airspeed tape In the setup page, go to user section, Graphic and select menu AHRS. -
Page 19: Altitude Tape
LX iris EFIS Document name: LX HUM PFD page Document revision: Altitude tape Figure . Altitude tape widget with BARO at the bottom, vertical speed in- Figure . ”Show airspeed” is disabled, dicator at the top and altitude indica- ”Show altitude” is disable and ”Show tion in the middle direction”... -
Page 20: Barometric Pressure Setting (Baro)
LX iris EFIS Document name: LX HUM PFD page Document revision: Figure . ”Show airspeed”, ”Show altitude”, ”Show direction” options in Figure . ”Show airspeed” is enabled, setup page, ”User” section, ”Graphic” ”Show altitude” is enabled and ”Show menu, PFD menu direction”... -
Page 21: Turn Coordinator
LX iris EFIS Document name: LX HUM PFD page Document revision: Turn coordinator Figure . Turn coordinator widget Turn coordinator settings In the setup menu, pilot must go to user section, select graphic and then AHRS. Scroll down to Turn coordinator and press to select. Pilot can select between ” min”, ” min” and ”Off”. Standard rate turn indicator Standard rate turn indicator is represented by two airplane silhouettes on roll indicator. -
Page 22: Bank Pointer
LX iris EFIS Document name: LX HUM PFD page Document revision: .6 Bank pointer Bank pointer is displayed as a yellow triangle and is always xed at its position. Underneath the yellow triangle we can nd Slip/skid indicator. Slip/skid indicator Slip/skid indicator is displayed as a thin rectangle below the Bank pointer. -
Page 23: Bug - Direction Tape
LX iris EFIS Document name: LX HUM PFD page Document revision: Bug - Direction tape Direction tape with bug function is displayed at the bottom of PFD page. Adjust the Direction tape bug to your desired heading with left-hand push-rotary knob while at PFD page. -
Page 24: Magnetic Heading Bug Options - Sync Hdg Bug
LX iris EFIS Document name: LX HUM PFD page Document revision: Magnetic heading bug options – Sync HDG bug In the setup menu, pilot must go to user section, select graphic and then AHRS. Scroll down to ”Sync HDG bug” and press to select. Pilot can select between ”Auto”, ”APT”, ”RTE” and ”None”. Figure . -
Page 25: Quick Settings Menu
LX iris EFIS Document name: LX HUM PFD page Document revision: Quick settings menu Access the quick setting menu by long press of a right-hand push-rotary knob while on PFD page. In the menu, pilot can adjust “Pitch attitude offset” and “Brightness”. At the top of the display, pilot can see the GPS status icon and Battery status icon. -
Page 26: Battery Status
LX iris EFIS Document name: LX HUM PFD page Document revision: Battery status At the top of Quick settings menu, pilot can quickly access to Battery status indicator. White battery outline indicates it is using the aircraft’s battery. A red battery outline indicates it is using its built-in backup battery. -
Page 27: Pitch Attitude Offset
LX iris EFIS Document name: LX HUM PFD page Document revision: Pitch attitude offset Figure . Quick settings menu Pilot can adjust the pitch attitude offset to a desired value of ± ° by pressing the right-hand push-rotary knob while on PFD page. Rotate the push-rotary knob to a desired value. Press to con rm. -
Page 28: Apt Navigation Page
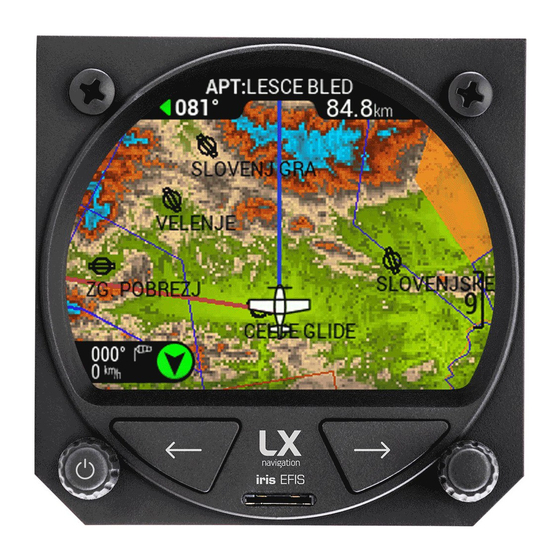
LX iris EFIS Document name: LX HUM APT navigation page Document revision: APT navigation page From PFD page press right button to access APT (Airport) navigation page. Pilot can select which APT point to use as navigational point. Overview Figure . -
Page 29: Zoom Level
LX iris EFIS Document name: LX HUM APT navigation page Document revision: Zoom level While on navigation page, use left-hand push-rotary knob to Zoom in and out. By rotating the left-hand push-rotary knob pilot will move through prede ned Zoom levels. 6. -
Page 30: 6.6 Navigation Lines
LX iris EFIS Document name: LX HUM APT navigation page Document revision: 6.6 Navigation lines Figure . Navigation lines Navigation lines are displayed to help the pilot visualize his ight. The blue line represents aircraft Track line. The red line represents “Destination line”. Both are user de ned in the setup menu, user section, graphic and select “Destination line”... -
Page 31: Navbox Line
LX iris EFIS Document name: LX HUM APT navigation page Document revision: NavBox line “NavBox” line is assembled of “NavBoxes”. A row of “NavBoxes” assembles a “NavBox line” which is marked with an indicator number in the top right corner of the “NavBox line”. Figure 8. -
Page 32: Edit "Navbox
LX iris EFIS Document name: LX HUM APT navigation page Document revision: 6. . Edit “NavBox” NavBoxes will appear on the APT and RTE navigation pages. All “NavBoxes” are pilot de ned. To change the “NavBox” press and hold right-hand push-rotary knob. The selected “NavBox” will appear on the red background. -
Page 33: 6.8 Select Apt
LX iris EFIS Document name: LX HUM APT navigation page Document revision: Figure . ”Navbox select” menu Rotate the right-hand push-rotary knob to move through each “NavBox” information available. Press the push-rotary knob to select the “NavBox” information. 6.8 Select APT Figure . -
Page 34: Sort By
LX iris EFIS Document name: LX HUM APT navigation page Document revision: Sort by Figure . Select airport menu, Sort by function Press the right-hand push-rotary knob to de ne the “Sort by” parameter. Default value is “ICAO”. Pilot can choose: •... - Page 35 LX iris EFIS Document name: LX HUM APT navigation page Document revision: Figure . Adding ”Filter” parameter with alphanumerical value Once pilot has selected the desired “Filter” parameter by pressing the right-hand push-rotary knob, one can apply next parameter, which is “Country”. Default value is ”All”...
- Page 36 LX iris EFIS Document name: LX HUM APT navigation page Document revision: Each of the parameters applied will affect the search results below the search parameters. If sorted by distance, no “Filter” can be applied and is disabled (grey text). Figure 6.
-
Page 37: Apt Details Page
LX iris EFIS Document name: LX HUM APT navigation page Document revision: Details about the selected airport are accessible by pressing the left-hand push-rotary knob at the APT page. APT details page To access APT details page, pilot must press the left-hand push-rotary knob at the APT page. Additional information about the selected airport will appear. -
Page 38: Rte Navigation Page
LX iris EFIS Document name: LX HUM RTE navigation page Document revision: RTE navigation page Figure . RTE navigation page From APT navigation page press right button to access RTE (Route) navigation page. Pilot can create, select, edit the route. Wind widget Wind widget can be found in the lower left corner of the display. -
Page 39: Zoom Level
LX iris EFIS Document name: LX HUM RTE navigation page Document revision: Zoom level While on navigation page, use left-hand push-rotary knob to Zoom in and out. By rotating the left-hand push-rotary knob pilot will move through prede ned Zoom levels. Map scale bar LX horizon will display a “Map scale bar”... -
Page 40: Navigation Lines
LX iris EFIS Document name: LX HUM RTE navigation page Document revision: Navigation lines Figure . Navigation lines Navigation lines are displayed to help the pilot visualize his ight. The blue line represents aircraft Track line. The red line represents “Destination line”. Both are user de ned in the setup menu, user section, graphic and select “Destination line”... -
Page 41: Navbox Line
LX iris EFIS Document name: LX HUM RTE navigation page Document revision: .6 NavBox line “NavBox” line is assembled of “NavBoxes”. A row of “NavBoxes” assembles a “NavBox line” which is marked with an indicator number in the top right corner of the “NavBox line”. Figure . -
Page 42: Edit Route
LX iris EFIS Document name: LX HUM RTE navigation page Document revision: Once pilot has selected the “NavBox” he wants to edit, a drop-down menu will appear with all available “NavBox” information: • UTC time • Leg distance • Vertical speed •... -
Page 43: Take Off Point
LX iris EFIS Document name: LX HUM RTE navigation page Document revision: Figure 6. By pressing the right-hand push-rotary knob pilot enters ”Edit route” menu Take off point To select the take-off point, pilot must press the right-hand push-rotary knob to select the “T” take-off point. -
Page 44: Select Turnpoint
LX iris EFIS Document name: LX HUM RTE navigation page Document revision: Figure 8. ”Select turnpoint” menu . . . Select turnpoint Press the right-hand push-rotary knob to de ne the “Sort by” parameter. Default value is “Distance”. Pilot can choose: •... -
Page 45: Select Airport
LX iris EFIS Document name: LX HUM RTE navigation page Document revision: Each of the parameters applied will affect the search results below the search parameters. If sorted by distance, no “Filter” can be applied and is disabled (grey text). The list will be instantly refreshed according to applied parameters and will display results: •... - Page 46 LX iris EFIS Document name: LX HUM RTE navigation page Document revision: Figure 6 . Select airport menu Press the right-hand push-rotary knob to de ne the “Sort by” parameter. Default value is “Distance”. Pilot can choose: • “Distance”, which will sort the results based on the distance. From the closest to the furthest airport.
- Page 47 LX iris EFIS Document name: LX HUM RTE navigation page Document revision: Figure 6 . Filtered results • “Rotating bearing icon to the selected airport” • “Distance to the selected airport” • “Bearing to the selected airport in degrees (°)” The selected airport can be con rmed by press of the right-hand push-rotary knob.
-
Page 48: Insert Turnpoint Or Airport
LX iris EFIS Document name: LX HUM RTE navigation page Document revision: Insert turnpoint or airport Figure 6 . Edit route menu To insert a new turnpoint or airport into pilots route, one should select the “L” Landing point and press of the right-hand push-rotary knob. A “Select action”... -
Page 49: Delete Added Turnpoint Or Airport
LX iris EFIS Document name: LX HUM RTE navigation page Document revision: NOTE Pilot can insert and delete arbitrarily number of additional turnpoints or airports to his route. Landing and take-off point can not be deleted. To see how, go to section “Insert turnpoint” or “Insert airport”. Delete added turnpoint or airport To delete the new created point, go to “Edit route”... -
Page 50: Next Turnpoint
LX iris EFIS Document name: LX HUM RTE navigation page Document revision: . . . Next turnpoint Quickly select next turnpoint in your planned route. Disabled (grey text) if your current position is Landing..Previous turnpoint Quickly select previous turnpoint in your planned route. Disabled (grey text) if your current position is Take-off. -
Page 51: Force Page
LX iris EFIS Document name: LX HUM G-force page Document revision: G-force page Overview Figure 6 . G-force page G-force page delivers a super accurate G-force load applied to the pilot and aircraft. At the top of the page if the actual G-force value. On the left side pilot can see the “MIN”... -
Page 52: Graphic G-Force Presentation
LX iris EFIS Document name: LX HUM G-force page Document revision: Below is the BARO (Barometric pressure). Set the BARO by turning the right-hand push-rotary knob. To nd out more refer to “Barometric pressure” section of the manual. Graphic G-force presentation Current G-force load is also displayed as red dot on the G-force scale. -
Page 53: Info Page
LX iris EFIS Document name: LX HUM Info page Document revision: Info page Figure 6 . Info page Info page will display the essential information about the device. GPS status GPS status is displayed in the rst section of the page. If the GPS status is “Last x”, the device does not have valid GPS source. -
Page 54: Utc Time And Date
LX iris EFIS Document name: LX HUM Info page Document revision: UTC time and date If the device has a valid GPS source, the current UTC time (above) and date (below) will be displayed in the right section below the “GPS status”. Current outside air temperature will be displayed as ”OAT”... -
Page 55: Logbook Page
LX iris EFIS Document name: LX HUM Logbook page Document revision: Logbook page Figure 68. ”Logbook” page with list of last ights Pilots logbook and memory device will serve the pilot as his own digital pilot logbook. The logbook page will display last ight although the device will store all the ight on the internal memory. -
Page 56: Flight Transfer
LX iris EFIS Document name: LX HUM Logbook page Document revision: Figure 6 . ”Flight details” page with ight details and ”Transfer to SD” option Flight transfer Select “Transfer to SD” to download your ight to Micro SD card inserted in the slot between the buttons on the front of the device. - Page 57 Logbook page Document revision: NOTE Always use manufacturer provided Micro SD card. Third party SD cards might not function with this device. In case the card is lost, contact your local of cial representative or LX navigation d.o.o. Device manual Public...
-
Page 58: Statistics Page
LX iris EFIS Document name: LX HUM Statistics page Document revision: Statistics page Figure . Statistics page will appear once the device is in ”Flight mode” Overview Statistics page is hidden if device is not in the ” ight mode” and will appear instead of ”Logbook”... -
Page 59: End Ight
LX iris EFIS Document name: LX HUM Statistics page Document revision: End ight Figure . Manually ”End ight” by pressing right-hand push-rotary knob while on Statistics page. To manually end ight, press right-hand push-rotary knob while on statistics page. A pop-up message will appear. -
Page 60: Airspace Page
LX iris EFIS Document name: LX HUM Airspace page Document revision: Airspace page Figure . ”Airspace” page with the list of active airspace and details Airspace page will list all the near and active airspace. To transfer the airspace le (.as), go to Setup, System section and Transfer menu. List of airspace At the list of airspace, pilot can see the name of the airspace and its class below. -
Page 61: Airspace Details
LX iris EFIS Document name: LX HUM Airspace page Document revision: Figure . Empty list will appear if no Figure 6. List of near and active airspace is near or active airspace with details Airspace details By pressing right-hand push rotary knob on selected airspace from the list, pilot will access ”Airspace details”... -
Page 62: Setup Page
LX iris EFIS Document name: LX HUM Setup page Document revision: Setup page Overview At setup page, the pilot can set all parameters of the unit. The Setup menu is divided into two sections, ”User” and ”System”. ”User” settings are concerning the pilot’s personal preferences and setting, which will change if the pilot selects of the pilot pro le, while ”System”... -
Page 63: Pilot
LX iris EFIS Document name: LX HUM Setup page Document revision: Pilot Figure 8. Setup page and ”Pilot” menu Pilot settings will allow the pilot to: • Select active pilot (Select from the list) • Write a name of the pilot •... -
Page 64: Airspace
LX iris EFIS Document name: LX HUM Setup page Document revision: Pages The Pages setting is allowing the pilot to enable and disable all available pages of the LX Hori- zon: • PFD • APT page • RTE page • G-force •... - Page 65 LX iris EFIS Document name: LX HUM Setup page Document revision: Figure 8 . Default pages settings Select from the list of available pages: • APT page • RTE page • G-force page • PFD page • Info page • Logbook page •...
-
Page 66: Map
LX iris EFIS Document name: LX HUM Setup page Document revision: . . . Airspace In the ”Airspace” menu pilot can adjust colors to speci c airspace. Pilot can de ne ”Outline” color, ”Fill” color and ”Transparency level”. • “Controlled Zone” Set ”Outline” and ”Fill” color •... - Page 67 Setup page Document revision: Figure 8 . Color Palette Figure 8 . Color Palette Figure 8 . Color Palette - LX Navigation - LX Navigation - Imhof Figure 8 . Color Palette Figure 8 . Color Palette Figure 86. Color Palette...
-
Page 68: Route
LX iris EFIS Document name: LX HUM Setup page Document revision: Figure . Color Palette - White (no elevation) . . . Route In the ”Route” menu, pilot can adjust colors to speci c elements on the ”RTE” page. Pilot can de ne ”Outline”... -
Page 69: Warnings
LX iris EFIS Document name: LX HUM Setup page Document revision: Warnings In the ”Warnings” menu, pilot can enable or disable warnings. The warnings are related to the values adjusted at ”Setup” page, System section, ”Aircraft” menu, ”Airspeed” menu. • “Stall” ”On” or ”Off” option •... -
Page 70: System" Section
LX iris EFIS Document name: LX HUM Setup page Document revision: ”System” section ”System” section of setup are settings of the device, which remain xed until changed and will not be affected by the active pilot. System section setup items are: •... - Page 71 LX iris EFIS Document name: LX HUM Setup page Document revision: Figure 6. Aircraft menu, ”Airspeed” section Figure . Aircraft menu, ”Category” Figure 8. Aircraft menu, ”Registra- section tion nr” section Device manual Public...
-
Page 72: Nmea
. Setup page, ”Units” section NMEA In the ”NMEA” section, pilot can adjust all communication protocols between LX navigation device and third party peripherals. To nd out more, please refer to ”LX NMEA . Protocol” and ”LX NMEA . Protocol” document. - Page 73 • “Transponder” ”On” or ”Off” option. If enabled - ”On”, baudrate on ”Flarm” port will go to ”BR 6 ” and GPS data will be transmitted on ”Flarm” port. For detailed description of LXWPx, LXDT and LXBC sentences refer to LX Navigation Data Port documentation (document name: LX CP). Figure .
-
Page 74: Transfer
LX iris EFIS Document name: LX HUM Setup page Document revision: Transfer In the ”Transfer” section, pilot can transfer and upload all database les. Pilot should use speci c data formats: • “.cub” For ”Turpoint”, ”Airspace” and ”Route” les. • “.cup” For ”Task” and ”Route” les. •... -
Page 75: Network
LX iris EFIS Document name: LX HUM Setup page Document revision: Network In the ”Network” section, pilot can adjust all the network settings. The menu is divided into ”Wireless” section and ”Cloud” section. ”Wireless” section of ”Network” menu: • “Wireless mode” ”Off”, ”Bluetooth server”, ”Bluetooth client”, ”WiFi Access point” or ”WiFi client”. -
Page 76: Service
LX iris EFIS Document name: LX HUM Setup page Document revision: Service Figure . Setup page, ”Service” section In the ”Service” section pilot can access multiple settings: • “Info” ”Serial number”, ”Firmware”, ”Hardware” and ”Battery”. • “CAN unit info” • “Password” (Numeric input for special features and functions) •... -
Page 77: Shutdown
LX iris EFIS Document name: LX HUM Setup page Document revision: . .8 Shutdown To shutdown the device, go to setup page and scroll all the way down to the bottom of the ”Setup” menu. Select the ”Shutdown” option. A pop-up message will appear - use the right- hand push-rotary knob to select ”Yes”... -
Page 78: Taking Care Of Your Iris Efis
LX iris EFIS Document name: LX HUM Taking care of your iris EFIS Document revision: Taking care of your iris EFIS If you were taken here by following the link from the introductory part of this manual, you can get back by clicking on the underlined text - Using this manual. The internal battery The iris EFIS has a Li-Ion internal battery, used for powering the unit, if the main power supply of the plane gets cut, during ight. -
Page 79: Pressure Sensors
LX iris EFIS Document name: LX HUM Taking care of your iris EFIS Document revision: Pressure sensors The iris EFIS incorporates a variety of delicate pressure sensors. Since these are zero- ux sensors (there is no air ow through the sensors, only pressure differences), no air lters are required. -
Page 80: Contact
LX iris EFIS Document name: LX HUM Contact Document revision: Contact Headquarters LX navigation d.o.o. Tkalska ulica Celje Slovenia VAT ID Company is registered in Slovenia, EU under the VAT ID: SI Webpage www.lxnavigation.com Phone + 86 ( ) + 86 ( ) Sales sales@lxnavigation.com... - Page 81 LX navigation will not proceed with repair unless we get a straight respond on information email sent aſter inspection of device. LX navigation is not obligated to keep the device, if the owner does not answer the information email within a 30 day period. If the customer respond aſter the given period, some additional charges may appear.
Need help?
Do you have a question about the iris EFIS Series and is the answer not in the manual?
Questions and answers