
Summary of Contents for VisionAid ReadEasy Evolve Feature Pack
- Page 1 ReadEasy Evolve Feature Pack User Manual English, Version 1.2 Copyright (C) 2019, VisionAid International Ltd, all rights reserved.
-
Page 2: Table Of Contents
Table of Contents Introduction ..................Page 4 Improvement program ..............Page 4 Safety ....................Page 5 Pacemaker safety guidelines ............Page 5 Feature Pack contents ..............Page 5 Feature Pack connections ..............Page 6 Wireless Control Pad ................ Page 8 Key additional features for blind users ........... - Page 3 Main menu button ................ Page 19 Document management .............. Page 20 Pages management ..............Page 22 Bookmarks ................... Page 24 Recognition profiles ..............Page 25 Display and pointer ..............Page 25 Menu settings ................Page 27 Advanced settings ............... Page 27 Additional controls for low vision users –...
-
Page 4: Introduction
Users are the best people to help us improve and develop our products so if you have any ideas or suggestions, no matter how small, please do contact us. Email: suggestions@visionaid.com Post: ReadEasy Evolve Suggestions VisionAid International Limited Bridge Lodge Spalding Lincolnshire PE11 3AU United Kingdom Phone:... -
Page 5: Safety
Safety Pacemaker safety guidelines The ReadEasy Evolve contains magnets in multiple locations. If you have a pacemaker fitted please consult the manufacturer’s guidelines for safe operating distances. Do not use the ReadEasy Evolve near inadequately shielded medical devices. There are magnets located in the main unit, the camera arm, the Wireless Control Pad and the Wireless Control Pad Simplifier. -
Page 6: Feature Pack Connections
Feature Pack connections All of the input and output connections are located on the rear of the ReadEasy Evolve, in a row running horizontally in-line with the power connection. The connections are directly above the camera storage section, 2.5 inches (6.5cm) up from the base. USB 3.0 port 1 HDMI port DisplayPort... - Page 7 HDMI and DisplayPort for monitor or television connection The HDMI and DisplayPort can be used to connect your ReadEasy Evolve to a monitor or television enabling you to also use it like a powerful desktop video magnifier to magnify and enhance the view of your documents.
-
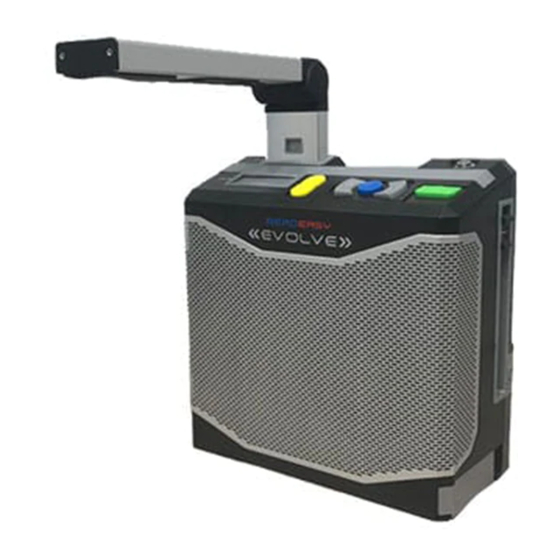
Page 8: Wireless Control Pad
It has two raised dots directly above it. Wireless Control Pad The ReadEasy Evolve Feature Pack includes a tactile, 16 button, Wireless Control Pad that enables many additional features. The controls are all individually shaped (and coloured for low vision users) for easy navigation. -
Page 9: Key Additional Features For Low Vision Users
Key additional features for low vision users 1. Display your documents in large print on any screen. 2. Adjust the size and enhance them as they are being read back to you. 3. Integrated joystick allows your documents to be panned without having to physically move the page around under the camera. -
Page 10: Removing The Wireless Control Pad
Wireless Control Pad batteries Two triple A (AAA) batteries to power the Wireless Control Pad are included with the ReadEasy Evolve Feature Pack. Inserting or replacing the batteries Your distributor may have already inserted the batteries into the Wireless... -
Page 11: Wireless Control Pad Connection
Carefully open the hinged battery compartment cover on the base of the Wireless Control Pad. To do so, turn it over so the soft foam base is facing upwards. There is a cut out at the top of the foam for the battery cover. -
Page 12: Simplifier
Control Pad connected”. It can take up to 10 seconds for the Wireless Control Pad to connect after a button it pressed. The Wireless Control Pad will power itself off automatically after the ReadEasy Evolve is turned off, it has no on / off switch of its own. Simplifier The Wireless Control Pad includes a simplifying overlay which hides the low vision controls, Main menu, Bookmarks and Help buttons, reducing the... -
Page 14: Controls For No Vision & Low Vision Users
Controls for no vision & low vision users Help & Cancel Help button This is the turquoise triangular button located in the very top left of the Wireless Control Pad. Normal operation help (Live or Document modes) If you are wondering what a particular button does on the Wireless Control Pad, pressing the Help button, (when not in a menu or question dialogue) starts Help mode which is an intuitive control describer mode. -
Page 15: Capturing Documents
Capturing documents There are two controls to capture documents, both are located in the bottom right corner of the keypad. Please note, for information regarding how to position your document, please see “Positioning Documents for Capture” on page 13 of the ReadEasy Evolve Standard User Manual. -
Page 16: Powerread Feature
Append: Quick press Each quick press adds an additional page to your current document. This is ideal for capturing short multiple page documents (e.g. a 3 page letter). Multi-page automatic capture: Press & hold If you wish to capture multiple pages of a document automatically (e.g. a chapter of a book), after your first page has been captured, press and hold the Append button until, “Multi-page capture started”... -
Page 17: Navigating Documents
Navigating documents Captured documents can be navigated using the group of 6 navigation controls. They are coloured blue and silver. Play / pause button This is the blue circular button located in the centre of the bottom row of buttons. It has a triangle and two rectangles embossed on it. -
Page 18: Next & Previous Paragraph & Page Buttons
Next & Previous paragraph & page buttons These are the two taller outermost grey crescent shaped buttons located either side of the Next and Previous sentence buttons. They have double right and left arrows embossed on them. Next & Previous paragraph: Quick press To navigate forwards and backward a paragraph, press the taller right or left crescent buttons. -
Page 19: Main Menu
Main menu ReadEasy Evolve has additional features and settings which are accessed through the Main menu. Some features have shortcuts for faster, direct access and are described in the relevant sections. Menu navigation You are presented with a vertical list of options and you always start at the top of the list. -
Page 20: Document Management
Open Main menu: Long press To open the Main menu, long press the Main menu button. Document management This is the first item in the Main menu. It allows you to store, retrieve, import and export documents, both on ReadEasy Evolve’s built-in memory and on external USB memory sticks and MP3 players. - Page 21 Open a document Select from a list of your saved documents to open. ReadEasy Evolve remembers your last position and automatically opens your document at that point. Documents are ordered with the most recently saved one at the top of the list. Please note, ReadEasy Evolve’s user manual will be stored on every ReadEasy Evolve after an upcoming software update.
-
Page 22: Pages Management
Pages management This is the second item in the Main menu and is not yet implemented. This allows you to perform advanced functions on your currently open document. Page management has the following options: 1. Page information 2. Document information 3. - Page 23 5. Collate pages This is extremely useful if capturing a large number of pages in a document where the left and right pages together are larger than A4 (or letter paper size) and you wish to capture at A4 camera height for maximum accuracy. You can capture all the pages on one side of your document, followed by all the pages on the other side, before using Collate pages to knit them back together in the correct order.
-
Page 24: Bookmarks
Bookmarks This is the third option in the Main menu. Bookmarks enable you to set markers in your document to quickly navigate between. This can be useful when there are places in your document that you’d like to refer back to at a later date, such as the beginning of chapters or particular points of interest. -
Page 25: Recognition Profiles
To exit the Bookmarks menu, press the Cancel button or quick press the Bookmarks button. Recognition profiles This is the fourth option in the Main menu and is an advanced setting. Please refer to this section in the Standard User Manual for all but two additional options below: 1. - Page 26 3. Highlight type Choose the way the currently selected word is highlighted. Options include: None, Rectangle, Inverse rectangle, Underline, Colour text. 4. Pointer Colour Choose the colour of the pointer on screen (appears when the joystick or optional mouse is moved). 5.
-
Page 27: Menu Settings
14. Center on word when reading (default: disabled) By default, the ReadEasy Evolve tracks words on screen in a natural way, only moving the screen when required. Enabling this option keeps the word being read in the middle of the screen at all times. 15. - Page 28 Please refer to this section in the Standard User Manual for all but the one option below. When the Wireless Control Pad is connected, an additional option appears which is not documented in the Standard User Manual: Calibrate Wireless Control Pad joystick This enables you to re-calibrate the joystick on the Wireless Control Pad.
-
Page 30: Additional Features For Low Vision Users
Additional features for low vision users ReadEasy Evolve has many additional features for low vision users. This section is only useful for users with some usable vision who also have their ReadEasy Evolve connected to computer monitor or television. Documents can be magnified, highlighted, automatically scrolled, contrast and colour enhanced and more, to make reading far easier than with traditional video magnifiers or reading machines. -
Page 31: Controls For Low Vision Features
3. Document mode Once a document has been captured and recognised, you can display your document in 6 enhanced modes as well automatically scroll it whilst having it read out loud. Controls for Low Vision Features The 5 main low vision controls are yellow (one has a grey centre) and are located at the top of the keypad in the centre and over to the right. -
Page 32: Reading Colours Button
rotate the zoom dial anticlockwise. This also increases and decreases the size of text when you are in a menu. Reading colours button This is a grey round button located in the centre of the Zoom dial. Cycle preferred reading colour, its inverse & full colour: Quick Press To change between your preferred reading colour (text and background colour), its inverse and full colour, quick press the Reading colours button. - Page 33 Pan around your document: Move the Joystick in desired direction To pan around your document in Live mode, Image view and Overlay view, move the Joystick in the direction you want to move your document. The further you move the Joystick, the faster you will pan. Start reading from word closet to pointer &...
-
Page 34: Text Views Button
Navigate by a screen of text: Move Joystick in the opposite directions of continuous scrolling Some users prefer to read text when it is static rather than scrolling continuously. ReadEasy Evolve features an intelligent screen-by-screen reading mode which allows you to instantly advance or go back one screen of text at a time. -
Page 35: Text Views
Peek at Image view from Overlay view: Press and hold When in Overlay view, press and hold the Text views button to peek at the original Image view. This can be extremely useful if ReadEasy Evolve hasn’t recognised a word correctly as it allows you to quickly see the original picture of the word so that it can be read. - Page 36 1. Image view This displays the unenhanced original image of your document. It is perfect for looking at handwritten documents or photographs.
- Page 37 2. Overlay view This view preserves the formatting, layout and pictures of your document and replaces the words with crystal clear text in your chosen two-colour reading combination. This makes it ideal for looking at documents with pictures, tables and diagrams. 3.
- Page 38 4. Horizontal view This view repositions all of the text in the document onto a single line. Text can be continuously scrolled horizontally and screen-by-screen. 5. Vertical view Ideal for some users with Retinitis Pigmentosa, (tunnel vision), the vertical visualisation displays one word per line. Text can be continuously scrolled vertically and screen-by-screen.
-
Page 39: Touch Screen Features
6. Word view Displays one word on screen at a time. Text can be advanced screen-by- screen. Touch Screen Features If you have a compatible multi-touch monitor connected to your ReadEasy Evolve via HDMI or DVI and USB, there are several features that are only applicable to you. -
Page 40: Caring For Your Touch Screen
Zoom in / out To decrease the magnification, use your index finger and thumb to make a pinching movement on the screen. To increase the magnification, move your closed finger and thumb apart. You can also do the pinching and stretching motion with two fingers on separate hands.
Need help?
Do you have a question about the ReadEasy Evolve Feature Pack and is the answer not in the manual?
Questions and answers