Table of Contents
Advertisement
Quick Links
Installation Instructions for 81568
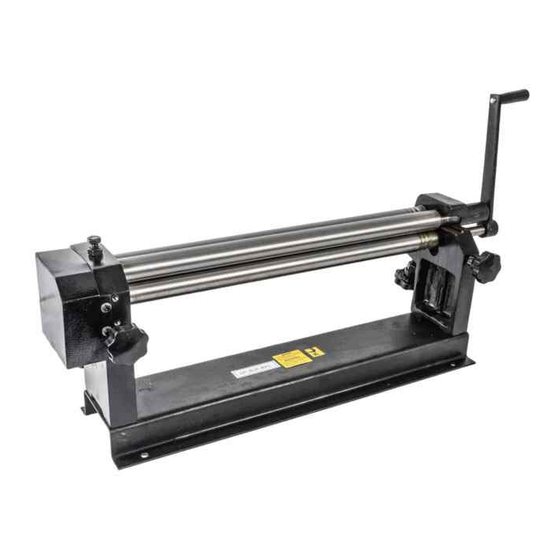
Slip Roll
24" Maximum Width
Introduction
Please read and save these instructions. Read carefully before attempting to assemble, install, operate or maintain the
product described. Protect yourself and others by observing all safety information. Failure to comply with instructions
could result in personal injury and/or property damage. Retain instructions for future reference.
This hand operated 24" slip roll is made of a heavy duty steel plate base with a cast iron frame and ground high carbon
steel rolls. The slip roll uses three adjustable rolls to fabricate straight cylinders, as small as the diameter of the rolls,
and cones of limited dimensions. There are wire forming grooves on the rolls which are used to form wire loops &
curves of various thickness and diameters, and cylinders form metal with wired edges. Closed cylinders, cones and
wire loops can be removed from the machine without distortion by a pivotal top roll.
Unpacking
Refer to the parts diagram
Check for shipping damage and completeness. Immediately report missing parts to JEGS.
WARNING: Be careful not to touch overhead power lines, piping, lighting, etc. If lifting equipment is used. See
specifications below for weight. Proper tools, equipment and qualified personnel should be employed in all phases of
unpacking and installation.
The slip rolls come assembled as one unit. The crank handle assembly needs to be fastened to the tool and should be
located and accounted for before assembling.
Important: Rolls are coated with a protectant. To ensure proper fit and operation, remove coating. Coating is easily
removed with mild solvents, such as mineral spirits, and a soft cloth.
Avoid getting cleaning solution on paint or any of the rubber or plastic parts. Solvents may deteriorate these finishes.
Use soap and water on paint, plastic or rubber components. After cleaning, cover all exposed surfaces with a light
coating of oil.
WARNING: Never use highly volatile solvents. Non-flammable solvents are recommended to avoid potential fire
hazard.
Specifications
Model
Max
thickness
(ga)
555-81568
20
General Safety Information
WARNING: For your own safety, read all of the instructions and precautions before operating tool.
CAUTION: Always follow proper operating procedures as defined in this manual even if you are familiar with use of this
or similar tools. Remember that being careless for even a fraction of a second can result in severe personal injury.
BE PREPARED FOR THE JOB
1. Wear proper apparel. Do not wear loose clothing, gloves, neckties, rings, bracelets or other jewelry which may get
caught in moving parts of machine.
2. Wear protective covering to contain long hair.
3. Wear safety shoes with non-skid soles
4. Wear ANSI approved glasses. Prescription glasses are not safety glasses.
5. Be alert and think clearly. Never operate tools when tired, intoxicated or when taking medications that cause
drowsiness.
Max width
Dia of
(in)
Roll
(in)
24
38
Min.cylinder
Wire groove
size formed
diameter
(in)
(mm)
1.50
2.4, 3.2, 4
1-800-345-4545 jegs.com
Packing
G.W/N.W
Dimension
(lbs)
(in)
88/81
37.4x10.6x15
Advertisement
Table of Contents

Summary of Contents for Jegs 81568 Series
- Page 1 Unpacking Refer to the parts diagram Check for shipping damage and completeness. Immediately report missing parts to JEGS. WARNING: Be careful not to touch overhead power lines, piping, lighting, etc. If lifting equipment is used. See specifications below for weight. Proper tools, equipment and qualified personnel should be employed in all phases of unpacking and installation.
- Page 2 Adjust rear roll so that the workpiece can pass through the rolls without difficulty. Slightly raise the rear roll before each succeeding pass until the desired diameter is obtained. 1-800-345-4545 jegs.com...
- Page 3 Curvature too severe for workpiece Adjust rear roll lower for less curvature, pass workpiece thickness. through rolls several times, increasing the curvature with each successive pass. Workpiece spirals Rolls are not parallel Adjust rolls parallel, see Operation. or deforms 1-800-345-4545 jegs.com...
- Page 4 Parts Diagram 1-800-345-4545 jegs.com...
- Page 5 13 6-1.0 x 8 mm cone point set screw Gear shaft 6 mm lock washer 31 8-1.25 x 30 mm cone point set screw Rear roll adjusting knob 19T gear Right frame Pivot block Roll guide block Gear cover 1-800-345-4545 jegs.com...
Need help?
Do you have a question about the 81568 Series and is the answer not in the manual?
Questions and answers