Table of Contents
Advertisement
Quick Links
NanoWii FC - User Manual
1. Einleitung | Introduction......................................................2
2. Installation........................................................................ 3
2.1. Pins Anlöten | Solder the pins...............................................3
2.2. Wahl der Stromquelle | Chooseing a power source...................4
2.2.1. Lipo oder Steller | LiPo or ESC................................................4
2.2.2. USB Power...........................................................................5
2.3. Empfänger anschließen | Connect a RX...................................6
2.3.1. Standard Empfänger | Standard RX.........................................6
2.3.2. Summsignal Empfänger | PPM sum RX.....................................7
2.3.3. Spektrum Satellite................................................................7
2.4. Steller anschließen | Connect the ESCs...................................8
2.5. Copter Montage | Copter installation.....................................9
2.6. Arduino IDE......................................................................10
2.7. MultiWii Firmware & upload.................................................11
3. Layout und Maße | Layout and Dimensions...........................12
4. Externe Sensoren | External sensors...................................13
4.1. LiPo Überwachung | LiPo monitoring.....................................13
5. Technische Details | Technical Details..................................14
Version 1.1
Advertisement
Table of Contents

Summary of Contents for Flyduino NanoWii FC
-
Page 1: Table Of Contents
Version 1.1 NanoWii FC - User Manual 1. Einleitung | Introduction............2 2. Installation................ 3 2.1. Pins Anlöten | Solder the pins..........3 2.2. Wahl der Stromquelle | Chooseing a power source....4 2.2.1. Lipo oder Steller | LiPo or ESC..........4 2.2.2. USB Power................5 2.3. -
Page 2: Einleitung | Introduction
Einleitung | Introduction Das NanoWii wurde entworfen um kleine The NanoWii was designed to controll small bis mittelgroße Multirotor Helikopter zu to medium sized multirotor helicopters. steuern. Es verfügt über einen It contains a microcontroller unit, a 3-axis Mikrocontroller (Prozessor), einem 3- gyroscope and a 3-axis ACC Achsen Kreisel (Gyro) und einem 3-Achsen (accelerometer). -
Page 3: Installation
Installation 2.1. Pins Anlöten | Solder the pins Zu erst sollte man sich entscheiden, welche First you should decide, which pins you Anschlüsse man braucht. Es ist nicht nötig need. Not all pins are required to be alle Pins anzulöten. So kann man Gewicht soldered. -
Page 4: Wahl Der Stromquelle | Chooseing A Power Source
2.2. Wahl der Stromquelle | Chooseing a power source 2.2.1. Lipo oder Steller | LiPo or ESC Es gibt 3 Möglichkeiten das NanoWii mit There are 3 ways to power the NanoWii Strom zu versorgen. board. 1. Standard: Stromversorgung direkt über 1. -
Page 5: Usb Power
2.2.2. USB Power Um Probleme mit der USB und der Board To prevent problems with the USB and the -internen Spannung zu vermeiden, ist der board power, the USB's +5V pin is not Pluspol von dem USB Anschluss nicht connected by default. verbunden. -
Page 6: Empfänger Anschließen | Connect A Rx
2.3. Empfänger anschließen | Connect a RX 2.3.1. Standard Empfänger | Standard RX Ein normaler 4-6 Kanal Empfänger ist You can use a standard RX with 4-6 ausreichend. Fünf (5) Kanäle sind aber channels. A RX with a minimum of available empfehlenswert. -
Page 7: Summsignal Empfänger | Ppm Sum Rx
2.3.2. Summsignal Empfänger | PPM sum RX Über einen Summsignal-Empfänger können With a PPM sum RX you can use up to 8 bis zu 8 Kanäle mit nur einem Kabel channels with only one wire genutzt werden. (Siehe Anschuss-Diagram) 2.3.3. Spektrum Satellite Ein Spektrum Satellite Empfänger kann wie With a Spektrum Satellite RX you can also... -
Page 8: Steller Anschließen | Connect The Escs
2.4. Steller anschließen | Connect the ESCs Am NanoWii ist der Anschluss von bis zu 6 The NanoWii was designed to provide up to Stellern vorgesehen. Es können jedoch bis 6 ESC connections, but by using the zu acht (8) angeschlossen werden. additional pins A2 and 4, up to 8 ESCs/motors are possible. -
Page 9: Copter Montage | Copter Installation
2.5. Copter Montage | Copter installation Bei dem Einbau des NanoWii ist darauf zu When installing the NanoWii it is best placed achten, dass es so mittig wie möglich am at the center of your copter. It also may Copter angebracht wird. help if you place some rubber rings between Außerdem kann es von Vorteil sein, die the screws and the NanoWii PCB for sensor... -
Page 10: Arduino Ide
2.6. Arduino IDE Arduino (http://www.arduino.cc) ist eine Arduino (http://www.arduino.cc) is a open Open Source Software, die gemacht ist um source software that is designed to simplify den Umgang mit bestimmten AVR the use of some AVR MCU's. Mikrocontrollern zu vereinfachen. It is used to edit and upload C-code. -
Page 11: Multiwii Firmware & Upload
2.7. MultiWii Firmware & upload MultiWii (http://www.multiwii.com) ist eine MultiWii (http://www.multiwii.com) is an Open Source Multirotor Helikopter Software open source multirotor heli software by von Alexandre Dubus. Alexandre Dubus. Das NanoWii ist extra für diese Software The NanoWii is specifically designed for the ausgelegt. -
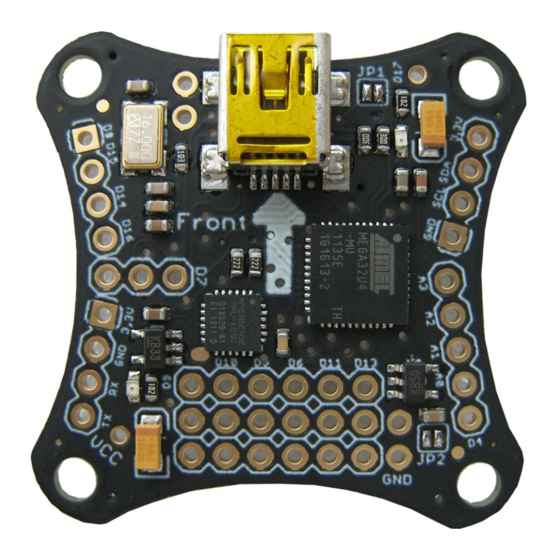
Page 12: Layout Und Maße | Layout And Dimensions
Layout und Maße | Layout and Dimensions... -
Page 13: Externe Sensoren | External Sensors
Externe Sensoren | External sensors Es können alle von der Software You may connect any I²C sensor to the unterstützten I²C Sensoren angeschlossen NanoWii that is supported by the software. werden. But as a Gyro and a ACC is already Da Gyro und ACC ja schon vorhanden sind, present, it is recommendable to connect empfiehlt sich nur noch der Anschluss von:... -
Page 14: Technische Details | Technical Details
The Spektrum brand is a trademark of Horizon Hobbies USA. Vorbehalt | Disclaimer: Dieses Dokument wurde als Referenz fuer den This is a reference document for the Flyduino flight “Flyduino” erstellt, und erhebt keinerlei Anspruch controller and does not claim to be correct nor ä...
Need help?
Do you have a question about the NanoWii FC and is the answer not in the manual?
Questions and answers