Samsung NP-Q1 User Manual (Vista) User Manual
Ultra mobile pc
Hide thumbs
Also See for NP-Q1 User Manual (Vista):
- User manual (206 pages) ,
- Important information manual (212 pages)
Table of Contents
Advertisement
Quick Links
Chapter 1.
Getting Started
Product Features
Before You Start
Contents
Safety Precautions
Proper Posture During Computer Use
Important Safety Information
Replacement Parts and Accessories
Regulatory Compliance Statements
WEEE SYMBOL INFORMATION
Overview
Turning the Computer On and Off
2
4
7
8
18
20
22
24
35
36
42
Advertisement
Table of Contents

Subscribe to Our Youtube Channel
Related Manuals for Samsung NP-Q1 User Manual (Vista)


Summary of Contents for Samsung NP-Q1 User Manual (Vista)
- Page 1 Chapter 1. Getting Started Product Features Before You Start Contents Safety Precautions Proper Posture During Computer Use Important Safety Information Replacement Parts and Accessories Regulatory Compliance Statements WEEE SYMBOL INFORMATION Overview Turning the Computer On and Off...
-
Page 2: Product Features
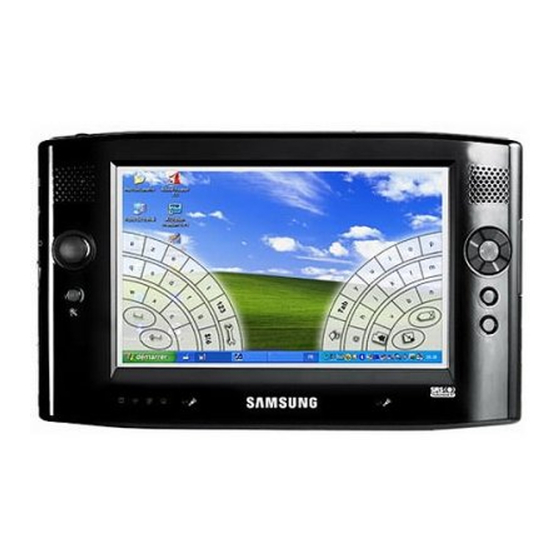
Product Features Small but Strong UMPC (Ultra Mobile PC) ● Intel Celeron M ULV Processor / ● 256MB~Up To 1GB DDR2 Memory ● 1.8”, 20~60GB High-Capacity Hard Disk Drive 7” WVGA TFT LCD ● Basic Resolution of 800x480 Pixels, Maximum Resolution of ●... - Page 3 Multiple Network Support ● Wired LAN, Wireless LAN, Bluetooth (Optional) ● Resolves Space Restrictions through the Wireless Communication Function Compact, Light-Weight Design for Portability / Polished Design ● A mere 779g (Without the Bluetooth modules) ● High-Gloss Front Panel Optional Accessories for Additional Convenience ●...
-
Page 4: Before You Start
Before You Start Before reading the User Guide, first check the following information. User Guide Information This product is supplied with an Getting Started Guide, and a User Guide. You can even more easily and conve- niently use the computer by using any of the guides depending on your needs. - Page 5 Start > All Programs Click the Start button and > Samsung > then select All Programs User Guide > > Samsung > User User Guide Guide > User Guide in this order from the menu. Description...
- Page 6 Copyright © 2007 Samsung Electronics Co., Ltd. Samsung Electronics Co., Ltd. owns the copyright of this manual. No part of this manual may be repro- duced or transmitted in any form or by any means, electronic or mechanical, without the consent of Samsung Elec- tronics Co., Ltd.
-
Page 7: Table Of Contents
Chapter 7. Windows Media Center About Package Contents and the Program Guide Connecting and Setting Up Media Center Using Media Center Chapter 8. Appendix Using Samsung Magic Doctor Using McAfee SecurityCenter Reinstalling Software Reinstalling Windows Vista Q & A Intel Media Sharing Software Information Product Specifications... -
Page 8: Safety Precautions
Safety Precautions For your security and to prevent damage, please read the following safety instructions carefully. Since this is commonly applied to Samsung Computers, some figures may differ from actual ones. Warning Failing to follow instructions marked with this symbol may cause personal injury and even fatality. - Page 9 If the power cord or pow- er outlet makes a noise, disconnect the power cord from the wall outlet and contact a service center. There is a danger of elec- tric shock or fire hazard. Do not use a damaged or loose mains plug or power cord or power outlet.
- Page 10 If water or another sub- stance enters the power input jack, AC adapter or the computer, dis- connect the power cord and contact the service center. Damage to the device within the computer may cause electric shock or fire hazard. Battery Usage Related Keep the battery out of the reach of infants and...
- Page 11 Do not place any con- tainer filled with water or chemicals over or near the computer. If water or chemicals en- ter the computer, this may cause fire or electric shock. If the computer is broken or dropped, disconnect the power cord and con- tact a service center for a safety check.
- Page 12 Use only authorized parts (multi-plug, bat- tery and memory) and never disassemble parts. There is a danger of damaging the product, electric shock or fire hazard. Shut down the com- puter and disconnect all cables before disas- sembling the computer. If there is a modem, disconnect the phone line.
- Page 13 This may cause an injury, fire or explosion. Use only a battery autho- rized by Samsung Elec- tronics. Failing to do so may cause an explosion. Avoid contact with metal...
- Page 14 There is a danger of fire. Make sure to have the product tested by a safety service engineer after repairing the product. Authorised Samsung Re- pair Centers will carry out safety checks after a repair. Using a repaired product without testing it for safety might cause electric shock or fire.
- Page 15 computer, make sure to remove the battery. There is a danger of fire. Do not use a damaged or modified CD/Floppy Disk. There is a danger of dam- aging the product or per- sonal injury. Do not insert your fingers into the PC Card Slot.
- Page 16 Use parts authorized by Samsung Electron- ics only. Failing to do so, may cause fire or damage the product. Never disassemble or repair the product by yourself. There is a danger of electric shock or file. To connect a device...
- Page 17 LCD Related LCD Bad Pixels The limits of LCD manu- facturing technology permit a maximum of 4 abnormal or bad pixels, which does not affect the system performance. This system may have the same level of abnor- mal or bad pixels as any other company’s prod- ucts.
-
Page 18: Proper Posture During Computer Use
If the user is not included in the coverage, the recommendation is to be applied according to the user’s needs. Since this is commonly applied to Samsung Computers, some figures may differ from actual ones. -
Page 19: Volume Control
Hand Position ■ It is recommended to connect and use an external keyboard and mouse when using the computer for a long time. ■ Do not hold the Stylus Pen with excessive force. ■ Do not press the touch screen with exces- sive force. -
Page 20: Important Safety Information
Important Safety Information Safety instructions Your system is designed and tested to meet the latest standards for safety of information technology equipment. How- ever, to ensure safe use of this product, it is important that the safety instructions marked on the product and in the docu- mentation are followed. - Page 21 CONTAIN MERCURY AND MUST BE RECYCLED OR DISPOSED OF ACCORDING TO LOCAL, STATE OR FEDERAL LAWS. details see lamprecycle.org, eise.org, or call 1-800-Samsung. The Instruction On Safety Operation of NotePC When installing and operating devices please refer to safety require- ments in the user guide.
-
Page 22: Replacement Parts And Accessories
Battery Disposal To reduce the risk of fire, use only No. 26 AWG or larger telecommuni- cations line cord. Contact the Samsung Helpline for in- formation on how to dispose of batter- ies that you cannot use or recharge any longer. -
Page 23: General Requirements
Connect and Disconnect the AC adapter The socket-outlet shall be installed near the equipment and shall be easily acces- sible. Do not unplug the power cord out by pulling the cable only. Power Cord Requirements The power cord set (wall plug, cable and AC adapter plug) you received with your computer meets the requirements for use in the country where you purchased your... -
Page 24: Regulatory Compliance Statements
Regulatory Compliance Statements Wireless Guidance Low power, Radio LAN type devices (radio frequency (RF) wireless communication devices), operat- ing in the 2.4 GHz Band, may be present (embedded) in your notebook system. The following section is a general overview of considerations while operating a wireless device. Additional limitations, cautions, and concerns for specific countries are listed in the specific country sections (or country group sections). - Page 25 ■ Radio frequency wireless communication can interfere with equipment on commercial air- craft. Current aviation regulations require wireless devices to be turned off while traveling in an airplane. 802.11B (also known as wireless Ethernet or Wifi) and Bluetooth communication devices are examples of devices that provide wireless communication.
-
Page 26: United States Of America
United States of America USA and Canada Safety Requirements and Notices Do not touch or move antenna while the unit is transmitting or receiving. Do not hold any component containing the radio such that the antenna is very close or touching any exposed parts of the body, especially the face or eyes, while transmitting. - Page 27 This equipment has been tested and found to comply with the limits for a Class B digital device pursuant to Part 15 of the FCC Rules. These limits are designed to provide reasonable pro- tection against harmful interference in a residential installation. This equip- ment generate uses and can radiate radio frequency energy and if not installed and used in accordance with...
- Page 28 This transmitter must not be collocated or op- erate in conjunction with any other antenna or transmitter except the installed Bluetooth trans- mitter. Operation of this device is subject to the fol- lowing two conditions: (1) This device may not cause harmful interference, and (2) this device must accept any interference received, including interference that may cause undesired operation...
- Page 29 complaint with the FCC if you believe it is nec- essary. The telephone company may make changes in its facilities, equipment, operations, or pro- cedures that could affect the operation of the equipment. If this happens, the telephone com- pany will provide advanced notice in order for you to make necessary modifications to main- tain uninterrupted service.
- Page 30 Wireless devices that may be in your system are only qualified for use in Canada if an Industry Canada ID number is on the system label. As a general guideline, a separation of 20 cm (8 inches) between the wireless device and the body, for use of a wireless device near the body (this does not include extremities) is typical.
-
Page 31: European Union
Users should make sure, for their own protec- tion, that the electrical ground connections of the power utility, telephone lines, and internal metallic water pipe system, if present, are connected to- gether. This precaution may be particularly impor- tant in rural areas. To avoid electrical shock or equip- ment malfunction do not attempt to make electrical ground connections... - Page 32 – ETS 300 328 (if fitted with a 2.4 GHz band embedded wireless device) – ETS 301 489-1 (if fitted with a 2.4 GHz band embedded wireless device) – ETS 301 489-17 (if fitted with a 2.4 GHz band embedded wireless device) European Radio Approval Information (for products fitted with EU-approved radio devices)
- Page 33 [Norwegian] Dette produktet er i henhold til bestemmelsene i det europeiske direktivet 1999/5/EC. [Portuguese] Este produto cumpre com as normas da Diretiva Européia 1999/5/EC. [Spanish] Este producto cumple con las normas del Direc- tivo Europeo 1999/5/EC. [Swedish] Denna produkt har tillverkats i enlighet med EG- direktiv 1999/5/EC.
- Page 34 This restriction should be indicated in the manu- al as follows: Dans le cas d’une utilisation privée, à l’extérieur d’un bâtiment, au-dessus d’un espace public, aucun enregistrement n’est nécessaire pour une distance de moins de 300m. Pour une distance supérieure à 300m un enregistrement auprès de l’IBPT est requise.
-
Page 35: Weee Symbol Information
WEEE SYMBOL INFORMATION Correct Disposal of This Product (Waste Electrical & Electronic Equipment) (Applicable in the European Union and other European countries with separate collec- tion systems) This marking shown on the product or its literature, indicates that it should not be disposed with other household wastes at the end of its working life. -
Page 36: Overview
Overview The items marked with this symbol are optional items which may be changed or ■ may not be provided depending on the computer model. The actual color and appearance of the computer may differ from the pictures used ■ in this guide. -
Page 37: Status Indicators
Status Indicators This turns on while the hard disk drive is being accessed. Wireless LAN This turns on when the wireless LAN is operating. p.95 Power Status This shows the computer operating status. When the computer is operating. Blinks: When the computer is in Standby mode. Charge Status This shows the power source and the battery charge status. -
Page 38: Top View
Top View CF Card Slot A slot into which a CF card is inserted. Wired LAN Port A port to which an Ethernet cable is connected; connects the computer to a LAN. Power Switch / AV Now Switch You can turn the computer on or off by sliding this switch to the right and releasing it. -
Page 39: Right View
Right View Monitor Port A jack used to connect a monitor, TV or projector supporting a 15-pin D- SUB interface. p.60 USB Port A port used to connect a USB device such as a USB keyboard, mouse, etc. DC-in Jack A port used to connect the AC adapter supplying power to the computer. -
Page 40: Left View
Left View External ODD Power Port A port used to supply power to the external USB ODD. USB Port A port used to connect a USB device such as a USB key- board, mouse, USB ODD, etc. Headphone Jack A jack used to connect the headphones. Volume Control Button A button used to control the volume. -
Page 41: Back View
Back View 80° Stand You can position the computer at an 80° degree angle so that you can comfortably view the screen. Battery Latch The latch used to remove or install the battery. p.144 20° Stand You can position the computer at a 20°... -
Page 42: Turning The Computer On And Off
Turning the Computer On and Off Turning the computer on Install the battery and connect the AC adapter. (Refer to the Getting Started Guide.) Adjust the stand at the back of the computer to a comfortable angle. Slide the Power Switch to the right, hold it for more than 0.1 seconds and then release it. -
Page 43: Turning The Computer Off
Turning the computer off Click the Start ( ) button on the taskbar. Click the ( ) and click on Shut down. The computer will shut down. Power Button Before Using the Power Button Since the Power Icon is set to power saving mode, selecting Start > Power Button ), will cause the computer to enter Sleep mode. -
Page 44: Chapter 2. Using The Computer
Chapter 2. Using the computer Stylus Pen Entering Text Using the Buttons CF Card Slot Connecting a Monitor Adjusting the Volume... -
Page 45: Stylus Pen
Stylus Pen A Stylus Pen is used instead of mouse and provides the same function. It is recommended to connect and use a USB keyboard and mouse when using the computer for a long time. Taking the Stylus Pen Out Pull the Stylus Pen upwards. - Page 46 Stylus Pen Functions Mouse Using the Stylus Pen Single- Single- click Double- Double- click Right- Press and click Hold Drag Drag Single-tap with the pen to select an item. Double-tap with the pen to run an item. ● Method 1. If you press and hold the pen over a point of the screen, a circle is drawn around the pointer.
- Page 47 Calibrating the Stylus Pen When using the Stylus Pen for the first time or the pointing position of the Sty- lus Pen is incorrect, you can correct the pointing position. Click Start > Control Panel > Hard- ware and Sound > Tablet PC Set- tings.
-
Page 48: Using The Tablet Pc Input Panel
Entering Text You can enter text by using the Tablet PC Input Panel or DialKeys on this computer. Using a USB keyboard is more convenient over long periods of use. For example, the procedures to enter text in Notepad will be described below. Using the Tablet PC Input Panel The Tablet PC Input Panel is an on-screen letter input pad provided by Windows. - Page 49 Entering text using the Writing Pad You can enter characters by writing char- acters on the Stylus Pen Writing Pad directly. In the Tablet PC Input Panel, tap the Writing Pad icon ( Write text in the input area of the Writing Pad with the Stylus Pen and wait a moment.
- Page 50 Entering text using the On-Screen Keyboard The On-Screen Keyboard displays a standard keyboard on the screen so that you can enter a letter by pressing the corresponding key on the screen. In the Tablet PC Input Panel, tap the On-Screen Keyboard icon ( Tap a character key with the Stylus Pen to enter the character.
- Page 51 Dialkeys DialKeys is an on-screen keyboard designed to be used with compact touch screen computers. You can enter letters using the DialKeys by pressing a key on the screen with your thumbs while holding both of the lower corners of the computer with your hands. To launch the DialKeys for the first time, tap Start >...
- Page 52 Exiting Dialkeys Press and hold the Dialkeys icon ( press the Exit from the pop-up menu. Auto Scaler Button ( ), Quick Launch Button ( not work while Dialkeys is working. In this case, use the keys after exiting the Dialkeys. Corresponds to the Enter key on a keyboard.
-
Page 53: Using The Buttons
Using the Buttons The procedures to use the Menu, Quick Launch and Auto Scaler buttons are described below. The Menu Button ( Press the Menu button to launch the Menu Program. The Menu Program provides shortcuts to frequently used functions on the computer. You can easily change the settings. - Page 54 Menu Items Whenever this item is pressed, the LCD brightness is Brightness increased(decreased) by one step. Wireless Press this item to turn the Wireless LAN on or off. LAN On/Off Sound On/Off Press this item to turn the volume on or off. If you press Off, the LCD screen is turned off.
- Page 55 The Quick Launch Button A Quick Launcher Button refers to a button which can be configured so that pressing it launches a frequently used program or plays the role of pressing a particular key combi- nation. It is convenient to set your frequently-used programs or key combinations as groups.
- Page 56 Configuring Additional Groups Below are procedures to add an additional group to the Default group and for setting up functions for the four buttons. As an example, the procedures to add a new group named “Test”, configure the u1 button to a particular key combination, and configure the u2 button to a program are described below.
- Page 57 Double-click the Easy Button Manager icon on the Desktop or click Start > All Programs > Samsung > Easy Button Manager > Hotkey settings. Select a group to be deleted from the Group field of the main screen and then click...
-
Page 58: The Auto Scaler Button
The Auto Scaler Button The default resolution of this computer is 800x480 pixels. In the default resolution, the complete screen image of programs designed for high resolutions may not be dis- played properly. In this case, press the Auto Scaler button(Automatic Resolution Ad- justment Button) on the left side of the computer and select a higher screen resolution. -
Page 59: Removing A Card
CF Card Slot A CF card slot is provided for using CF cards. A CF card is a removable storage device that can be used to exchange data with digital devices such as digital cameras, PDAs, etc. This computer supports the CF Card Type I and II. Using a Card Insert a card into the slot in the right direction. -
Page 60: Connecting A Monitor
Connecting a Monitor Using an external monitor, you can watch a movie on wide screen or give a presentation. The procedures to view pictures on an external monitor are described below. When using an external monitor or playing a game, an external USB mouse is more convenient. - Page 61 Method 1. Configuring with the Menu Button Connect the monitor and press the Menu button on the right side to launch the Menu program. Select the LCD/CRT item from the menu and configure it according to your require- ments. Whenever LCD/CRT is pressed, the mode changes between LCD > Clone > Dual View mode in this order.
- Page 62 Method 2. Configuring with the Intel Program * The terms and the screen figures in the manual may differ from actual ones. Connect the monitor and click the Intel(R) Graphics Media Accelerator Driver for Mobile icon ( ) on the Taskbar. Or right-click on the desktop. The pop-up menu appears.
- Page 63 Display Device When carrying it When playing a game When giving a presentation (Clone Mode) When giving a presentation (Extended Mode: Dual View) Display Mode Select Notebook. Select Monitor. When playing a game, using only the external monitor is better. Select the Intel(R) Dual Display Clone.
-
Page 64: Adjusting The Volume
Adjusting the Volume You can control the volume with the Volume Control button or Volume Control program. Using the Volume Control with the Volume Control Button Press the top of the Volume Control But- ton ( ) (+) to turn up the volume or press the bottom of the button (-) to turn down the volume. -
Page 65: Chapter 3. Using Microsoft Windows Vista
Chapter 3. Using Microsoft Windows Vista About Microsoft Windows Vista Windows Vista Screen Layout Control Panel The screen shots used in this chapter may differ from actual screens depending on the Windows Vista version and model. -
Page 66: Welcome Center
About Microsoft Windows Vista Microsoft Windows Vista (hereafter Windows) is a computer operating system. Since you have to learn how to use it in order to use the computer efficiently and effectively, use the Welcome Center and Windows Help and Support to learn about Windows Vista. The screen layout may differ depending on the computer model and the operating system. -
Page 67: Help And Support
Help and Support Windows Help and Support provides information on Windows basic functions and us- ages. Click Start > Help and Support. You can find help for frequently used basic functions using Find an Answer and you can search for help by entering a keyword in the Search box. Windows Basics Security and Main- tenance... - Page 68 Tablet PC Setting Information This computer is a Tablet PC with a touch screen. In the Tablet PC Settings of the Control Panel, you can set the screen correction, screen pivot function and whether to use the left-handed or right-handed option. Click Start >...
-
Page 69: Windows Vista Screen Layout
Windows Vista Screen Layout Desktop If you turn the computer on, the Desktop screen appears. The desktop is the working area on the computer. It consists of a large workspace and a taskbar at the bottom as shown in the figure below. The screen layout may differ depending on the computer model and the operation system version. - Page 70 You can drop useless files and folders here. Recycle Bin Shortcut Icons You can launch programs by clicking the shortcut icons on the Desktop. The menu from which you can launch programs. Start Menu Press the start button. The Start menu appears. Start Button Currently running programs are displayed here.
-
Page 71: Start Menu
Start Menu The menu from which you can launch programs. Click Start ( ). The Start menu appears. Fixed Programs The program or search result is displayed. All Programs You can search for files, folders, etc. Username Search Computer Control Panel Help and Support Power Menu Button Lock Button... - Page 72 Search Computer Control Panel Help and Sup- port Power Button Lock Button Power Menu Button Enables users to search for files and folders. Shows storage devices such as hard disk drives, CD/DVD drives, network drives, etc. In addition, you can manage files and folders here. Enables users to configure the appearance and settings of Windows such as the Desktop, window colors, hardware and software settings, security, etc.
- Page 73 Sidebar / Gadget Sidebar is a vertical bar that appears at the side of the Desktop. A mini program called Gadget runs over the Sidebar which shows information such as stocks, schedule, weather, etc. and provides frequently used tools. You can download various Gadgets from the Internet other than the default Gadget. Sidebar / Gadget Structure If you launch Windows, the Sidebar is automatically launched and the Sidebar and Gadget appear at the side of the Desktop.
- Page 74 Adding a Gadget You can find a gadget in the Gadget Gallery and add it to the Sidebar. If you click the + at the top of the Sidebar, the Gadget Gallery opens. If you double-click on a gadget, the gadget is added to the Sidebar. ■...
- Page 75 Exiting the Sidebar Right-click on the Sidebar icon ( ) in the System Tray with the clock on the taskbar and select Exit to exit the Sidebar. Closing the Sidebar ■ Even if you close the Sidebar, the Sidebar continues running in the System Tray in the clock area, though it is not displayed on the Desktop.
-
Page 76: Window Layout
Window A window is the basic frame for a computer operation. As an example, let’s see the layout of a Pictures Window. Click Start > Pictures. The items and names may differ depending on your computer model and the Win- dows Vista version. - Page 77 Address Display Line Shows the location of the currently selected folder or file. You can move to the previous or next page by clicking the Back or Next buttons. Move Button page. Provides menus to run functions for the selected folder or file, etc. Menu Bar Provides icons to quickly run frequently used functions.
- Page 78 Window View Functions If you have set up the Aero func- tion, you can use the window view functions. If you want to use the Aero func- tion, click Start > Control Panel > Appearance and Personalization > Window Color and Appear- ance.
-
Page 79: Opening The Control Panel
Control Panel Tools for configuring Windows are located in the Control Panel. Opening the Control Panel Click Start > Control Panel. System and Maintenance Security Network and Internet Hardware and Sound Programs Using this function, you can configure Windows performance op- tions. - Page 80 User Accounts You can change the user account settings, passwords and con- and Family Safe- figure the Parental Controls function. Appearance and Using this function, you can configure the Desktop style, theme Personalize or screen saver settings. Clock, Lan- Using this function, you can configure the date, time, language guage, and Re- and regional settings.
-
Page 81: Adding User Accounts
User Accounts Using Windows Vista User Accounts, more than one user can easily share the same The procedures to add and delete a user account and to switch users are described below. Adding User Accounts Click Start > Control Panel> User Accounts and Family Safety. -
Page 82: Switching User Accounts
Removing User Accounts ■ If there is only one administra- tor account for the computer, you cannot delete the adminis- trator account. ■ You can only delete another ac- count when you are logged in as an administrator. Click Start > Control Panel > User Accounts and Family Safety >... - Page 83 Changing the screen resolution and the color The resolution refers to the number of pixels displayed on the screen. When increas- ing the resolution, the items on the Desktop become smaller and more items can be displayed on the screen. The higher the color quality, the more colors are displayed on the screen.
- Page 84 Configuring the Start Menu Power Button The Power button on the Start menu ) performs various operations de- pending on the settings. Click Start > Control Panel > Hard- ware and Sound > Power Options and then Change power-saving Set- tings.
- Page 85 Select a power plan and click the OK button. Type Description Sets the computer to enter Sleep mode. The screen and hard disk will be turned off to reduce the power consumption of the overall system. Sleep If you slide the power switch of the computer to the right, the computer wakes from Sleep Mode and you can resume work- ing.
-
Page 86: Phishing Filter
Phishing Filter Phishing is a method used by hackers to illegally collect personal information such as credit card numbers, passwords, other account numbers, etc. through emails or web- sites. The Phishing Filter protects users from these phishing attempts. If the current page is judged to be a suspicious website, the Phishing Filter displays a warning message with an alarm when the Phishing Filter is enabled. - Page 87 The Internet Options window opens. Locate the Phishing Filter item in the Settings field. Select Turn on automatic website checking and click the OK button to use the Phishing Filter. To not use the Phishing Filter, select Turn off automatic website checking in the Settings field in Step 3 above.
-
Page 88: User Control Function
User control function Using this function, you can control the content your children can access. You can determine for how long they can use the computer and the content they can access. When you have finished the settings, click OK to finish. Configuring Parental Controls Click Start >... - Page 89 Using Activity Report You can view and evaluate your chil- dren’s internet access through the Activity Report. Open the User Controls window re- ferring to the descriptions of Parental Controls. Set Activity Reporting to On. To view the Activity Report, click on View Activity Report on the right of the User Controls window.
-
Page 90: Windows Mobility Center
Windows Mobility Center Using Windows Mobility Center, you can easily configure computer settings such as the volume, the wireless network connection settings, the display settings, etc. all at the same time. Some functions may not be supported depending on the Windows Vista version. Click Start >... -
Page 91: Chapter 4. Using The Network
Chapter 4. Using the Network Wired Network Wireless Network Using the Easy Network Manager Bluetooth... -
Page 92: Wired Network
Wired Network A wired network is a network environment used for a company network or broadband internet connection at home. You can also configure the network settings using the Easy Network Manager. p.98 Connect a LAN cable to the comput- er’s LAN port. - Page 93 Select Internet Protocol Version 4 (TCP/IPv4) from the Networking tab and click Properties. ■ The LAN device driver may differ depending on your LAN device model. ■ To add a network component, click Install in the screen shown in the figure above. You can add clients, services, and protocols.
- Page 94 Using both DHCP and a fixed IP simultaneously Using the Alternate Configuration pro- viding by Windows Vista, you can set both automatic and fixed IP addresses and then you can select to use either of them to connect to the Internet. Click Start >...
-
Page 95: Wireless Network
Wireless Network A wireless network (Wireless LAN) environment is a network environment that enables com- municating between multiple computers at home or a small-size office through wireless LAN devices. You can also configure the network settings using the Easy Network Manager. ■... -
Page 96: Connecting To A Wireless Lan
Connecting to a Wireless LAN If there is an AP, you can connect to the Internet via the AP using the Wireless LAN connection method provided by Windows Vista. Right-click over the Network Con- nections ( ) icon on the taskbar and click Connect to the Network. - Page 97 Checking the network connection status If you move the pointer over the Network Connections icon ( ) of the Taskbar, you can view the connection status.
-
Page 98: Network Settings
Wireless LAN LED ( ) is lit. p.98~99 p.100 p.101 Click Start > All Programs > Samsung > Easy Network Manager > Easy Network Manager. Click the Add button. Select a network location icon and enter the name of the location (e.g. - Page 99 Select Internet Direct Connection and click the Next button. Select the LAN device, setup the IP address and click the Next button. Select Device Select a device to be connect- ed to the Internet. Select either Wired LAN or Wireless LAN. IP Settings To use a static IP address, fill in the fields.
-
Page 100: Using In Another Location
Click Start > All Programs > Samsung > Easy Network Manager > Easy Network Manager when con- nected to the Internet. Select an icon that represents the... -
Page 101: Diagnosing The Network Status
Diagnosing the Network Status You can diagnose the network state and find solutions for why you cannot connect to the network. Launch Easy Network Manager. Select Management and Diagnose Status from the menu. The Network Connections window appears. Click Start to start the network diag- nosis. -
Page 102: Bluetooth Function
Bluetooth Bluetooth is wireless communications technology that allows access to nearby devices such as another computer, a cell phone, printer, keyboard, mouse, etc. without a cable connection. Us- ing Bluetooth, you can exchange files, connect to the Internet, and construct a private network as well as communicate with a keyboard, mouse, printer, etc. -
Page 103: Using Bluetooth
Electronic Busi- ness Card (Vcard) Exchange Sound Output HID Connections For more information about using the Bluetooth function, refer to the online help of the Bluetooth Device. Using Bluetooth The procedures to exchange files between computers supporting Bluetooth and to use other Bluetooth devices are described below. - Page 104 If the Bluetooth Device window appears, click Add. If the Add Bluetooth Device Wizard screen appears, select the My device is set up and ready to be found and click the Next button. When the search is complete, all available Bluetooth devices are listed. Select the Headset from the list and click the Next button.
- Page 105 ■ A Bluetooth device is represent- ed by the device type and name (Dedicated Bluetooth ID). ■ To use the Bluetooth headset, Blue- tooth Pairing Mode is required. For the procedures to set up Pair- ing Mode, refer to the Headset Manual.
- Page 106 Exchanging Files between Bluetooth Computers The procedures to exchange files between computers with Bluetooth capability are described below. On the computer which is sending a file (hereafter Computer A), right-click the Bluetooth icon( ) on the taskbar and select File Transfer. Click Browse, select a Bluetooth device to send the file to and click the Next button in the Select Bluetooth...
-
Page 107: Usage Instructions
The Bluetooth function of a Bluetooth PDA, mobile phone, mouse or keyboard may be turned off. To use them in con- nection with a Samsung computer sup- porting Bluetooth, you must check if the Bluetooth function of the device to con- nect to is turned on. -
Page 108: Chapter 5. Using Applications
Chapter 5. Using Applications Introducing Programs CyberLink PowerDVD Samsung Update Plus Play AVStation AVStation Now Using Origami Experience... -
Page 109: Introducing Programs
Introducing Programs Using the software supplied with the Samsung computer, you can easily use functions and troubleshoot problems. Try to use the software after learning about the basic use of the software. For detailed infor- mation, refer to the help section of the corresponding software. -
Page 110: Multi Media Functions
It is optional and is not supplied with some models. Management Functions Samsung Update Plus ( Samsung Update Plus is a software function that examines and updates the Samsung software and drivers installed on your Samsung computer to the most recent versions. -
Page 111: Troubleshooting Functions
Example) The icon that appears when pressing the Menu button and clicking Brightness Up. Troubleshooting Functions SAMSUNG Magic Doctor ( SAMSUNG Magic Doctor is trou- bleshooting software provided by Samsung Computer for system diagno- sis, and restoring the system. -
Page 112: Cyberlink Powerdvd
CyberLink PowerDVD CyberLink PowerDVD is a DVD player program. The CyberLink PowerDVD program is only supplied when you have purchased an external ODD, and you have to install the program additionally. It is optional and is not supplied with some models. Insert a DVD title into the DVD drive. - Page 113 If you click the Undock Player Panel button, the program control panel transforms as follows. ■ Detailed Usage For more detailed usage, click Start > All Programs > Cyberlink DVD Suite > Power DVD > PowerDVD Help. ■ DVD Region Code A DVD title has a region code according to the international specifications so that it can be played only in that specific region.
-
Page 114: Samsung Update Plus
Samsung Update Plus Samsung Update Plus is software that examines and updates the Samsung software and drivers installed on your Samsung computer to the latest version. ■ To search for updates and update your computer using Samsung Update Plus, your computer must be connected to the Internet. - Page 115 If there are available software or driver updates for your computer, the available updates will be listed. Select the required updates from the list and click on Install Updates to start the update. Updates that must be installed separately. If you select Install for an update item that must be installed sepa- rately, a message appears inform- ing you of this.
-
Page 116: Launching And Screen Layouts
■ To play an audio CD or DVD, you have to connect an external ODD. Use the de- scription below provided that an external ODD is connected. Launching and Screen Layouts To launch the program, click Start > All Programs > Samsung > Play AVStation. Alternatively, double-click the Play AVStation icon( Menu Library )on the Desktop. -
Page 117: Movie Station
Movie You can play a video (movie) file or a DVD/VCD title. Music You can play a music file or an audio CD. Photo You can view or edit a photograph (image), and also view the photographs in a Slide- Show. - Page 118 ■ What is EDS (Enhanced Digital Sound)? EDS (Enhanced Digital Sound) is sound quality enhancement technology devel- oped by Samsung Electronics. You can listen to clearer sound if you enable the EDS function when playing music or movie on Play AVStation.
-
Page 119: Playing A Movie File
Click on Capture Current Screen ( in the Photo Station > Captured Images folder. Captured images are saved in the C:\Samsung\Play AVStation\Data\Capture. You can change the captured im- age folder by selecting Menu > Tools > Options > Capture. p.120. - Page 120 Adding Videos to the Library The Movie Library is a library with movie files to be used by Movie Station. The procedures to add movie files saved on the computer to the Library are described below. You can add files or folders. As an ex- ample, the procedures to add folders are described below.
- Page 121 Highlight / Chapter Function Using the Highlight function, you can watch a highlighted part of a movie such as a sports or news item, etc. Using the Chapter function, you can create chap- ters for a movie and play the movie from any of the chapters.
-
Page 122: Music Station
Music Station Launch Play AVStation and click Music on the Station Bar. Music Type Music Library Repeat Setting Random Play Setting Play Control Buttons Music Search Playlist Window Volume Control... -
Page 123: Playing An Audio Cd
ODD. Insert an audio CD into the CD drive. If the AutoPlay window appears, select Play audio CD using Samsung PLAY AVStation. The CD is played. If a CD is already inserted in the CD/DVD drive, select CD in the Audio CD folder of the Library and double-click the title. -
Page 124: Playing A Music File
Playing a Music File If a music file is registered to the Music Library, you can easily play the music file. For the procedures to register tracks to the Library, refer to Move to Music Station and double-click on All Music. Double-click a music file. - Page 125 Adding Music Files to the Library The Music Library is a library with music files used by Music Station. The proce- dures to add music files saved on the computer to the Library are described below. You can add files, folders. As an example, the procedures to add a folder are described below.
-
Page 126: Photo Station
Photo Station Launch Play AVStation and click on Photo on the Station Bar. Photo Library Photo List and Thumbnail Window View and Edit Button SlideShow Button Batch Edit Button... - Page 127 Viewing an Image The procedures to view images regis- tered to the Photo Library individually and via a SlideShow are described below. For the procedures to register image files to the Library, refer to p.129. Move to Photo Station and double- click on All Images.
- Page 128 Editing an Image You can change the shape of an image, edit an image or apply special effects to an image. The image editing functions are described below. Move to Photo Station and double- click on All Images. Click on a folder which includes images, and the images in the folder are displayed.
- Page 129 Adding Images to the Library The Photo Library is a library with image files to be used by Photo Station. The proce- dures to add image files saved on the computer to the Library are described below. You can add files, add folders. As an example, the procedures to add folders are described below.
-
Page 130: Screen Layout
AVStation Now Using AVStation Now, you can easily and quickly play music, photographs, movies and DVDs when the computer is on/off. Start To turn the computer on, slide the Power switch/AV Now switch to the left ( and hold it for more than 0.1 seconds. If the HOLD switch on the left side of the computer is slid upwards all buttons of the computer are locked... - Page 131 Music: Play AVStation is launched and you can play a music file or audio CD. Movie: Play AVStation is launched and you can play a movie or DVD title. Photo: Play AVStation is launched and you can view photographs or image files indi- vidually or in a SlideShow.
-
Page 132: Using Origami Experience
Using Origami Experience Origami Experience is a program that categorizes programs installed on the computer for easier and more convenient use. It is optional and is not supplied with some models. The terms and the screen figures in the manual may differ from actual ones. To launch Origami Experience, click Start >... - Page 133 For example, the procedures to launch the Calculator are described below. Launch Origami Experience. Click Programs > More Programs > Calculator.
-
Page 134: Chapter 6. Settings
Chapter 6. Settings BIOS Setup Setting a Boot Password Changing the Boot Priority Battery... -
Page 135: Entering The Bios Setup
Entering the BIOS Setup Slide the Power switch to the right to turn the computer on. The booting screen (SAMSUNG logo) appears. Press the Menu button ( right side of the computer. When an external keyboard is connected, press the F2 key. - Page 136 After a moment, the BIOS setup screen appears. The items in the BIOS setup may differ depending on the product. Setup Menu Setup Items Help Help for the se- lected item ap- pears automati- cally.
-
Page 137: The Bios Setup Screen
The BIOS Setup Screen Menu Main Used to change the basic system and environment settings. Used to configure advanced functions on your computer around devices and Advanced chipsets. Security Used to configure security functions, including passwords. Boot Used to set the boot priority and other boot options Exit Used to exit the Setup either saving the changes or not. - Page 138 System Setup Buttons (Keys) The following Buttons(keys) are used in System Setup. When an external keyboard is connected, you can use the keys enclosed in paren- thesis. For example, you can press the F1 key instead of the Auto Scaler button. Setup Key Button Auto Scaler...
- Page 139 Enter (F9) (F10) Exiting the System Setup 1. Move to Exit menu > Exit Saving Changes using the Joystick and press Enter. 2. Select Yes and press the Enter button. The System Setup is closed and Windows is started. Selects an item or opens a submenu. To initialize the setup settings, press the F9 key on the external keyboard.
-
Page 140: Setting A Supervisor Password
files saved on the computer. Do not lose or forget your password. If you have forgotten your password, contact a Samsung service center. In this case, a service fee will be charged. For the setup buttons, refer to the description of ‘System Setup Buttons (Keys)’. - Page 141 On the screen, the password setting buttons are described. You can set a password by entering numbers between 1 and 4 with the Joystick. Since the u2 button is used as Delete (BackSpace) and the u4 button is used as Cancel (Esc), enter the pass- word using the Joystick.
- Page 142 Setting a User Password Users can start the system with a user password, but cannot enter the System Setup. By doing this, you can prevent other users from entering Setup. Before configuring a user password, a supervisor password must have been configured.
-
Page 143: Changing The Boot Priority
Changing the Boot Priority The default boot priority of your computer is the CD-ROM first, then a removable device and then the hard disk drive in this order. You can change the booting priority using the Boot menu of the System Setup. As an ex- ample, the procedures to change the highest boot priority device to the hard disk drive are described below. -
Page 144: Battery
Battery Please refer to the following instructions when running the computer on battery power without connecting the AC power. A Lithium-Ion smart battery is supplied with this computer. Carefully read and follow the precautions printed on the battery before using the bat- tery. -
Page 145: Charging The Battery
To install the battery again, slide the battery into the system. The battery latches move inwards and fix the battery automatically. Charging the Battery Attach the battery and connect the AC adapter to the DC-in jack of the computer. The battery will then start charging. Measuring the Remaining Battery Charge You can view the battery charge status... - Page 146 To view on the battery If you press the PUSH button for the bat- tery, you can view the remaining battery charge. Battery Warning ■ You will hear an alarm when the remaining battery charge reaches below 10%. In this case, connect the AC adapter or turn off the computer and install a fully charged battery.
-
Page 147: Extending The Battery Usage Time
Alternatively, right-click the power measuring device icon ( ) in the notification area of the taskbar and select Power Options. If the following screen appears, select one of the modes. from the Brightness item to decrease the LCD Samsung Optimized Multimedia... - Page 148 Samsung Optimized This mode is appropriate for normal conditions. It maximizes the system performance when the computer is running on AC power while maximizing the battery usage time when the computer is running on battery power. Multimedia This mode is appropriate for a multimedia environment that requires maximum system performance.
- Page 149 Disconnect the AC power adapter after turning off the computer. Restart your computer and press the Menu button when the SAMSUNG logo appears, to start System Setup. Using the arrow keys, select Smart Battery Calibration in the Boot menu and press Enter.
-
Page 150: Chapter 7. Windows Media Center
Windows Media Center is provided for some versions of Windows Vista only. Therefore, this chapter is for models with Windows Media Center only. Chapter 7. Windows Media Center About Package Contents and the Program Guide Connecting and Setting Up Media Center 152 Using Media Center... -
Page 151: About Package Contents And The Program Guide
About Package Contents and the Program Guide About the Package Contents The package contents of your Samsung computer may differ depending on the com- puter model. The Media Center remote control, external-type remote control sensor and TV tuner card are not supplied with your computer and the devices are not required to use Me- dia Center. -
Page 152: Optional Devices
TV tuner card are not essential for using Media Center. Since these devices are not supplied with your Samsung computer, you have to pur- chase them additionally if necessary. Remote Control Using the Media Center remote control, you can use Media Center more conve- niently over a short distance. -
Page 153: Connecting Devices
TV Tuner Card Using a TV tuner card, you can watch and record TV programs. Some models have built-in TV tuner cards. This manual describes their usage assuming your computer has a built-in TV tuner card. There are two types of TV tuner cards, built-in and external types, and they may not support a re- cording function depending on the... -
Page 154: Media Center Setup
Media Center Setup Connect all necessary devices and setup Media Center. You have to complete the settings to use Media Center. Turn the computer on. Click Start > Windows Media Center or Start > All Programs > Windows Media Center. If the following start screen appears, select the installation option. - Page 155 If you have selected Custom Setup, continue with the setup according to the Setup Wizard instructions. If there are no installed TV tuner cards, the TV related setup steps will appear during the Media Center setup. In addition, if the computer is not connected to the Internet, you cannot setup and use the TV Guide (Channel Information).
-
Page 156: Start Screen Layout
Using Media Center The descriptions of the Media Center start screen and basic functions will be given below. Start Screen Layout If you selected Run Setup Later in the Media Center start screen or did not com- plete the Setup Wizard, the Setup Wizard screen appears when launching Media Center. -
Page 157: Pictures & Videos
Pictures + Videos: You can view pic- tures, images and video files. Music: You can listen to music files, au- dio CDs and the radio. TV + Movies : You can watch and record TV programs and play DVD titles. Online Media: You can access all kinds of multimedia content over the Tasks: You can change the Media Center... - Page 158 If the Library Setup screen appears, select Add Folder to Watch. Specify the path for the folder accord- ing to the instructions on the screen. If the following screen appears, click Finish. You can view the newly added folder in the Picture Library or Video Library.
-
Page 159: Viewing Videos
Select a folder with picture files. If you select a picture, the picture is displayed in full screen. You can view another picture by using the Play Control buttons or the direc- tion buttons on the keyboard. To view pictures in a SlideShow, click on Play SlideShow. - Page 160 Viewing Pictures and Videos Saved on Removable Media The procedures to view pictures, images and videos saved on removable media in Media Center are described below. Launch Media Center. Insert a removable media with picture, image or video files. Removable media refers to a CD, DVD, USB flash memory, memory card, etc.
- Page 161 Music In Music of Media Center, you can play music files or audio CDs. In addition, you can rip the tracks of an audio CD onto the computer and play them later individ- ually or by using a playlist. To use it, you need to connect an external-type ODD.
- Page 162 If the Rip CD window appears, click Yes. Ripping a CD begins by showing rotating CD icon on the right side that indicates ripping a CD is in progress. When ripping is complete, the ripping CD complete message appears. The ripped tracks are displayed in the Music >...
-
Page 163: Using Playlists
Using Playlists You can easily create, manage and play a playlist with ripped music albums and music files downloaded from the Internet. Launch Media Center, and select Music > Music Library. You can search for a music file by selecting the album, artist, genre or song at the top. - Page 164 Select Save As Playlist, enter a playlist name and select Save. If you have a remote control, you can enter a name using the numeric buttons on the remote control. To play the saved playlist, select Media Center > Music Library > Playlist, select a playlist and click Play.
- Page 165 TV + Movies The TV function is only available when a TV tuner card is installed on your computer. TV + Movies Menus Live TV You can watch live TV programs. Recorded TV You can watch recorded TV programs. Guide (TV Broadcast Program Guide - EPG) You can view the TV program guide.
- Page 166 Playing a DVD The procedures to watch a DVD title are described below. To use it, you need to connect an external-type ODD. Launch Media Center. Press the Eject button of the DVD drive to open the tray and insert a DVD title.
-
Page 167: Online Media
Online Media You can access more online content through Online Spotlight. Online Spotlight is a service provided by content providers via the Media Center. You can enjoy all kinds of multimedia content such as movies, news, sports, etc. over the Internet. ■... - Page 168 Chapter 8. Appendix Using Samsung Magic Doctor Using McAfee SecurityCenter Reinstalling Software Reinstalling Windows Vista Q & A Intel Media Sharing Software Information 194 Product Specifications Glossary Index Contact SAMSUNG WORLD WIDE...
-
Page 169: Using Samsung Magic Doctor
Using Samsung Magic Doctor Magic Doctor is troubleshooting software provided by Samsung Computer. A user can diag- nose system problems via one-click or by selecting diagnostic items. Diagnosing the System Diagnosing the System is a function to check system connections and diagnose problems affecting to system operation and solve it. -
Page 170: Using Mcafee Securitycenter
Using McAfee SecurityCenter A computer virus is a program that damages computer files and information saved on a com- puter. A computer is infected by an already infected file or by another computer over the Inter- net. Let’s learn how to use McAfee SecurityCenter in order to scan and remove viruses and to protect your computer from various threats on the Internet. -
Page 171: Reinstalling Software
Reinstalling Software You can reinstall software using the System Software Media, when a device driver or com- puter application is not working properly. When software is not working properly, it is recommended removing the software using the Add or Remove Programs of the Control Panel and reinstalling the soft- ware using the System Software Media. -
Page 172: Installing Software
► If you select this option, programs not currently installed on the com- Standard puter are listed. Installation You can conveniently use this option, when installing all the pro- grams on the media after reinstalling Windows. ► If you select this option, programs are listed that need to be installed on Minimum the computer (drivers, Windows updates, etc.). -
Page 173: Reinstalling Windows Vista
■ The manual describes procedures on the basis of Windows Vista Home Premium. Reinstalling Windows may delete data (files and programs) saved on the hard disk drive. Make sure to backup all important data. Samsung Electronics shall not be held liable for any loss of data. - Page 174 When the window appears allowing you to select the operating system to be installed, tap the Next button. The name of the operating system may differ depending on the Win- dows version. When the Software License Agree- ment screen appears, select Agree and click the Next button.
- Page 175 The Registration Complete window appears. If you tap the Start button, a computer specifications check begins. After a while, the Windows Desktop appears. When Windows is launched, install the device drivers and applications according to your requirements using the System Soft- ware Media.
- Page 176 When a window appears in which you can select the operating system to be installed, tap the Next button. The name of the operating system may differ depending on the Win- dows version. When the Software License Agree- ment screen appears, select Agree and click the Next button.
-
Page 177: Display Related
Q & A This section provides information on possible problems, solutions and other references for using the system. Display Related The LCD screen is too dark or too bright A Adjust the LCD brightness. Press the Menu button and click on Brightness Alternatively, press the +, - Volume Control button while holding down the Menu button to adjust the LCD brightness. - Page 178 Press the Auto Scaler button and change the resolution to 800x600 pixels. The shortcut icons are not displayed on the screen. A The shortcut icons only appear when both the Magic Keyboard and Samsung Dis- play Manager programs are installed.
- Page 179 In the Display Properties window, resolution starts from 800x600. A Even if the current resolution is 800x480 pixels, it may be represented as 800x600 in the Display Properties. This is because the lowest resolution of the operating system is 800x600 and is unable to show the 800x480 resolution in the Display Properties window.
- Page 180 The shortcut icons are not displayed on the screen even if I press the shortcut key. A The shortcut icons only appear when the Easy Display Manager program is in- stalled. I have connected a monitor (or projector) to the computer, but the colors on the monitor are abnormally displayed.
- Page 181 Wired Network (LAN) Related The <Wake On LAN> function A1 <Wake On LAN> is a function that activates the system from Sleep mode when a signal (such as a ping or magic packet command) arrives over the network (wired LAN). Using the <Wake On LAN>...
- Page 182 When I am connected to a 100Mbps/1Gbps wired LAN and the computer exits Sleep/hibernation mode, a message appears informing you of a connection to a 10Mbps/100Mbps wired LAN. A When the computer exits standby/hibernate mode, restoring the network takes about 3 seconds. When the network is restored, it operates at 100Mbps/1Gbps.
- Page 183 Wireless Network (WLAN) Related The Wireless LAN device is operating properly, but I cannot connect to the Internet or to another computer. ► This is due to an incorrect configuration, or a configuration error. Check the following: A1 If you are using a computer-to-computer (Ad Hoc) network connection, check that the name of the configured network (SSID) is correct.
- Page 184 Even if the network provides DHCP, the server may not allocate an IP address to the client properly, and the client station cannot connect to the network. I cannot connect to the AP. ► Check the Computer Settings A1 Verify whether the wireless LAN function of the computer is on by performing the following.
- Page 185 ● Verify whether the AP’s firmware is the most recent version. (Contact the AP manufacturer or the place where you purchased the AP for details of the AP firm- ware.) A5 Verify whether the AP has been properly connected to the network. Verify whether the network is operating normally by connecting the wired network cable, which has been connected to the AP, to your computer.
- Page 186 When connecting to a computer-to-computer (Ad Hoc) network, I cannot connect to another computer on the same computer-to-computer network. A1 Make sure that the security settings and network name of the computer-to-comput- er (Ad Hoc) network are correct. A2 Check the TCP/IP properties of the computers to be connected through the com- puter-to-computer (Ad Hoc) network.
- Page 187 The network does not operate properly when both the wireless and the wired network connections are simultaneously configured with the same IP address. A You cannot use the wireless and the wired network connections using the same IP address simultaneously. To use either the wireless or the wired network in turn with the same IP address, you have to Disable whichever network device will not be used in the network connection of the Control Panel.
-
Page 188: Game And Program Related
I want to use the Wireless LAN power saving function to extend the system battery use time. A You can configure this in the Samsung Battery Manager program. Run the Sam- sung Battery Manager and select Options > Wireless LAN Power Saving > On from the menu. - Page 189 While playing a game, pressing the Menu button or pressing the LCD/CRT item does not work or the screen is not properly displayed. A Some games and 3D application programs may change the display device control. Therefore, pressing the Menu button and clicking the LCD/CRT item may terminate the running program or may display an abnormal screen.
- Page 190 The game is not displayed smoothly on the screen. A For 3D games, the texture data for the 3D screen display is saved to the system memory. If there is insufficient system memory, the data is saved to the hard disk drive and loaded to memory when required.
- Page 191 Other I cannot run any functions. A1 This may happen when the computer is in the HOLD status. When pressing a but- ton or switch in the HOLD status, the Charge LED blinks for a moment. Slide the HOLD switch downwards and try again. A2 If the computer is running on battery power, check the battery charge status.
- Page 192 The User Controls window appears when installing or running a program in Windows Vista. A In this case, click Allow (or OK) to install or run the program. However, if you do not have an administrator account, you have to enter the administrator password in the User Controls window and then click Allow (or OK).
- Page 193 Menu button. (See the Using Buttons section of the ‘Getting Started Guide’.) The Rotation function does not work. A Launch the ‘Setup.exe’ file in the C:\Program Files\samsung\Graphics Driver folder. If you have reinstalled Windows, reinstall the graphics driver using the ‘Sys- tem Software Media’ supplied with the computer.
-
Page 194: Intel Media Sharing Software Information
Intel Media Sharing Software Information (Only for some models) Intel Media Sharing Software enables users to access, download and play all kinds of media files such as music, video, image and picture files in the home network environment. Intel Media Sharing Software runs on Intel CPU installed Intel Centrino mobile PCs only. You can achieve the best performance when the software is used with the Intel Viiv system. -
Page 195: Product Specifications
Product Specifications The system specifications may differ depending on the derived models. For detailed system specifications, refer to the product catalog. CPU* Intel Celeron M ULV Processor / Intel Pentium M ULV Processor Cache Memory* 2MB/512KB L2 Cache Main Memory* 256MB ~ Max 1GB, Memory type : DDR2 SODIMM Main Chipset* Intel 915GMS / 400 MHz FSB Support, Intel ICH6-M... - Page 196 Wireless LAN Specifications (802.11BG Card) Atheros AR5006EX Wireless Network Adapter Device The Name of the Registered Equipment : Special Low Power Wireless Device for Wireless Data Communication Systems. Item Dimensions Physical Operating Specifications Temperature And Humidity Sleep Mode Receive Mode Power Transmission Specifications...
- Page 197 Radio Specifications The wireless network interface is designed for the 2.4GHz frequency in the unlicensed ISM band. RF Band Supported Channels Device Standard Output Power MAX 10 mW Modulation Scheme Data Rate (Mbps)* Antenna Type * The data rate may differ from the real data transmission rate. **11g mode is only supported when the device is connected to an IEEE 802.11g device.
-
Page 198: Registered Trademarks
Registered Trademarks Samsung is a registered trademark of Samsung Co., Ltd. SENS is a registered trademark of Samsung Electronics Co., Ltd. Intel, Pentium/Celeron are registered trademarks of the Intel Corporation. Microsoft, MS-DOS, and Windows are registered trademarks of the Microsoft Corpora- tion. -
Page 199: Glossary
Glossary The Glossary lists the terminologies used in this User Guide. For terminologies other than these, look in Windows Help. Backup A way to save the current data to restore it later if necessary. A backup is a way to restore computer data when the data or computer is damaged. - Page 200 Firewall A security system used to protect an in- ternal network or intranet from external networks through an authentication proce- dure. Hibernation Mode A power mode that saves all data in mem- ory to the hard disk and turns the CPU and hard disk off.
- Page 201 Power Schemes This refers to a pre-determined power management option group. For example, you can set the time the computer waits before entering Standby Mode, or before the monitor or hard drive turns off. The settings are saved as a power scheme. Quick Launch This refers to a toolbar that can be con- figured so that you can launch a program...
-
Page 202: Index
Network Status Diagnosis Password Playing Music Play AVStation Product Specifications Program Recorder Remaining Battery Charge Resolution / Color Samsung Update Plus Safety Precautions SlideShow Status Indicators Stylus Pen User Accounts / Switch User Video Play Volume Control Windows Vista Wired Network... -
Page 203: Contact Samsung World Wide
Contact SAMSUNG WORLD WIDE [U.S.A. / U.K. / AUSTRALIA / HONG KONG / MALAYSIA / SINGAPORE] Contact SAMSUNG WORLD WIDE If you have any comments or questions regarding a Samsung products, contact the SAMSUNG customer care center. Customer Care Center U.S.A. - Page 204 Servicio de Atencion al Cliente. Customer Care Center SPAIN [ITALY] Contatta SAMSUNG Se hai commenti o richieste sui prodotti Samsung contatta il nostro Servizio Clienti. Customer Care Center ITALY [RUSSIA / UKRAINE] Связывайтесь с SAMSUNG по всему миру...
Need help?
Do you have a question about the NP-Q1 User Manual (Vista) and is the answer not in the manual?
Questions and answers