Table of Contents
Advertisement
8-Channel AHD Mobile DVR
CRX-S
Model #: CRX3108
WARNING: SmartWitness installations should be performed by a qualified individual or installation professional
only. Working with a vehicle's power system can be dangerous to both you and your vehicle. This installation is
intended only to be a guide since vehicle designs and power/input sources can vary significantly
from vehicle to vehicle.
If you need to schedule a professional installation service in the USA for your
SmartWitness device(s), please visit
All cellular-enabled CRX devices must use the installation wizard for proper onboarding and activation,
please visit
http://install.smartwitness.com
USER GUIDE
http://smartwitness.com/scheduleinstall
to register, login, and use the SmartInstall wizard.
and submit the online form.
v1.0
Page 1 / 50
Advertisement
Table of Contents

Related Manuals for Smart Witness CRX-S

Summary of Contents for Smart Witness CRX-S
- Page 1 8-Channel AHD Mobile DVR CRX-S Model #: CRX3108 USER GUIDE v1.0 WARNING: SmartWitness installations should be performed by a qualified individual or installation professional only. Working with a vehicle's power system can be dangerous to both you and your vehicle. This installation is intended only to be a guide since vehicle designs and power/input sources can vary significantly from vehicle to vehicle.
- Page 2 Notice Any unauthorized use of this guide or its contents is prohibited. The contents may be changed without notice. The contents of this user guide are comprehensively designed to provide adequate information to set up and operate the purchased device. Please contact SMARTWITNESS if you have any questions or find any omissions. If you find any missing pages in this user guide, please contact your dealer or SMARTWITNESS for a replacement.
- Page 3 Please do not bend the cables on back panel while operation. The device overwrites when recording storage (HDD, SSD, SD Card) is full. The recorded data would be removed while overwriting. (The manufacturer is not responsible for removed recording data from user’s setting.) Recording data could be damaged and unrecoverable when storages (HDD, SSD, SD Card) are out of ...
-
Page 4: Table Of Contents
INDEX 1. Introduction ..................................... 5 2. System Components ................................6 3. Product ..................................... 8 3-1 Front Panel ................................... 8 3-2 Rear Panel ..................................9 4. Monitoring .................................... 10 4-1 System Start ................................10 4-2 System Shutdown ..............................10 5. Live Screen ..................................... 10 5-1 Live Screen Icon .............................. -
Page 5: Introduction
Introduction CRX3108 is a mobile digital video recorder which can records up to 8 channel camera inputs and compress the video data with H.264 codec. It can also record 8 channel audio signal with G.711 codec and save video/audio data to storages (HDD/SSD, SD Card). With network connection, it sends video and images to server and the user can access to the device via network. -
Page 6: System Components
2. System Components Please check you have all accessories including the package. The components may vary based on your region and seller. Storage might not be included in the package. Please consult with your local seller. Name Description Picture CRX3108 CRX3108 Main Unit CRX-GPS GPS Module... - Page 7 Name Description Picture MKY02 Locking Keys for Front Door CRX3-WH041-1 Camera Input Cable (4CH x 2) BRX-WH061 Video Out Cable CRX3-WH020-1 Power Cable CRX3-WH062-1 Digital IO & A/V Out CRX3-WH100-1 Car Signal Cable Page 7 / 50...
-
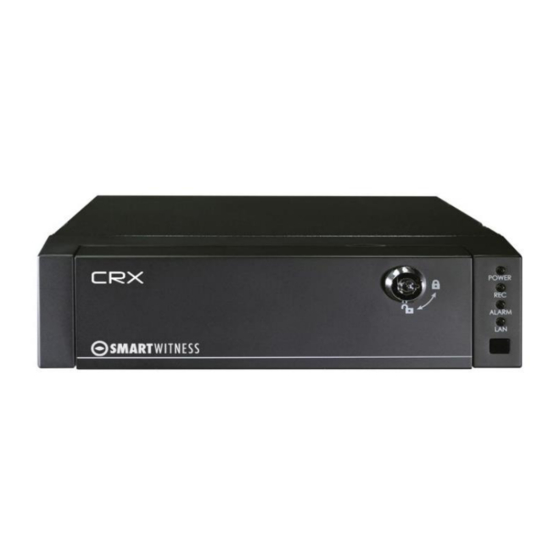
Page 8: Product
3. Product 3-1 Front Panel ① ② ④ ⑤ ③ ⑥ ⑦ ⑧ Name Description Front Lock Front Door Locking Cover ① [POWER] ② Power On/Off Status [REC] Recording Status [ALARM] System Warning Status [LAN] Network Connection Status IR Receiver IR Receiver for Remote Controller Control Panel [SER] Search, Backup... -
Page 9: Rear Panel
[∧∨<>] Arrow Keys HDD/SSD Tray HDD/SSD cannot be removed while HDD/SSD key lock is ON. ④ Please remove the storage when all LED turned off. HDD/SSD key lock You can turn on the device by HDD/SSD key lock. ⑤ SD Card Slot SD Card slot should be locked for operation. -
Page 10: Monitoring
4. Monitoring 4-1 System Start 1. After installation, the system boots up when HDD/SSD key lock turns on. 2. It takes about 30 seconds for boot-up and you can see the below screen after boot-up. Notes 1. You can control the main power by vehicle’s main power switch or ignition (ACC) according to power supply connection. -
Page 11: Icons
Name Description Camera Name You can set up the camera name. (Default CAM1 ~ CAM8) ① Alarm-in, Alarm-out 8 Alarm Inputs, 2 Alarm Outputs, G-sensor ② Storage Capacity HDD/SSD (Left), SD Card (Right) ③ Speed Vehicle’s current speed ④ Network Network connection status ⑤... -
Page 12: Osd Information
Alarm-in, Alarm-out, G-Sensor Alarm-in is activated Alarm-out is activated G-sensor is detected 3G/LTE Status Initializing – Initializing Fail - Communication Fail - Connection Ready – Communication in Progress WIFI Status Initializing – Initializing Fail - Communication Fail - Connection Ready – Communication in Progress LAN Status Initializing –... -
Page 13: Screen Layout
5-4 Screen Layout There are 7 screen layouts and you can change it by [<] button on live screen. Full Screen The system displays full screen from CAM1 to CAM8 sequentially by [CH] button on live screen. You can change the screen layouts from full screen to layout screen by [<] button. The below is the layout changing sequence. -
Page 14: Led Status
Item Description S/W Version Displays system S/W version H/W Version Displays system H/W version Network Displays network connection status MAC Address Displays system MAC address. Displays GPS information [Notes] Latitude/Longitude is displayed when GPS is working properly. Alarm in / Alarm Out Displays Alarm-in / Alarm-out status. -
Page 15: System Menu
POWER System shutdown (Green) Steady System start Not Recording (Orange) Steady Recording in Progress Blinking HDD/SSD Format, Recovery ALARM Normal Operation (Red) Steady Storage Error, Storage Full Blinking System Warning Network Not Available, No USB Dongle or No SIM Card (Orange) Steady Network Connection Normal... - Page 16 Controlling menu screen System menu consists of DEVICE, RECORD, EVENT, and SYSTEM. You can move the cursor by arrow button [∧∨<>]. You can enter each menu by [MENU] button and [ESC] button for previous menu. [MENU] button is also used for confirming the setting in menu screen. Page 16 / 50...
-
Page 17: Device
6-1 DEVICE You can set up camera, signal, G-sensor, external devices, EMS and miscellaneous. 6-1-1 CAMERA You can set up each camera’s video, name, brightness, contrast, transformation, and controls. CAMERA : You can select the camera you want to set up. (1~8) ... -
Page 18: Signal
3. Please change VIDEO setting to OFF for channels which are not connected to cameras. If the channel without cameras are set to ON, Alarm LED keeps blinking. 6-1-2 SIGNAL You can set up the function related to car pulse, RPM, and pulse signal types. CARPULSE TYPE : You can select type 1 to 25. -
Page 19: Ext Device
You can set up the initial calibration of G-sensor according to installation. You can change the X/Y/Z value among 0/90/180/270 degrees. Please check set up screen is same with actual installation. 6-1-4 EXT DEVICE Page 19 / 50... -
Page 20: Ems
You can set up external device connected to the product. DEVICE PORT : Please select the serial port connected to external device 1 or 2. (OFF, S2, S3, S4, S5, S6) DEVICE TYPE : Please select the type of external device 1 or 2. ... -
Page 21: Misc
You can set up EMS device (Option Product). PORT : Please select a port connected to EMS device. (OFF, S2, S3, S4, S5, S6) SUDDEN ACCEL/STOP : Please set up a criteria value. (OFF, 0.1G ~1.0G) / Default 0.4G OVERSPEED ALERT : Please set up a criteria value for overspeed. -
Page 22: Record
EXT-IR PORT : You can connect external IR receiver for specific serial port. INT-IR USE : You can enable/disable internal IR port according to external one. RF-READER : You can connect external RF reader device for driver identification. ... -
Page 23: Misc
6-2-1 MISC You can set up PRE REC TIME, POST REC TIME, OVERWRITE, DATA PASSWORD. PRE REC TIME : Pre-event recording time can be set when continuous+event recording mode is activated. You can set the duration from 0 to 5 sec. 0 sec means no pre-event recording footage. -
Page 24: Sd Dual Record
You can set up recording mode, resolution, frame, quality, audio for each channel. CHANNEL:Please select a channel number you want to set up. RECORD:You can set up recording mode. (Off / Continuous / Event / Continuous(Key Frame)+event / Continuous(ALL)+Event) RESOLUTION:You can set up the resolution. - Page 25 TYPE:You can set up SD Card dual record mode. (OFF, Continuous, Event, DRV) RECORD CH : You can select channels for SD Card dual record. FPS : This menu is enabled when you set up event recording on SD dual record mode. ...
-
Page 26: Event
6-3 EVENT You can set up the event related functions. 6-3-1 MOTION You can set up motion event recording. CAMERA:Please select a camera for motion event recording. (CH1~8) USE : You can enable/disable motion event recording for each channel. ... -
Page 27: Alarm In
RECORD CH:Please select a channel for recording when motion event occurs. RECORD SD:You can enable/disable SD card recording for motion event. ALARM OUT 1&2:You can set up alarm-out to external device connected to Alarm-out port. Alarm-out duration is 「N/A, 1sec, 5sec, 10sec~60sec, ∞」. LIVEOUT CH:... -
Page 28: Signal
USE : You can enable/disable alarm-in event recording. TITLE : You can set up a name of alarm. ALARMIN TYPE : Please select alarm-in type. Alarm 1 to 4 is voltage on/off and Alarm 5~8 is NO/NC. RECORD CH:You can select a camera channel for alarm-in event recording. -
Page 29: Speed / V-Loss
USE : You can enable/disable G-sensor event recording. RECORD CH:Please select a camera channel for G-sensor event recording. RECORD SD:You can enable/disable SD card recording for G-sensor event. ALARM OUT 1&2: You can set up alarm-out to external device connected to Alarm-out port. ... -
Page 30: System
EVENT SOURCE : You can select OVER SPEED or VIDEO LOSS. USE : You can enable/disable the event recording. RECORD CH: Please select a camera channel for overspeed, video loss event. RECORD SD: You can enable/disable SD card recording for overspeed, video loss event. ... -
Page 31: Date/Time
6-4-1 DATE/TIME SYSTEM TIME : You can set up system date and time. DATE FORMAT: You can set up data format like YY/MM/DD, DD/MM/YY. TIMEZONE : Please set up your timezone. DST : You can set up daylight saving time. ... -
Page 32: Service Menu
VEHICLE NO:You can register the vehicle number up to 10 characters. DRIVER ID:It displays driver ID registered in SD Card or external RF reader. This is to identify driver ID with recorded data. PASSWORD : You can set up a system password. ... - Page 33 MAINTENANCE : You can manage your storage installed in the device. POWER OFF : You can set up power options like shutdown delay and wakeup interval. SCREEN : You can manage screen options like default layout and sequence order. ...
- Page 34 [HDD/SSD] It supports quick and raw format. [SD FORMAT] It supports FAT32 or EXT4 format. Notes 1. All data in storage would be deleted after formatting so please back up the important data before format. 2. Please format a storage with this menu when you install new HDD/SSD or SD card. 3.
- Page 35 RECOVERY You can recover HDD/SSD and SD card when recorded data is managed. The recovery coverage depends on damage type and it doesn’t guarantee a recovery of data for every cases. Storage physically damaged would not be recovered with this feature. Warning 1.
- Page 36 FILE : Please select correct F/W file. CONFIRM : You can start upgrading. INFO : Progress would be displayed. (The system reboots automatically after upgrade.) Warning 1. Please do not unplug the power supply during upgrade. It may damage the unit. 2.
- Page 37 CONFIRM : You can confirm the initialization. INFO : Progress would be displayed. (The system reboots automatically after upgrade.) DRIVING BACKUP You can backup driving data recorded in storage. BACKUP DEVICE : Please select backup device. (SD Card or USB) DURATION : You can select duration for backup data.
- Page 38 [POWER OFF] You can manage power options of the system. POWER OFF DELAY : The system’s shutdown would be delayed for set up duration. The system should be installed with permanent power supply of vehicles. The duration could be up to 24 hours. REGISTER/WAKEUP INTERVAL : After the system is shutdown, it would boot up after REGISTER ...
- Page 39 DISPLAY ORDER : You can allocate each camera channel from slot 1 to 8 of layouts. If AUTO ORDER is applied, cameras would be allocated sequentially from channel 1 to 8. SEQUENCE : You can change live screen layouts automatically. ...
- Page 40 USE : You can enable/disable system warning event. SOURCE : You can select system warning event triggers. HDD ERROR : HDD is not recognized or recording is failed. SD ERROR : SD Card is not recognized or writing is failed. TEMP.
-
Page 41: Network
EVENT : You can select a notification targets for system warning event source. ALARM OUT1&2 : ALARM OUT 1or 2 would be triggered upon system warning event. BUZZER : Buzzer would be activated. ALARM LED : Alarm LED turns on. POPUP : An event windows is popped up. - Page 42 ① LAN DEVICE : You can select LAN for wired connection or 3G/LTE/WIFI. SERVICE : You can manage server settings. URL : Please input server address supports DMS5 API. DAS KEY : Please enter DMS5 license key. UPLOAD DRIVING : Driving data is uploaded to server. UPLOAD LIVETRACK : Live tracking data is uploaded to server for every second.
- Page 43 MOTION ALARM SIGNAL G-SENSOR SPEED camera channel EVENT CH : You can select a uploaded to server. EVENT PRE : You can set up between 0~10 sec as pre-event duration to be loaded to server. EVENT POST : You can set up between 0~10 sec as post-event duration to be uploaded to server.
-
Page 44: Hazard
DEVICE : 3G/LTE/WIFI SERVICE : It is same with LAN setting above. 3G/LTE SETUP DONGLE : Please set up a type of 3G/LTE dongle. (Default : TYPE0) APN, DIAL NO. USER/PASS : Please inputs settings according to carrier information of SIM. WIFI SETUP ... -
Page 45: Search And Playback
AUDIO : It plays a registered audio file when vehicle crosses a hazard zone. 7. SEARCH and PLAYBACK CRX3108 provides search and playback function from main unit. (Audio playback is not supported.) You can search and playback video by calendar search and log search. 7-1 CALENDAR SEARCH 1. -
Page 46: Playback
1. You can search the log you want to fine a video by arrow button [∧∨<>]. 2. Please press [MENU] button to playback a searched log. 3. Password is required if it is set up. 4. You can be back to log list screen by [>] button while playback. 7-3 PLAYBACK [Playback Screen] [How to control playback screen via front panel]... -
Page 47: Backup
Playback -[∧] : Increase playback speed (x1, x2, x4 -[∨] : Decrease playback speed(x1, x2 x4 -[MENU] : Pause ( -[∧] on Pause : Playback by 1 frame forward ( [∨] on Pause : Playback by 1 frame backward ( [MENU] on Pause : Playback starts. - Page 48 3. Please select hour and minute you want to backup. ① ② 4. Please press [SER] button to recall BACKUP menu. START TIME : Selected time from calendar search is displayed and you can adjust it via arrow buttons. DURATION : Please set up a backup duration up to 60 minutes.
-
Page 49: Drive Data Backup
2. Other functions are not available during backup. 8-2 DRIVE DATA BACKUP You can backup drive data in the HDD/SSD in MAINTENANCE menu. BACKUP DEVICE : Please select backup device. (SD Card or USB) DURATION : You can select duration for backup data. (1DAY, 3DAY, 1WEEK, ALL) CONFIRM : Start backup to selected device. -
Page 50: Technical Specifications
SPECIFICATION Camera Input 8 channels (12V camera in) Type 5MP(2592x1944), 4MP(2560x1440), 3MP(2048x1536) Full HD(1920x1080),AHD(1280x720), WD1(960x480), SD(720x480) Audio Input 8 channels Compression 8KHz ADPCM(u-Law) Video Recording resolution AHD: 2592x1944, 2560x1440, 2048x1536, 1920x1080, 1280x720 TVI: 2560x1944, 2560x1440, 2048x1536, 1920x1080, 1280x720 CVI: 1920x1080, 1280x720 NTSC: 960x480, 720x480, 720x240, 352x240 PAL: 960x575, 720x576, 720x288, 352x288 Recording Frame rate... - Page 51 Storage Main 2.5" HDD(500GB, 1TB, 2TB) or SSD(128GB, 256GB) x 1 slot SD Card support FAT32 or EXT4 (8GB~128GB) x 1 slot User interface 4 LED (Red, Orange, Blue, Green) Button 10 pcs Communication USB Type By USB 3G/4G or Wi-Fi modem (optional) Smart API Interface Video Output...
- Page 52 smartwitness.com support.smartwitness.com Page 52 / 50...
Need help?
Do you have a question about the CRX-S and is the answer not in the manual?
Questions and answers