Table of Contents
Advertisement
Quick Links
Thank you for purchasing the Venom™ V540 Brushless
Motor. This motor was designed for power and performance
thanks to it's well ventilated can and sensor capabilities. This
Motor has bearings that are serviceable and a replaceable
rotor.
WARNING
• Never leave the motor unattended while it is ON or plugged
in. If the motor overheats there is the potential for fire.
• Always check the connections of the wires and cables to
ensure correct polarity.
• Make sure all wires and cables are well insulated to
avoid short circuiting.
• Avoid contact with water and any other liquids. If this
occurs, stop the use of the product and set out to dry.
• Never solder on the PCB or other components.
• DO NOT over tighten the hex screws, this may lead
to stripping them. Warranty does not cover the screws.
• Check to make sure you have the correct gear ratio
and never overload the motor.
• DO NOT APPLY FULL THROTTLE if the motor has not
been installed. The high RPM of these motor can possibly
damage them.
• Make sure all connections and screws have been fastened
to avoid an out of control model.
• Always use a high power soldering unit and avoid
prolonged soldering to avoid damage to the different
components of the motor.
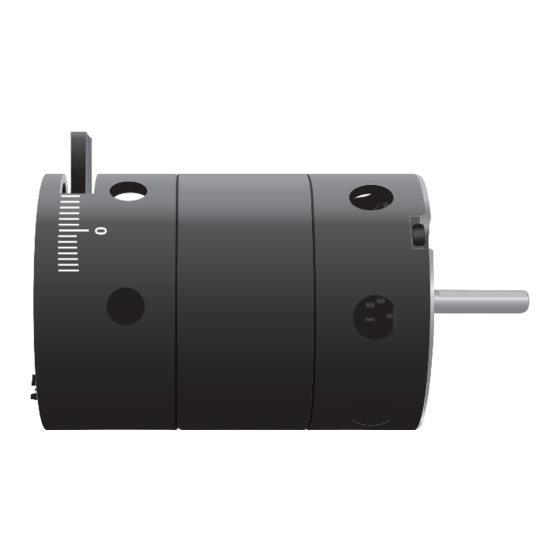
PART KEY
Output Shaft
BOTTOM
VEN-1356 Sensor Cable
(Sold Separately)
Soldiering Tabs
Orange
ESC
Yellow
Speed
Control
Blue
Sensor
Cable
TOP
Port
INSTALLATION
Sensor Cable VEN-1356 (Sold Separately):
A Bi-Directional Sensor Cable must be used with the V540
Motor at all times or else the motor will not work. Plug the
Sensor Cable into the Motor Sensor Cable Port and also into
the desired ESC (Speed control). (Refer to PART KEY
Drawing below)
Power Wires: To connect the correct power wires that will
provide power to the Venom™ V540, they will need to be
soldered accordingly. (Refer to PART KEY Drawing below)
1) Install the V540 into the model
2) Connect the Sensor Cable to both the Venom™ V540
Motor and the desired ESC.
3) Connect the Orange, Yellow, Blue Power Wires to the
ESC. NOTE: Check for correct polarity to avoid
damaging the Motor and the ESC.
4) Make sure all connections are correct before running the
model.
DISASSEMBLED
Bearings
Housing
Sleeve
Output
Shaft
and
Magnet
Sensor
Port
Timing Plate
Disassembling the Motor:
1) Remove all three Hex screws at the bottom of the motor
with a 1/16th hex screw driver.
2) Remove the bottom plate from the Motor Housing.
Remove or oil the bearing located in the plate where the
out-put shaft has been removed.
3) Carefully remove the Output Shaft and Magnet.
4) Remove three smaller hex screws from the top of the
Timing Plate.
5) Remove Sensor Port buy turning it clockwise and lifting
out of the Motor Housing hole.
6) Located inside the Sensor Port slot inside the Motor
Housing is the 2nd bearing to be oiled or removed.
The timing on the Venom™ V540 brushless motor is
extremely easy to adjust. You will need to loosen the
three 1/16th hex screws that are located at the top of the
motor near the Sensor Cable Port. Grip the top and turn
clockwise to advance the timing. (This adjustment
applies when output shaft is set to turn counter clock-
wise). The opposite is true to delay/retard timing. The
rotation direction of the motor can be changed by
switching any two of the three power wires. The effect of
advancing the timing is to make slightly more power
from the motor. The down side is increased heat and
less run time. There is a balance to be found in adjusting
the timing this is just one more tool in finding the balance
for your set up. Note: if the motor is run in a counter
clockwise direction the timing advance will be
clockwise.
COUNTERCLOCKWISE / CLOCKWISE
NOTE: This is the manufacturer default setting
TIMING
Bottom Plate
Motor Housing
1/16th
Hex
Screws
1/16th
Hex
Screws
Advertisement
Table of Contents

Subscribe to Our Youtube Channel
Related Manuals for VENOM V540

Summary of Contents for VENOM V540
- Page 1 Drawing below) Power Wires: To connect the correct power wires that will provide power to the Venom™ V540, they will need to be Thank you for purchasing the Venom™ V540 Brushless Motor. This motor was designed for power and performance soldered accordingly.
- Page 2 If a component is faults and material defects. This product has been defective or was not correctly made, Venom™ will, at its checked and adjusted individually before leaving the sole discretion, repair or replace it free of charge within manufacturer.
Need help?
Do you have a question about the V540 and is the answer not in the manual?
Questions and answers