Advertisement
Available languages
Available languages
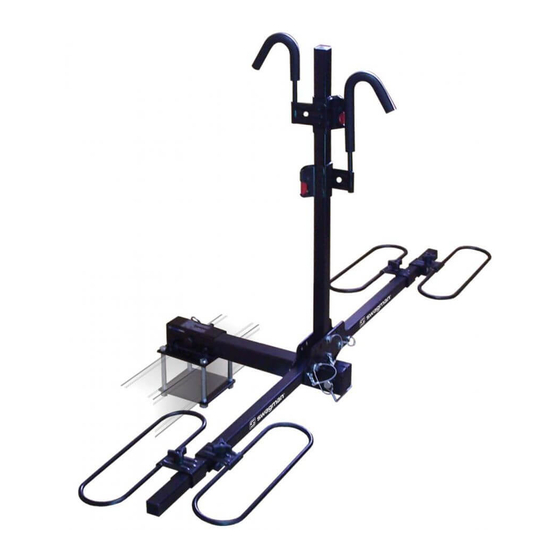
PRODUCT: 64663 XC RV 2 Bike Rack 2" Hitch or RV Bumper Mount • Page 1 of 2
INSTRUCTIONS:
1. Unfold the two side arms as shown (diagram 1) and insert the lynch
pins. Ensure that the pins are all the way in.
2. Slide the 4 wheel holder trays on to the bottom arms alternating the
direction of the trays (diagram 2). Do not tighten them at this time, as
they will have to be adjusted to fit each bike that you are carrying.
After the wheel holders are installed you will need to screw in the 2
metal screws at the end of each arm. This will prevent wheel holders
from coming off.
3. Slide the hooks onto the upright portion alternating the direction
(diagram 2).
4. Insert the Foot into the 2" square section at the bottom of the rack
(diagram 2).
5. Tighten the two set-screws to secure the receiver bar tight against
the square section. Check the set-screws periodically to ensure they
are tight (diagram 4).
6. Now take the whole assembly and install on the vehicle and insert
the threaded pin and clip. Tighten the threaded pin to 40 ft./lbs.
7. NOTE: If you are mounting the rack onto a 4" - 4.5" RV bumper, you
will need to use the bumper adapter (diagram 5). It can only be
mounted a continuos steel welded RV bumper. If you are not sure if
this is the type of bumper you have please contact your RV dealer.
8. Position the bumper adaptor on to the top of the 4" - 4.5" square
bumper. Position the plate on the underside and attach using (4) 5.5"
long bolts. Tighten the bolts securely. (diagram 5)
9. Take the rack assembly and insert into the bumper adapter and
insert the threaded pin and clip. Tighten the threaded pin to
40 ft./lbs.
BIKE INSTALLATION:
1. Pull the pin on the bottom of the upright arm and fold down. This
allows you to easily put the inside bike onto the rack (diagram 3).
2. Adjust the trays to the wheels of the bike so that they are all the way
in the tray. Once these are adjusted tighten the knobs on the tray so
that they are secure and cannot slide (diagram 6).
3. Fold the upright bar back into the upright position and insert the pin.
4. Push the hook down onto the bike. Press the red button below the
hook to slide it more easily into place. Release the red button when
the hook is securely holding the bike. Releasing the button locks the
hook in place and prevents it from any upward movement while
in transit. Ensure the hook arm is fully locked into the notches on the
upright arm.
5. Install the outside bike in the same manner.
NOTE: After complete installation check all pins and tighten
knobs to ensure they are all tight and that the bikes are motionless
on the rack.
Swagman • 300 - 1880 Government St. • Penticton, B.C. Canada V2A 7J1 • Phone (250) 490-8883 • Fax (250) 490-8885 • www.swagman.net
INSTRUCTION SHEET
1
threaded pin & clip
2"
end screw
5
2
end screw
set screws
3
4
set screws
6
REV 14/11/14
Advertisement
Table of Contents

Related Manuals for Swagman 64663

Summary of Contents for Swagman 64663
- Page 1 REV 14/11/14 Swagman • 300 - 1880 Government St. • Penticton, B.C. Canada V2A 7J1 • Phone (250) 490-8883 • Fax (250) 490-8885 • www.swagman.net...
- Page 2 • The purchaser should be aware that the load created by a rack and bicycles can exceed the maximum rating on the hitch or bumper. • Swagman Racks are powder coated to help prevent rust. When leaving them outside for extended periods of time the finish will lose its luster.
- Page 3 REV 14/11/14 Swagman • 300 - 1880 Government St. • Penticton, B.C. Canada V2A 7J1 • Phone (250) 490-8883 • Fax (250) 490-8885 • www.swagman.net...
- Page 4 Si vous remarquez que le porte-vélos bouge trop en le tirant vers l’avant et l’arrière, il est recommandé d’acheter et d’installer une courroie d’attache. REV 14/11/14 Swagman • 300 - 1880 Government St. • Penticton, B.C. Canada V2A 7J1 • Phone (250) 490-8883 • Fax (250) 490-8885 • www.swagman.net...
Need help?
Do you have a question about the 64663 and is the answer not in the manual?
Questions and answers