Advertisement
Quick Links
Advertisement

Summary of Contents for ALLpaQ Packaging Group Genesis Series
- Page 1 OPERATOR USER MANUAL Genesis Shipping series ALLpaQ PACKAGING GROUP EUROPARC INNOVATION CENTRE INNOVATION WAY GRIMSBY DN37 9TT TEL: +44 (0)1476 800-373 COPYRIGHT © 2012 ALLPAQ.COM REGISTERED IN ENGLAND NO. 6840689 ALL RIGHTS RESERVED Manual V1 - (Sept 14 2012)
-
Page 2: Chapter 1 - Allpaq Genesis 500 Operational Instructions
Chapter 1 - ALLpaQ Genesis 500 Operational Instructions 1.1 Moving the Container Pallet Base may be moved using manual handling equipment such as Fork lift truck Fig 1.2 or manual pallet jack. The Pallet base allows for a four way entry however if the handling equipment in use has forks lifting from the legs;... - Page 3 1.3 Fitting port position plates to bag ALLpaQ recommend that all 3D bags used in conjunction with it bioprocess range of containers should be fitted with a small plastic support disc when filled. Some bags may be pre fitted with a similar disc however if this is not the case please contact ALLpaQ immediately before use.
- Page 4 1.5 Fitting the lid One Operator Hold the lid against the front panel (Fig 5.1). Simply lower the lid until it is located across all four corners of the container (Fig 5.2). Always lock the lid to a fully erected container. Fig 5.2 Fig 5.1 1.6 Moving the container to storage...
- Page 5 1.9 Connect Bag Outlet Open the front base access door using the square key (Fig 9.1). The outlet tubing can be taken from the clamp (Fig 9.4), the end of drain tubing pulled from base storage area (Fig 9.3) and connected according to bag suppliers instructions.
-
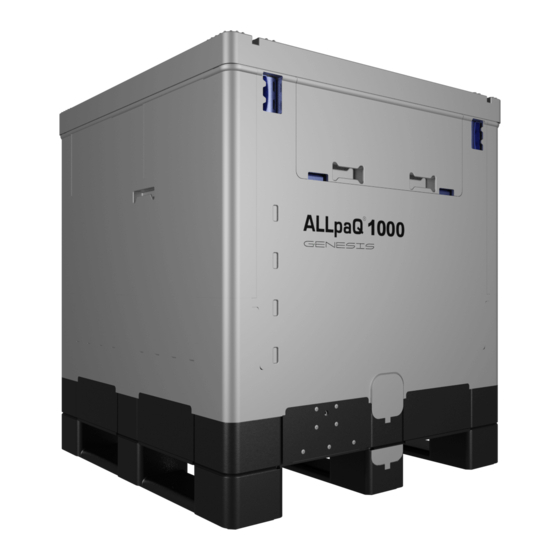
Page 6: Chapter 2 - Allpaq Genesis 1000 Operational Instructions
Once the panel has been released allow the panel to be lowered into the box using both hands. Repeat the procedure with the opposite short panel. Starting with either of the remaining long sided panels, Fig 11.4 lower the panel folding towards the centre (Fig 11.3). - Page 7 2.2 Unfolding the container for use When lifting the lid of a 1000 Litre container it is recommended that two people be involved in the operation. Fig 2.3 Fig 2.2 Fig 2.1 Hold and lift the black handles at the four corners of the lid and move towards the centre,...
- Page 8 2.4 Fitting the bag Before fitting the bag make sure you can gain access to the base by opening the drop door situated at the front of a standard unit (Fig 4.1). Note units may be supplied with two drop doors. Fig 4.3 Fig 4.2 Fig 4.1...
- Page 9 2.6 Moving the container to storage area Pallet base allows for four way entry provided the manual handling equipment used is either a pallet jack or fork lift truck (See Fig 1.1 and 1.2 above). Material handling equipment with forks lifting from the legs (1.6, Fig 6.2) ensure two way entry is used when lifting from front or rear of the base.
-
Page 10: Chapter 3 - All Allpaq Genesis 50 - 250 E & C Versions
Chapter 3 - All ALLpaQ Genesis 50 - 250 E & C Versions 3.1 Moving the Container Pallet base may be moved using manual handling equipment such as Fork lift truck or manual pallet jack. ALLpaQ Genesis 200E Fig 1.2 Fig 1.1 ALLpaQ Genesis 250 C Both units are based upon the same foot print and both pallet bases allow a two way entry on the... - Page 11 ALLpaQ Genesis 200E Only Once the container is unfolded remove the padded detachable floor panel and place safely near the unit avoiding any marked walkways. Fig 2.7 Fig 2.8 Front Fig 2.6 This will reveal a steel frame in the collapsed position (Fig 2.6). Lift frame and unfold legs to each corner of the container and ensure white legs are at the rear of the container Fig (2.7) Replace detachable padded floor panel (Fig 2.8) and container is ready for use.
- Page 12 Once the tubing has been fed through, the white disc will locate in the bottom drain hole of the base unit (Fig 4.2). Bag filling can commence in according to manufacturers recommendations. ALLpaQ recommend foam dunnage for all shipping containers (see 2:4 Fig 4.5) 3.5 Fitting the lid Hold the lid against the panel (Fig 5.1).
- Page 13 Any sampling should be conducted according to bag suppliers recommendations. Bag can be drained. Fig 9.2 3.10 Removal of bag Once the bag is drained apply any clamps to the outlet tubing (Fig 10.1). The bag can now be pulled out of the top of the container.
Need help?
Do you have a question about the Genesis Series and is the answer not in the manual?
Questions and answers