Advertisement
BEDIENUNGS- UND MONTAGEANLEITUNG /
DOMINO 1000, DOMINO 1000 RC
DOMINO 10XX, weitere Versionen /
Radar-Bewegungsmelder zur Detektion von Objekten für automatische Türen und Tore
Radar motion sensor unit for the detection of objects for automatic doors and gates
SICHERHEITSHINWEISE /
SAFETY INFORMATION
Das Gerät darf nur mit Schutzklein-
spannung betrieben werden, das mit
den Safety Extra-Low Voltage (SELV)-
Anforderungen in den auf IEC 60950 basieren-
den Sicherheitsstandards übereinstimmt. Dieses
Gerät darf nur von geschultem, qualifiziertem
Personal installiert und gewartet werden.
1. MONTAGE /
FITTING
1.1 ÖFFNEN DES RADARS /
OPENING THE RADAR SENSOR UNIT
1.2 BOHREN /
DRILLING
Bohrschablone aufkleben und
gemäss Anweisungen bohren
Stick the drilling template in place and drill
according to the instructions
1.3 BEFESTIGEN UND ANSCHLIESSEN /
1
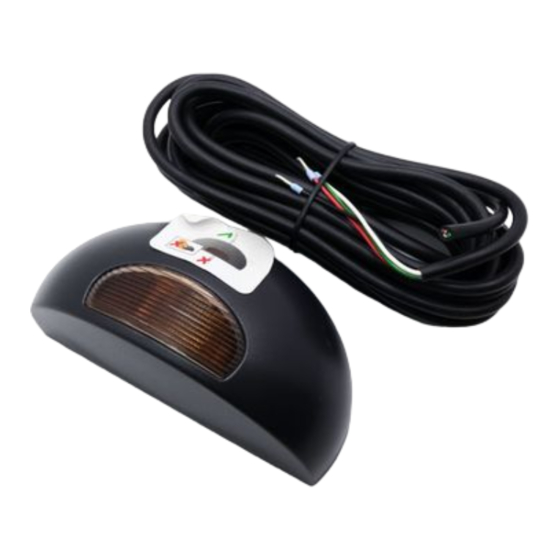
Kabel durch die vorgesehene
Öffnung ziehen
Draw the cable through the
opening provided
2
Bodenplatte mit den sich im Gehäuse befindenden Schrauben befestigen,
zum Herausnehmen und Einsetzen der Elektronik Punkt 2.3 beachten
Fasten the base plate with the screws contained in the housing,
to remove and insert the electronics, observe the instructions in point 2.3
1.4 WEITERE EINBAUMÖGLICHKEITEN /
Optional aus dem Zubehörprogramm. Decken-
montage mit Montagebügel oder Wandmontage
mit Wetterdach
Optional accessory out of the accessory range.
Ceiling-mounting with mounting bracket or wall
fastening with weather-cap set.
1.5 RADAR EINSTELLEN /
SETTING UP THE RADAR SENSOR UNIT
1. Gerät einschalten und 10 Sekunden warten
(LED blinkt rot/grün)
1. Switch on the unit and wait 10 seconds
(LED flashes red/green)
10 Sek./sec.
FITTING AND OPERATING INSTRUCTIONS
DOMINO 10XX, other versions
The unit is only to be operated
with voltages that comply with the
Safety Extra-Low Voltage (SELV)
requirements in safety standards
based on IEC 60950. This unit is only to be
installed and maintained by trained, qualified
personnel.
Haube nicht von oben öffnen!
Do not open the cover from top!
FASTENING AND CONNECTING-UP
Kabel an Anschlussklemme anschliessen
Connect the cable to the terminals
1 Speisung AC/DC
2 Speisung AC/DC
3 Relaiskontakt 1
4 Relaiskontakt 2
1 Power supply AC/DC white
2 Power supply AC/DC black
3 Relay contact 1
4 Relay contact 2
3
OTHER INSTALLATION OPTIONS
2. Radar einstellen / Einstellungen
durch Abschreiten überprüfen
2. Adjust the radar sensor unit / Check
the setting by pacing out the distance
1.6 SCHLIESSEN DES RADARS /
Haube von oben einfahren und aufdrücken bis sie einrastet
Insert the cover from the top and press until it clicks in place
1
2. EINSTELLUNGEN /
2.1 BEDIENELEMENTE /
1 Antenne
2 Potentiometer
3 Schraubklemme
4 Dip-Schalter
5 LED
6 IR Empfänger (nur RC Version)
7 IR Sender (nur RC Version)
1 Antenna
2 Potentiometer
3 Terminal
4 DIP switch
5 LED
6 IR Receiver (RC version only)
7 IR Transmitter (RC version only)
2.2 GRÖSSE DES ERFASSUNGSFELDES / WAHL DER ANTENNE
SIZE OF THE DETECTION AREA / CHOICE OF ANTENNA
weiss
schwarz
rot
Montagehöhe 2.2 m / Winkel Erfassungsfeld 30° / Empfindlichkeit max.
grün
Fitting height 2.2 m / Detection area angle 30° / Sensitivity max.
Standard Ausführung /
schmales Erfassungsfeld
red
narrow detection area
green
Für den Austausch Antenne vorsichtig mit zwei
Fingern herausziehen und anschliessend
andere Antenne einsetzen.
To change the antenna, withdraw it carefully
with two fingers and then insert the new
antenna.
Elektrostatisch gefährdete
Bauelemente.
Static sensitive devices.
Zum Tausch der Antenne kein
metallisches Werkzeug verwenden!
To change the antenna
do not use any metallic
CLOSING THE RADAR SENSOR UNIT
2
SETTINGS
OPERATING ELEMENTS
1
2
3
Standard version
Optionale Version /
breites Erfassungsfeld
wide detection area
tools!
DEUTSCH
ENGLISH
3
click
4
6
5
7
Optional version
Advertisement
Table of Contents

Related Manuals for 4 tec SENSORTECHNOLOGY DOMINO 1000

Summary of Contents for 4 tec SENSORTECHNOLOGY DOMINO 1000
- Page 1 BEDIENUNGS- UND MONTAGEANLEITUNG / FITTING AND OPERATING INSTRUCTIONS DEUTSCH ENGLISH DOMINO 1000, DOMINO 1000 RC DOMINO 10XX, weitere Versionen / DOMINO 10XX, other versions Radar-Bewegungsmelder zur Detektion von Objekten für automatische Türen und Tore Radar motion sensor unit for the detection of objects for automatic doors and gates...
- Page 2 2.3 POSITION DES ERFASSUNGSFELDES / POSITION OF THE DETECTION AREA Zum Verstellen Leiterplatte an der Seite Die Lage kann in 5°-Schritten von 0° bis 40° fassen, nach vorne ziehen und dann in die verändert werden. Werkeinstellung ist 15°, gewünschte Lage bringen. Anschläge können herausgebrochen werden.
- Page 3 TABLE STANDARDPROFILES Detektionseigenschaften Querverkehr Turtle-Mode Tür offen Turtle-Mode Tür geschlossen Domino 1000 Domino 1000 RC Detection characteristics Passing traffic Turtle mode, door open Turtle mode, door closed Relais-Kontakt schliesst bei Detektion (N. O.) Relay contact closed on detection (N. O.) Relais-Kontakt öffnet bei Detektion (N.
-
Page 4: Establish Communication
3.2 EINSTELLEN DER HALTEZEIT / SETTING THE OUTPUT HOLD TIME 1. Während der Initialisierungszeit (Zeit nach dem Einschalten, während dem die LED grün-rot 1. During the initialisation period (period after switching on, during which the LED flashes blinkt) die Stellung des DIP-Schalters 5 verändern. green-red) change the position of DIP switch 5. -
Page 5: Led Statusanzeige
Feld Turtle-Mode Tür offen 1 – 10 kleines Erfassungsfeld small detection area Detection area Turtle mode door open grosses Erfassungsfeld wide detection area Feld Turtle-Mode Tür geschlossen 1 – 10 kleines Erfassungsfeld small detection area Detection area Turtle mode door closed grosses Erfassungsfeld wide detection area 4 TEC AG... -
Page 6: Optionales Zubehör
Configuration with DIP-Switch / potentiometer is set or access locked 8.LIEFERUMFANG / SCOPE OF DELIVERY 9.OPTIONALES ZUBEHÖR / OPTIONAL ACCESSORIES - Deckenmontagebügel - Ceiling-mounting bracket - DOMINO 1000 - DOMINO 1000 - Wetterdachset - Weather-cap set - Anschlusskabel - Connecting cable (Deckenmontagebügel enthalten) (ceiling mounting bracket included) - Schrauben für Montage...
Need help?
Do you have a question about the DOMINO 1000 and is the answer not in the manual?
Questions and answers