Advertisement
Benutzer-Information
User information
Instructions à l´utilisateur
Wichtig:
• Vor Erstgebrauch lesen!
• Montage nach dieser Vorlage durchführen!
• Dokument aufbewahren!
Important:
• Read before use!
• Observe installation instructions!
• Retain this document!
Important:
• A lire avant la première utilisation!
• Effectuer le montage en respectant les
instructions indiquées!
• Conserver ce document!
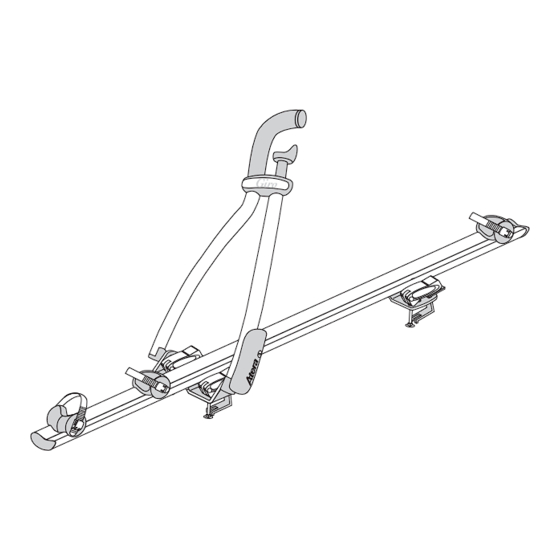
GIRO
Fahrradträger
Bicycle carrier
Porte-vélo
Art.-Nr./Art. no./N° d'article: 082 216
Nettogewicht (ca.):
Net weight (approx.):
Poids net (env.):
Max. Zuladung:
Max. load:
Charge max.:
1
3,0 kg
ein Fahrrad
one bicycle
un vélo
Advertisement
Table of Contents

Subscribe to Our Youtube Channel
Summary of Contents for Atera GIRO
- Page 1 GIRO Benutzer-Information Fahrradträger User information Bicycle carrier Instructions à l´utilisateur Porte-vélo Art.-Nr./Art. no./N° d’article: 082 216 Wichtig: Nettogewicht (ca.): 3,0 kg • Vor Erstgebrauch lesen! Net weight (approx.): • Montage nach dieser Vorlage durchführen! Poids net (env.): • Dokument aufbewahren! Max.
- Page 2 GIRO Art.-Nr./Art. no./N° d’article: 082 216 Abb./Fig. 1 Abb./Fig. 3 ✗ Abb./ Abb./ Fig 1a Fig 1b ✔ Abb./ Abb./ Fig 3a Abb./ Fig 1c Fig 1d ca. 6 Nm Abb./Fig. 2 Abb./Fig. 4 Abb./ Fig. 2a Abb./ Fig. 2b Abb./...
- Page 3 GIRO Art.-Nr./Art. no./N° d’article: 082 216 Abb./Fig. 5 Installation on square bar Fig. 1 Loosen the fastening screws of the rear holding plate (Fig 1a). Position the bicycle carrier provisionally on the roof rack and ca. 6Nm adjust the rear holding plate to the distance between the carrier bars (Fig.
- Page 4 GIRO Art.-Nr./Art. no./N° d’article: 082 216 Abb./Fig. 6 Abb./Fig. 9 Abb./ Fig 9a Abb./ Fig 9b Abb./Fig. 7 max. ø 50 mm max. ø 50 mm Abb./Fig. 10 max. 80 mm Abb./Fig. 8 Abb./ Abb./ Fig. 10b Fig. 10a Abb./ Abb./...
- Page 5 GIRO Art.-Nr./Art. no./N° d’article: 082 216 Abb./Fig. 12 Fahrradmontage Abb./ Abb. 6 Fig 12a Spanngriff öffnen und Fahrradhalter aufstellen. Fahrrad provisorisch auf die Schiene stellen. Fahrradhalter möglichst rechtwinkelig zum Fahrrad ausrichten. Abb. 7 Maximale Durchmesserwerte des Fahrradrahmens (für Rund- und Ovalrohre) beachten.
- Page 6 GIRO Art.-Nr./Art. no./N° d’article: 082 216 Bicycle loading Fixation du vélo Fig. 6 Fig. 6 Open the clamping handle and raise the clamping arm. Position Ouvrir la poignée de serrage et basculer la béquille vers le haut. the bicycle provisionally on the rail. Align the clamping arm at Placer provisoirement le vélo sur le rail.
- Page 7 GIRO Art.-Nr./Art. no./N° d’article: 082 216...
- Page 8 GIRO Art.-Nr./Art. no./N° d’article: 082 216 Allgemeine Gebrauchs-und General user information Instructions générales Warnhinweise and safety instructions d’utilisation et avertissements Die zulässige Dachlast (= Gewicht des The admissible roof load (= weight of the La charge admissible sur le toit (= poids Dachträgers + Zubehör + Beladung) des...
- Page 9 GIRO Ersatzteilliste Art.-Nr./Art. no./N° d’article: 082 216 List of spare parts Liste des pièces de rechange Art.Nr./Item no./N article: 087 610 Art.Nr./Item no./N article: 087 099 Art.Nr./Item no./N article: 088 304 Art.Nr./Item no./N article: 088 302 Art.Nr./Item no./N d’ Art.Nr./Item no./N° d Art.Nr./Item no./N...
- Page 10 GIRO Art.-Nr./Art. no./N° d’article: 082 216 Eberhard Tittel GmbH Postfach 2240 D-88192 Ravensburg Telefon 07 51 - 76 04-0 Telefax 07 51 - 76 04-76 E-Mail: info@atera.de...
Need help?
Do you have a question about the GIRO and is the answer not in the manual?
Questions and answers