Advertisement
Quick Links
Jaguar XK8 / XKR 'RealGauge' Oil Pressure Option Installation &
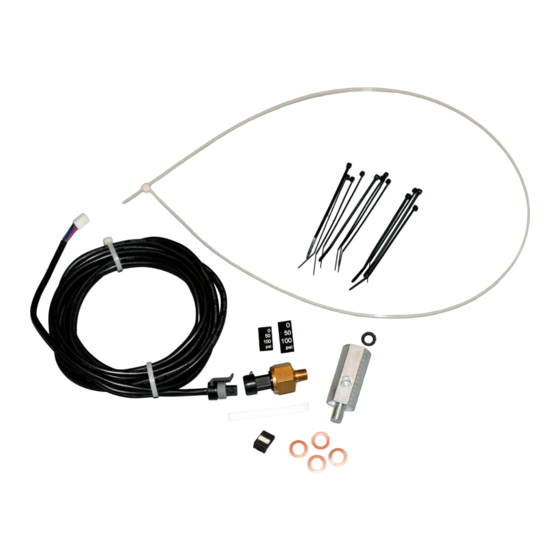
Kit Contents supplied:
Quantity 1 - 100 PSI automotive oil pressure sensor
Quantity 1- Oil pressure sensor cable
Quantity 1 - 4 pin connector body
Quantity 1- Tee adapter for oil pressure sensor and original factory pressure switch
Quantity 12- 4" Tie-Wraps
Quantity 1- 2.5" x 1/4" PTFE thread seal tape for new oil pressure sensor
Quantity 4- 10 mm inside diameter, 16 mm outside diameter, 1 mm thick copper seal ring and
spacer for tee adapter to engine block
Quantity 1- Replacement steel/rubber sealing ring for original factory pressure switch
Quantity 1- 36" long tie-wrap wire pulling tool (pre-attached to sensor cable)
Quantity 1- set of 12-point font numerical self-adhesive labels (usage optional).
Quantity 1- set of 16-point font numerical self-adhesive labels (usage optional).
For more info or to purchase go to www.thejagwrangler.com
TheJagWrangler LLC
Operation Manual
'96-'99
Left-Hand Drive
1
Rev 1.1
Advertisement

Subscribe to Our Youtube Channel
Related Manuals for TheJagWrangler RealGauge

Summary of Contents for TheJagWrangler RealGauge
- Page 1 TheJagWrangler LLC Jaguar XK8 / XKR 'RealGauge' Oil Pressure Option Installation & Operation Manual '96-'99 Left-Hand Drive Kit Contents supplied: Quantity 1 - 100 PSI automotive oil pressure sensor Quantity 1- Oil pressure sensor cable Quantity 1 - 4 pin connector body ...
- Page 2 Tube of RTV sealing compound Small size metal paper clip Handy items (may be helpful to have on hand if needed): Toothpick Superglue or Epoxy Rev 1.1 For more info or to purchase go to www.thejagwrangler.com...
- Page 3 Installation Procedure: 1. In order to proceed with the Oil Pressure Option, the installation of the RealGauge Module must be completed through initial testing. Install the Oil Pressure Option prior to reinstalling the wood dash and the kick panel. 2. Disconnect the battery again.
- Page 4 9. Plug the 3-gauge cluster harness back in, put it in place and replace the four Philips screws. 10. Unplug the right side (smaller) main instrument cluster connector by depressing the opposing tabs and pulling. Rev 1.1 For more info or to purchase go to www.thejagwrangler.com...
- Page 5 12. Note the tiny pin number references embossed in the corners of the connector face (you may need a bright light and a magnifier). They can be used to reference the other pin positions by counting. Rev 1.1 For more info or to purchase go to www.thejagwrangler.com...
- Page 6 Orange-Black, position 10 Orange-Blue, position 15 Orange-Slate, position 17 Orange-Green, position 18 Rev 1.1 For more info or to purchase go to www.thejagwrangler.com...
- Page 7 14. Check that all of the remaining pins are fully seated, and plug the off-white nylon retainer back fully into the instrument cluster connector. 15. Check that the locking tab on each terminal stands out about 10 degrees, and gently bend it back into position if necessary. Rev 1.1 For more info or to purchase go to www.thejagwrangler.com...
- Page 8 17. Firmly depress the white insert in the connector body to lock the pins in place. The white insert may not move very much. 18. Plug this four conductor connector into the mating RealGauge harness connector attached to the gray four conductor cable (wire colors on the right may vary from photo below).
- Page 9 23. Squeeze the connector tab and unplug the connector from the oil pressure switch (the one with the orange wire) adjacent to the oil filter. If your car has another sensor with two wires (not all do), leave the other sensor alone. Rev 1.1 For more info or to purchase go to www.thejagwrangler.com...
- Page 10 The final position after proper tightening to 13 Nm is shown below in the photo on the right. Start with one copper washer, add additional as Final port needed. position at 13 Nm Port position when finger tight Rev 1.1 For more info or to purchase go to www.thejagwrangler.com...
- Page 11 Do not pull the orange wire itself. Do not install the connector so the orange wire is under constant tension. Rev 1.1 For more info or to purchase go to www.thejagwrangler.com...
- Page 12 It is also easy to route without lots of disassembly. Airbox Receiver/ dryer 32. Route the sensor cable under the airbox snorkel and tie wrap it to the airbox bolt. Rev 1.1 For more info or to purchase go to www.thejagwrangler.com...
- Page 13 ECM compartment. Wrap three turns of electrical tape around the cable before inserting it in the grooves at the entrance and exit of the ECM compartment. Replace the ECM compartment cover. Rev 1.1 For more info or to purchase go to www.thejagwrangler.com...
- Page 14 34. Route across the firewall, adding zip ties as shown. Rev 1.1 For more info or to purchase go to www.thejagwrangler.com...
- Page 15 (It is not absolutely necessary, but if you have difficulty with this step remove the wipers and the plastic grille under the wipers and to gain easier access.) Rev 1.1 For more info or to purchase go to www.thejagwrangler.com...
- Page 16 It may also help to place a light in the footwell and to guide the nylon fish line toward the light.) Rev 1.1 For more info or to purchase go to www.thejagwrangler.com...
- Page 17 Plug the sensor cable into the 3-pin connector on the front edge of the RealGauge module with the red wire on the left and the black wire on the right.
- Page 18 Protective rubber gloves are recommended for this step. 48. Allow the engine to fully warm up and check for oil leaks by the sensors that were just installed. Rev 1.1 For more info or to purchase go to www.thejagwrangler.com...
- Page 19 Remember to reinstall the connectors for the trip button on the instrument cluster wood bezel, and the valet switch and aspirator fan on the kick panel. Congratulations on a successful installation! Having Difficulty? For support, email: whitexkr@comcast.net with as much detail as possible. Rev 1.1 For more info or to purchase go to www.thejagwrangler.com...
-
Page 20: Operation
An over-temperature condition (over 230 degrees F) or a low oil pressure condition, as detected by the Jaguar OEM oil pressure switch (set at 6 psi) or the optional Realgauge oil pressure sensor (set at 8 psi) will cause an audible alarm, which is a high pitched continuous tone. In either case, the car should be pulled off the road as soon as it is safe to do so and the engine shut off to prevent engine damage. - Page 21 (shown below) at the front of the RealGauge module. Then reconnect the battery and reset the windows. This will permanently silence and disable the alarm for the high coolant temperature and low oil pressure and you will never have an audible alarm.
- Page 22 Installation of this unit, as for many aftermarket products, may void your vehicle's warranty, if any. If you do not agree to these terms please return the product within 90 days for a full refund. Rev 1.1 For more info or to purchase go to www.thejagwrangler.com...
Need help?
Do you have a question about the RealGauge and is the answer not in the manual?
Questions and answers