
Summary of Contents for SoundEar SoundAir3 300
- Page 1 ound ® VeRSIon: 5.1.11 Manual – uK Model Model Model Model 310xl...
-
Page 2: Table Of Contents
Congratulations on your new soundear®3 deviCe what is soundear®3 setting up the soundear®3 deviCe • Box content • Optimal placement of the SoundEar®3 device • How to mount your SoundEar®3 on the wall Model 300, 310 and XL Model 320 BasiC features of the soundear®3 • POrtS On tHE dEvicE Model 300, 310 and XL Model 320 using the touCh display soundear® software setup • SoundEar®3 with wireless connection • SoundEar micro Pc manual... - Page 3 • Light day - 300, 310 and XL • Light night - 300, 310 and XL • noise levels - 320 • Mini display • Alarm • Export light settings to device via USB • noise limits guideline soundear® usB key • Formatting the USB key • Export log files from the internal memory • import measurement data from the USB key to the software MeasureMent data • Live measurements • chart statistics • Show in chart • Zoom function • device info reporting • Setting up a noise report • report name...
- Page 4 • Show measurements in folder • choose destination folder advanCed settings • Analog output • Microphone calibration soundear®3 faCtory settings • Factory settings • reset the device to factory settings MaintenanCe teChniCal speCifiCations R e t u R n t o ta b l e o f C o n t e n t s...
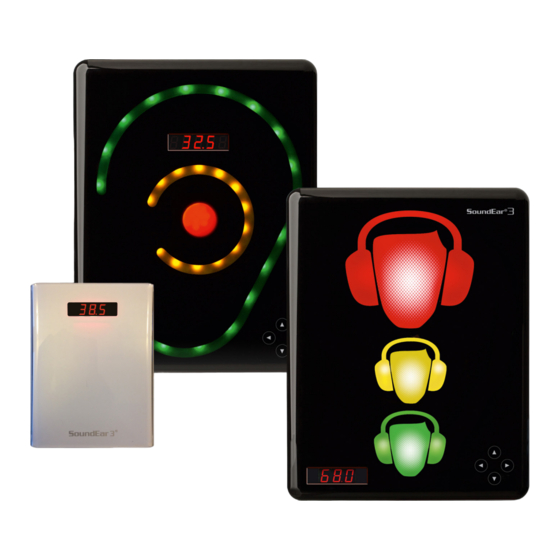
- Page 5 – device We are pleased that you selected one of our products to help you create a better auditory environment for yourself and others. SoundEar®3 is desig- ned so that you can easily set it up and start using it right away. this instruction manual provides information on how to fully take advan- tage of your product. For a complete understanding of the features and possibilities of the SoundEar®3, we advise you to carefully read this manual before use. Please find all our latest updates on our website: soundear.com/downloads For tutorials with video instruction, please check out our SoundEar® youtube channel for additional information regarding our SoundEar® products. if you have any questions or comments, please contact us at: soundear@soundear.com We hope you enjoy using the SoundEar®3. yours sincerely, SoundEar A/S SoundEar®3 300 SoundEar®3 320 SoundEar®3 310 SoundEar®3 310Xl...
-
Page 6: What Is Soundear®3
WHAt iS SOUndEAr®3 soundear®3 is a visual-based product, designed to provide the user with a compre- hensive overview of the noise conditions in their surroundings. soundear®3 visua- lizes noise and alerts you when the noise is becoming too loud. it is an ideal tool to help monitor and map your noise environment. -
Page 7: Setting Up The Soundear®3 Device
SEttinG UP tHE SOUndEAr®3 dEvicE BOX cOntEnt please check the box content, depending on the box purchased 1. SoundEar®3 2. USB key with software 3. External microphone 4. Four pole extension cables for calibration 5. Power adaptor with EU, US and UK plug 6. USB adaptor cable R e t u R n t o ta b l e o f C o n t e n t s... -
Page 8: Optimal Placement Of The Soundear®3 Device
• not in a corner. • not close to any sound-absorbing materials. • not close to noisy instruments. Area: 40 m2 diameter: 10-11 m. Height: 1,8 m. above ground HOW tO MOUnt yOUr SOUndEAr®3 On tHE WALL when selecting a location for your soundear®3, please make sure to follow the instructions below: 1. Make sure not to cover the microphone on the bottom of the device. 2. Avoid placing SoundEar®3 close to sound-absorbing materials. direCtly on the wall Model 300, 310 and Xl check for an available plug socket nearby. Fasten a screw (diameter 8-9mm) and check whether the cabinet is attached securely. if you are using a vESA wall mounting bracket, please consult the included user manual. -
Page 9: Model 300, 310 And Xl
SEttinG UP tHE SOUndEAr®3 dEvicE Model 300, 310 and Xl Model 320 1. Loosen the screw to remove the wall mounting bracket. Fasten the wall mounting bracket on the wall with 4 screws. Hang SoundEar®3-320 onto the wall mounting bracket and fasten it with the screw. R e t u R n t o ta b l e o f C o n t e n t s S o u n d E a r ® 3 – m a n u a l... -
Page 10: Basic Features Of The Soundear®3
Power Analogue 0-10V/ 24 VDC Outputs 4-20 mA 24 VDC/150 mA 1. Analogue output. connect your external system here, if you have one. 2. USB port. insert the SoundEar USB drive here to download measurements or the USB dongle for wireless connectivity. 3. Power supply. insert power supply here. 4. SoundBuster. connect your SoundBuster here, if you have one. 5. External mic. insert your microphone here. 6. connect your device to power. R e t u R n t o ta b l e o f C o n t e n t s... -
Page 11: Model 320
24 VDC 24 VDC/150 mA 1. External mic. insert your microphone here. 2. SoundBuster. connect your SoundBuster here, if you have one. 3. Power supply. insert power supply here. 4. USB port. insert the SoundEar® USB drive here to download measurements or the USB dongle for wireless connectivity. 5. Analog output. connect your external system here, if you have one. 6. connect your device to power. R e t u R n t o ta b l e o f C o n t e n t s... -
Page 12: Using The Touch Display
USinG tHE tOUcH diSPLAy located on the front of soundear®3 (models 320 and 320 X excepted), you will find a touch display from which you can control the device manually. the functions of the touch display include setting alarm levels, time, current noise level (LAeq 1sec.), and on/off function for the mini display. • Use the horizontal arrow heads to navigate between the different options. -
Page 13: Soundear® Software Setup
SOUndEAr® SOFtWArE SEtUP if you are using soundear®3 as a single user device (without any wireless connection), please skip this next section below about wireless connectivity and continue reading the manual. SOUndEAr®3 WitH WirELESS cOnnEctiOn if you are using your SoundEar®3 with wireless connectivity, please click on the following links to download wireless instruction manuals: SOUndEAr MicrO Pc MAnUAL if you are using SoundEar®3 with Wi-Fi connection, click here. WirELESS dOnGLE MAnUAL if you are using SoundEar®3 with USB amber dongles, click here. R e t u R n t o ta b l e o f C o n t e n t s... -
Page 14: Soundear®3 Software - Single User
SOUndEAr®3 SOFtWArE – SinGLE USEr inStALL tHE SOFtWArE the soundear® usB key includes the software installer. please find the software on the included usB key. insert the USB key in your computer, open the USB and click on the installation file. Select your preferred language to use during the soft- ware installation and click “OK”. R e t u R n t o ta b l e o f C o n t e n t s... -
Page 15: Software Update
SOUndEAr®3 SOFtWArE – SinGLE USEr Follow the on-screen installation instructions. When the installation is complete, click “close”. SOFtWArE UPdAtE please make sure that you have installed the latest version of the soundear®software. 1. Go to the menu ‘Setup’ -> ‘About SoundEar®3’ to see your current software version. 2. click the “Software update” button to check for newer versions. 3. A pop-up window will be shown on your screen. click “OK” to proceed with the update. 4. click “OK” to confirm update. R e t u R n t o ta b l e o f C o n t e n t s... -
Page 16: Firmware Updates
SOUndEAr®3 SOFtWArE – SinGLE USEr FirMWArE UPdAtES we strongly advise you to check for the latest version of the firmware on a regular basis. with your device connected to your pC via usB cable, go to the menu "setup" and "device info" and click ‘Check for firmware updates’. -
Page 17: Device Configuration
Before connecting the device to your computer, open the soundear®3 software and you are ready to start the con- figuration. insert the micro USB port into the SoundEar®3 and the USB A port on your computer. R e t u R n t o ta b l e o f C o n t e n t s... - Page 18 dEvicE cOnFiGUrAtiOn cOnnEctinG tHE dEvicE a pop-up window will appear onscreen after your device is connected. Please select the laptop icon to configure your device for single use. here you can: 1. name the device. if not configured, the software will store the measurements using the device’s unique id. 2. Location. 3. Set a threshold for when you want to receive an alarm email. nOtE: these settings can also be set in the menu “define settings” within the software. click “OK” to save your configuration. R e t u R n t o ta b l e o f C o n t e n t s S o u n d E a r ®...
-
Page 19: Set Time
SEt tiME set the time and date on your soundear® 3. Upon first connection of the device, we recommend set- nOtE: your device must be connected to the computer ting the time and date in the internal clock. via USB for you to set the time on your device. Open the SoundEar® software and double-click on the After double-clicking on the time bar, a loading icon time display, located in the upper right-hand corner of should appear at the top center of the screen with the the screen. -
Page 20: Define Settings
dEFinE SEttinGS you can use ‘define settings’ to create your own specific settings. LiGHt dAy – 300, 310 And XL 1. Use the slider to set the limit for the green, yellow and red ear. For now, we will set the “yellow ear” to 60 dB and red to 75 dB. 2. Select how long the noise level should be exceeded before the red ear turns on. Here, we have selected 3 sec. 3. As a standard, the visual alarm is measured in LAeq1s. if needed, you can also select LAF max, LAS max or Lc peak. Here, we will select LAeq 1s. 4. then select whether the red ear should flash or just be lit, and for how long. 5. click “configure” to save your settings. How to make light settings for SoundEar3 R e t u R n t o ta b l e o f C o n t e n t s S o u n d E a r ®... -
Page 21: Light Night - 300, 310 And Xl
dEFinE SEttinGS LiGHt niGHt – 300, 310 And XL if needed, you can create an alternate setting during night. 1. check the ‘night’ box and set the time period for your 2. Set the limits for green, yellow and red ear using night settings. in this example, it is set to start at the slider. in this example, we will set them all to 60 22:00 in the evening and end at 07:00 in the morning. dB. this allows you to turn off the light emanating from the device, preventing it from disturbing people while they sleep. -
Page 22: Noise Levels - 320
dEFinE SEttinGS noISe leVel 320 even though the 320 does not have a visual alarm, you can still set the background in live measurements to make it easy to see when the noise level has been exceeded. R e t u R n t o ta b l e o f C o n t e n t s S o u n d E a r ®... - Page 23 dEFinE SEttinGS noISe leVel 320 now, go to "live Measurements" and your screen background will show your settings. red: 80 – 120 dB yellow: 7 0 – 80 dB Green: 20 – 70 dB if you want an alternate night setting, check the box After 22:00 your screen will now show your night settings: ‘night’ and create your settings. • Green: 20 – 60 dB • red: 60 – 120 dB R e t u R n t o ta b l e o f C o n t e n t s S o u n d E a r ®...
-
Page 24: Mini Display
Mini diSPLAy select what should be shown in the mini display of your soundear®3. 1. Select in the drop-down menu, whether you want the display to show the time, the current noise level in LAeq 1 second, or the alarm level for the red ear. you can also choose to turn the mini display off. 2. if you do not want anyone to be able to change these settings manually on the device, check the ‘Locked dis- play’ box. 3. When you have made your settings, click ‘configure’ . R e t u R n t o ta b l e o f C o n t e n t s... -
Page 25: Alarm
dEFinE SEttinGS alaRM how to get e-mail notifications about critical noise levels – using the ‘alarm’ setting: 1. Go to the tab ‘Alarm’ and select the noise limit and duration at which the system will send an e-mail notification. in this case, 60 dB for more than 20 seconds. 2. Select which e-mail address you want the notifications sent to. R e t u R n t o ta b l e o f C o n t e n t s S o u n d E a r ®... - Page 26 dEFinE SEttinGS alaRM 3. check the ‘Show on live measurements’ box, if you want the alarm level to show in the ‘Live Measurement’ view for your device: 4. When you have created your settings, click ‘configure’ . nOtE: the software needs to be running to generate an alarm e-mail. R e t u R n t o ta b l e o f C o n t e n t s S o u n d E a r ®...
-
Page 27: Export Light Settings To Device Via Usb
1. Go to ‘define settings’ and go through the tabs ‘noise 2. return to the tab ‘Export settings to USB’ and click on levels’ and ‘display’ to create your settings without ‘Export setup to USB’ . Make sure you have a formatted USB stick connected to your Pc. clicking “Configure”. 3. insert the USB stick in the SoundEar®3. your new light nOtE! Alarm settings and wireless settings can only be settings are now being transferred to from the USB transferred to your device when directly connected to your stick to your device. Pc via a USB cable. -
Page 28: Noise Limits Guideline
WHAt nOiSE LiMitS tO cHOOSE Setting the right noise limit on your SoundEar®3 device is an important step. this means the difference between the SoundEar® flashing red all the time, or not at all. We recommend that you start out with an estimated noise limit, and make sure to re-evaluate after a week or two. here are our recommendations on noise levels for different auditive environments: auditive environment noise limit in dB Exam - no disruptive noise - intense concentration 35 - 45 dB Operating rooms, neonatal departments 35 - 45 dB Educational, schools 50 - 60 dB Open-plan offices, call centers 55 - 65 dB industry without noisy machines Storage, assembly and laboratory work 60 - 70 dB day care 70 - 80 dB Factories with noisy machines 75 - 85 dB concerts etc., rehearsal rooms, music schools... -
Page 29: Soundear® Usb Key
SOUndEAr® USB KEy FOrMAttinG tHE USB KEy the usB key included is formatted in the format called “fat 32”. if you wish to use an alternative usB key with a larger memory, it is important that it has the same format. Please follow the steps below to format your USB key. iMPOrtAnt: Please remember to export any files you may have on your USB key before formatting, as the formatting will overwrite all existing files on your USB key. -
Page 30: Export Log Files From The Internal Memory
SOUndEAr® USB KEy EXPOrt LOG FiLES FrOM tHE intErnAL MEMOry the internal log can store laeq 1minute measurements for up to 600 days. these measurements can be extracted from the device to the soundear software via usB. 1. connect the USB key to your SoundEar®3 device. the words ”USB” followed by ”copy” will appear in the mini display. counting from 0 to 100, the mini display will show the progress of the export to USB. this process can take from a few seconds... -
Page 31: Measurement Data
‘Measurement data’ , you will find all features relating to viewing the data – both live measurements and from the measurement library. LivE MEASUrEMEntS if your SoundEar®3 device is connected, you will be able to view what is being measured live. Move the cursor over the graph to view measurement and time. R e t u R n t o ta b l e o f C o n t e n t s... -
Page 32: Chart Statistics
MEASUrEMEnt dAtA cHArt StAtiSticS the tab ‘chart statistics’ gives you an overview of min., max. and average noise levels, as well as peak levels for your device(s). if you have selected more than one device, it will show the average noise levels for all the devices combined. By clicking the green arrow, you can go back and forth and see the statistics for each device. the peak count shows how many peaks there have been within the measured time. >105 dB(c) - 34 106 – 110 dB(c) – 14 111 – 115 dB(c) – 6 116 – 120 dB(c) – 0 R e t u R n t o ta b l e o f C o n t e n t s S o u n d E a r ®... -
Page 33: Show In Chart
MEASUrEMEnt dAtA SHOW in cHArt you can choose to have your noise levels shown as: • LAeq 1 sec. (shows the average A weighted noise level over a 1 second period). • LAeq 1 min. (shows the average A weighted noise level over a 1 minute period). • LAeq 15 min. (shows the average A weighted noise level over a 15 minute period). • LAeq 60 min. (shows the average A weighted noise level over a 60 minute period). • Lcpk max. (shows the highest measured c peak value within a second). -
Page 34: Zoom Function
MEASUrEMEnt dAtA ZOOM FUnctiOn When data is shown on the graph, it is possible to zoom in on a specific period in order to have a closer look at noise levels. current measurements. 1. Move your mouse cursor anywhere on the graph. 2. With a mouse controller, simply move the mouse scroll wheel back and forth to zoom in and out. 3. if you are using a touchpad, place two fingers on the touchpad and move your fingers up and down the touch- pad to zoom in and out. R e t u R n t o ta b l e o f C o n t e n t s S o u n d E a r ®... -
Page 35: Device Info
SoundEar®3 device. 3. location: name a location for your SoundEar®3 device. When you are done, click ‘configure’ to save your settings. R e t u R n t o ta b l e o f C o n t e n t s S o u n d E a r ® 3 – m a n u a l... -
Page 36: Reporting
How to create an automated noise report in SoundEar Software SEttinG UP A nOiSE rEPOrt the soundear® software can deliver a noise report based on laeq 1min measurements on a daily or weekly basis via e-mail. go to ‘set-up’ in the left side menu and click ‘reporting’ . nOtE! you can only receive a report if your device is directly connected to your computer or if you have connection to your devices via micro Pc or wireless dongle. 1. click the green plus to add a new report. R e t u R n t o ta b l e o f C o n t e n t s... -
Page 37: Report Name
rEPOrtinG rEPOrt nAME 1. report name 2. show in report Start by naming your report. this name will be used choose what you want included in the report by check- for the PdF you will receive as an email along with the ing the boxes. date. R e t u R n t o ta b l e o f C o n t e n t s S o u n d E a r ® 3 – m a n u a l... -
Page 38: Device Average
rEPOrtinG dEvicE AvErAGE device average gives you an overview of what has been measured for the chosen devices in the chosen time period. R e t u R n t o ta b l e o f C o n t e n t s S o u n d E a r ® 3 – m a n u a l... - Page 39 rEPOrtinG An EXAMPLE R e t u R n t o ta b l e o f C o n t e n t s S o u n d E a r ® 3 – m a n u a l...
- Page 40 rEPOrtinG An EXAMPLE. R e t u R n t o ta b l e o f C o n t e n t s S o u n d E a r ® 3 – m a n u a l...
-
Page 41: Chart
rEPOrtinG cHArt chart will show you what has been measured for the chosen devices in one chart. HOUrS Hours shows you the average measured for each hour in the chosen time period. R e t u R n t o ta b l e o f C o n t e n t s S o u n d E a r ® 3 – m a n u a l... -
Page 42: Day
rEPOrtinG if you choose to include multiple days in the report, ‘day’ will give the average daily noise level for each of the chosen devices. R e t u R n t o ta b l e o f C o n t e n t s S o u n d E a r ® 3 – m a n u a l... -
Page 43: Send Report
rEPOrtinG SEnd rEPOrt you can choose between a daily report or a weekly report. daily report • Mark check box ‘Every day’ • choose time you want to receive the report • chose time periode to include in the report • type in email address(s) to receive the report weekly report • Mark check box ‘Every week’ • choose time you want to receive the report • chose time periode to include in the report, in this case Monday to Friday from 08:00 – 16:00 • type in email address(s) to receive the report R e t u R n t o ta b l e o f C o n t e n t s S o u n d E a r ®... -
Page 44: Devices In Report
rEPOrtinG dEvicES in rEPOrt Check the boxes for the devices you want to include in the report. nOiSE LiMitS in rEPOrt drag the markers to set the noise levels you want shown in the report. the set noise levels will be used on all devices chosen for the report. When you are done with your settings, click ‘OK’ to save and activate the report. R e t u R n t o ta b l e o f C o n t e n t s S o u n d E a r ®... - Page 45 rEPOrtinG the report is shown in the left column. you can see an overview of your settings in the right column. click ‘Preview’ to see a sample of the report. if you want to edit your report, click on the button ‘Edit’ if you want to remove a report, click on the red mark next to the report name. click ‘OK’ in the pop-up window to remove the report. R e t u R n t o ta b l e o f C o n t e n t s S o u n d E a r ® 3 – m a n u a l...
-
Page 46: Library
LiBrAry here, you can find and compare the measurements collected. nAviGAtinG tHE LiBrAry Open ‘Library’ , located in the ‘Measurement data’ menu. SHOW MEASUrEMEntS 1. Start by selecting the devices you want to look at. R e t u R n t o ta b l e o f C o n t e n t s R e t u R n t o ta b l e o f C o n t e n t s S o u n d E a r ®... - Page 47 LiBrAry SHOW MEASUrEMEntS 2. Select the dates you want to look at. dates with data available will be highlighted in a light green color. When you select a date, it wil turn into a darker shade of green. 3. if needed, select what time interval you want to look at, by designating the hours and minutes in the drop-down menu. 4. click ‘Show’ to view your measurements. R e t u R n t o ta b l e o f C o n t e n t s S o u n d E a r ® 3 – m a n u a l...
-
Page 48: Show In Chart
LiBrAry SHOW in cHArt As standard, the graph will show LAeq 1min measurements. Use the arrows to choose between: - LAeq 1 sec. - LAeq 1 min. - LAeq 15 min. - LAeq 60 min. you can also choose to have your measurements shown as Lcpk max., LAF max. or LAS max. R e t u R n t o ta b l e o f C o n t e n t s S o u n d E a r ® 3 – m a n u a l... -
Page 49: Show As Hours, Days Or Chart
LiBrAry SHOW AS HOUrS, dAyS Or cHArt in the ‘Show as’ drop-down menu, you can get an average view of your measurements, shown as hours, days or chart. hours: Presents you with a bar chart, representing the average noise level for each hour in your selected period. R e t u R n t o ta b l e o f C o n t e n t s S o u n d E a r ® 3 – m a n u a l... - Page 50 LiBrAry SHOW AS HOUrS, dAyS Or cHArt days: Presents you with a bar chart, representing the average noise level for each day in your selected period. Chart: Presents you with a continuous chart of the average noise levels in your selected period. R e t u R n t o ta b l e o f C o n t e n t s S o u n d E a r ® 3 – m a n u a l...
-
Page 51: Chart Statistics
LiBrAry cHArt StAtiSticS As standard, chart statistics will show you the aver- age of all your measurements for all selected devices. Use the green arrows to view the statistics for each device. the information in chart statistics will be updated, depending on what you select in ‘Show in chart’ . R e t u R n t o ta b l e o f C o n t e n t s S o u n d E a r ® 3 – m a n u a l... -
Page 52: Export Measurements To Csv
LiBrAry EXPOrt MEASUrEMEntS tO cSv when exporting to Csv, you can create a Csv file with the precise information you need. in this example, i am interested in a csv file with LAeq 1min values for two devices over a period of three days. 1. click on the drop-down menu ‘Export’ and select ‘csv’ . 2. decide where you want to save the file. 3. A pop-up window will be shown on your screen, displaying the progress of the export. R e t u R n t o ta b l e o f C o n t e n t s S o u n d E a r ®... - Page 53 LiBrAry EXPOrt MEASUrEMEntS tO cSv 4. Open the csv file to view your measurements. R e t u R n t o ta b l e o f C o n t e n t s S o u n d E a r ® 3 – m a n u a l...
-
Page 54: Generate Noise Report
LiBrAry GEnErAtE nOiSE rEPOrt you can generate a noise report of the measurements you have selected in the library 1. click on the report symbol in the top right corner of the screen. 2. name your report and select what you want included in the report. By default, device average is always included. 3. Set your noise settings for the report by dragging the yellow and red markers. 4. click ‘OK’ to view your report as a pdf. you can read more and see a sample of the noise report in the chapter rEPOrtinG R e t u R n t o ta b l e o f C o n t e n t s S o u n d E a r ®... -
Page 55: Show Measurements In Folder
LiBrAry SHOW MEASUrEMEntS in FOLdEr See where your measurements are saved using the menu ‘Show measurements in folder’ . your measurements are au- tomatically saved in a .csv format, allowing you to analyze them further in Excel or other data analysis software of your choosing. By clicking here, you will be directed to the root folder. cHOOSE dEStinAtiOn FOLdEr if needed, you can choose which folder your measurements are saved in. 1. choose where to save your measurements by click- 2. choose your destination folder or create a new folder by ing on ‘choose destination folder’ in the menu clicking on ‘Make new Folder’ . ‘Measurement data’ . R e t u R n t o ta b l e o f C o n t e n t s S o u n d E a r ®... -
Page 56: Advanced Settings
AdvAncEd SEttinGS AnALOG OUtPUt Model 300, 310 and XL the analog outputs enable you to connect soundear®3 to Building Management systems (BMs) or to communicate USB Log/ Power SoundBuster Ext. mic. 5 VDC/ config. with other devices that are compatible with analog out- PC data Power... - Page 57 AdvAncEd SEttinGS AnALOG OUtPUt choose analog output format, either 0-10 v or 4-20 mA. Set the dynamic area, e.g. 30-120 dB. Save your settings by clicking ‘configure’ in the bottom right corner. R e t u R n t o ta b l e o f C o n t e n t s S o u n d E a r ® 3 – m a n u a l...
- Page 58 AdvAncEd SEttinGS MicrOPHOnE cALiBrAtiOn to calibrate the soundear®3 microphone, you will need a calibrator. you can use any standard cali- brators on the market with a microphone diameter of 1⁄2 inch. nOtE: For proper calibration, we recommend that you only use the included 4-pole extension cable. if calibrating more than one microphone, disconnect the extension cable from the SoundEar®3 and re- insert it between each calibration. the specific microphone id and last date of calibration is displayed in the upper left corner of the micro- phone. We recommend that the microphone is calibrated at least once a year – or as needed. 1. connect SoundEar®3 to your Pc with a mini USB ca- Wait a few seconds until the noiselevel shown in LAS ble and remove the external microphone.
-
Page 59: Microphone Calibration
When the calibration is complete, connect the micro- A new pop-up window will tell you when the calibration phone to SoundEar®3 and the device is now ready for is completed. use. R e t u R n t o ta b l e o f C o n t e n t s... -
Page 60: Soundear®3 Factory Settings
FActOry SEttinGS rESEt tHE dEvicE tO FActOry SEttinGS if you want to reset your device to factory settings, you can do so by connecting the device to your computer via USB cable and clicking the button ‘Factory Settings’ in the menu. PLEASE nOtE! this will remove all your previous settings and data from the device and re-install the original settings. soundear®3 factory settings light settings Green: 30 dB - 120 dB yellow: 75 dB -120 dB red: 80 dB -120 dB All measurements are shown as dB (A) Slow. night settings yellow: 60 dB -120 dB red: 60 dB -120 dB night settings are not part of the standard settings. to activate, please check the ”night Settings” box. advanced settings Output 1: dB(A) Slow Output 2: dB (c) Fast Output type: 0 -10 v Min. output: 30 dB Max. output: 1 20 dB MAintEnAncE to ensure correct and precise performance of SoundEar®3, repairs and service should be carried out by a trained technician. -
Page 61: Technical Specifications
: 512MB rAM. USB port : 1xUSB 2.0 port. cPU : 1.5GHz AMd/intel processor. We recommend using a screen at least 1366 x 768 in size. Frequency range : 20 Hz – 20kHz. Measuring Level range : 30 dB – 120 dB. Accuracy : +/- 0.5 dB. Frequency Weighting : dB(A) and dB(c) filters. time Weighting : Slow (1S) & Fast (125mS). dynamic range rMS : 90dB and Peak detection. Light managing : Full configurability through SoundEar® software, including night setting. Alarm settings : 30-120 dB. Alarm trigger display : 1 sec. – 5 min. 2xOutputs (1 for dB A + 1 for dB c) : Either 0-10v or 4-20mA outputs. 2xUSB ports : Micro USB (Power & Pc), USB OtG (Log, config). display data : LAeq 1 second, Alarm settings, clock, off. Power Supply : 5vdc (micro USB) / 24vdc (screw terminal). current consumption : Max 2.5W. Microphone : 20 Hz – 20 KHz. Mass Storage (internal memory) : 16MB (128MBit) (600 days log time). - Page 62 UK: the crossed-out wheeled bin means that within the European Union the product must be taken to separate collection at the product end of its life. this applies not only to your device but also to any enhancements marked with this symbol. do not dispose of these products as unsorted municipal waste. R e t u R n t o ta b l e o f C o n t e n t s S o u n d E a r ®...
Need help?
Do you have a question about the SoundAir3 300 and is the answer not in the manual?
Questions and answers