Advertisement
GENERAL DESCRIPTION
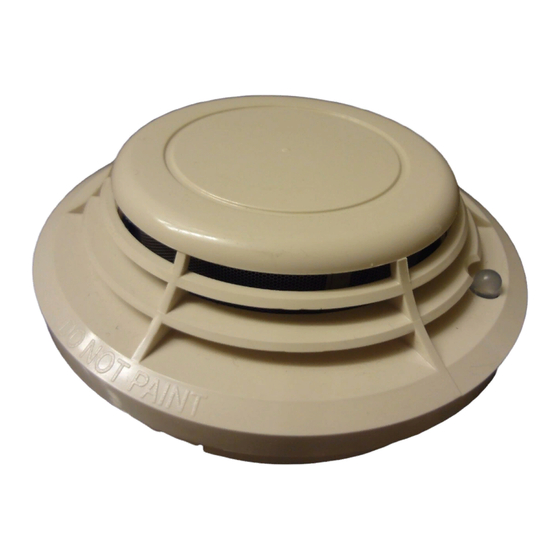
Model FSI-751 is an intelligent sensor that uses a state-of-the-art ionization sensing chamber. This sensor is designed to provide open area protection and
is intended for use with compatible control panels only.
Two LEDs on each sensor light to provide a local, visible sensor indication. Remote LED annunciator capability is available as an optional accessory (Part
No. RA400Z).
Notifier panels offer different feature sets across different models. As a result, certain features of the FSI-751 may be available on some control panels, but
not on others. The sensor will support either FlashScan™ or CLIP (Classic Loop Interface Protocol) mode. The possible features available in the FSI-751,
if supported by the control unit include:
1. The panel controls the LED operation on the sensor. Operational modes are RED blink, RED continuous, GREEN blink, and off.
2. The remote output may be synchronized to the LED operation or controlled independent of the LEDs.
Please refer to the operation manual for the UL listed control unit for specific operation of the FSI-751.
SPECIFICATIONS
Operating Voltage Range:
Max. Avg. Standby Current:
Max. Alarm Current (LED on):
Operating Humidity Range:
Operating Temperature Range
Height:
Diameter:
Weight:
WIRING GUIDE
Refer to the installation instructions for the plug-in base
being used. As indicated in Figure 1, terminals for power,
ground, and the optional RA400Z Remote Annunciator
are included in the base. Base Models B710LP (shown
in Figure 1) and B501 are electrically identical.
NOTE: All wiring must conform to all applicable codes,
ordinances, regulations and to the control panel
ifications.
NOTE: Verify that all sensor bases are installed and that
polarity of the wiring is correct at each base.
Disconnect loop power before installing sensors.
Before installing the sensor, please refer to the System Smoke Detector Application Guide. This manual includes detailed information on sensor spacing,
placement, zoning, and special applications. Copies of this manual are available from Notifier.
1. Sensor Installation
a. Set the address on the sensor per job drawings.
NOTE: Some panels support extended addressing. In order to set
the sensor above address 99 on compatible systems, carefully remove the stop
on the upper rotary switch with thumb or finger as shown in Figure 2.
b. Insert the sensor into the base and rotate it clockwise until it drops into place.
c. Continue to rotate the sensor until it locks into the base.
Dust covers are an effective way to limit the entry of dust into smoke detector sensing chambers. However, they may not completely prevent airborne
dust particles from entering the detector. Therefore, Notifier recommends the removal of detectors before beginning construction or other dust producing
activity.
Be sure to remove dust covers from any sensors that were left in place during construction as part of returning the system to se
2.Tamper-Resistance
Model FSI-751 includes a tamper-resistant capability that prevents its removal from the bracket without the use of a tool. Refer to the base manual for
details on making use of this capability.
3. After all sensors have been installed, apply power to the system.
4. See Figure 3. Test the sensor by positioning a test magnet (M02-04) against the sensor plastic in the magnet test area. The alarm level should be rec-
ognized at the panel and the LED controlled by communication command from the panel.
N500-57-00
www.PDF-Zoo.com
FSI-751 Plug-in Intelligent Ionization Sensor
Installation and Maintenance Instructions
15 to 32 VDC
300µA @ 24 VDC (one communication every 5 sec. with LED blink enabled)
6.5 mA @ 24 VDC
10% to 93% Relative Humidity, noncondensing
0° to 49°C (32° to 120°F)
1.7 inches (43 mm) installed in B710LP Base
6.1 inches (155 mm) installed in B710LP Base
4.1 inches (104 mm) installed in B501 Base
3.6 oz. (102 g)
+
spec-
-
-
+
REMOTE ANNUNCIATOR
+
-
2
3
1
CLASS A OPTIONAL WIRING
WARNING
Figure 2.
CAUTION
1
Notifier 12 Clintonville Rd, Northford, CT 06472-1653, (203) 484-7161
CAUTION: Do not loop wire under terminal 1 or 2.
Break wire run to provide supervision of connections.
2
3
3
1
Figure 1.
BREAKAWAY STOP
2
1
I56-1249-04R
Advertisement
Table of Contents

Related Manuals for Notifier FSI-751


Summary of Contents for Notifier FSI-751
- Page 1 No. RA400Z). Notifier panels offer different feature sets across different models. As a result, certain features of the FSI-751 may be available on some control panels, but not on others. The sensor will support either FlashScan™ or CLIP (Classic Loop Interface Protocol) mode. The possible features available in the FSI-751, if supported by the control unit include: 1.
- Page 2 – Increase the separation between the equipment and receiver. – Connect the equipment into an outlet on a circuit different from that to which the receiver is connected. – Consult the dealer or an experienced radio/TV technician for help. N500-57-00 I56-1249-04R www.PDF-Zoo.com ©2001 Notifier...
Need help?
Do you have a question about the FSI-751 and is the answer not in the manual?
Questions and answers