Table of Contents
Advertisement
Quick Links
Advertisement
Table of Contents

Summary of Contents for ARTECH Fonkorder1
- Page 1 Telephone USB Recorder fonkorder1 English Version1.0...
-
Page 2: Table Of Contents
Section 2 Product Overview ................. 2 Section 3 Packing Contents ................. 4 Section 4 System Requirements ..............4 Section 5 Install fonkorder1 USB Recorder and Application ....... 5 5.1. Install USB Recorder Hardware ............10 5.2 Install Procedures ................10 Section 6. - Page 3 1. Search System Log ................42 2. Contact Directory ................... 43 3. Record Statistics ..................44 Appendix for User ..................45 Operating Warnings ..................46 Service Warranty ..................47 Warranty Cover ..................47 Warranty Range ..................47 Artech Contact Info ..................48...
-
Page 4: Section 1 Brief Introduction
Section 1 Brief Introduction Thanks for purchasing Artech Telephone USB Recorder - Fonkorder1. Fonkorder1 stores recording information based on hard disk of computer, detailed telephone operating information can be recorded, such as talking contents, line live status, start talking time, inbound or outbound call no., talking duration, etc. -
Page 5: Section 2 Product Overview
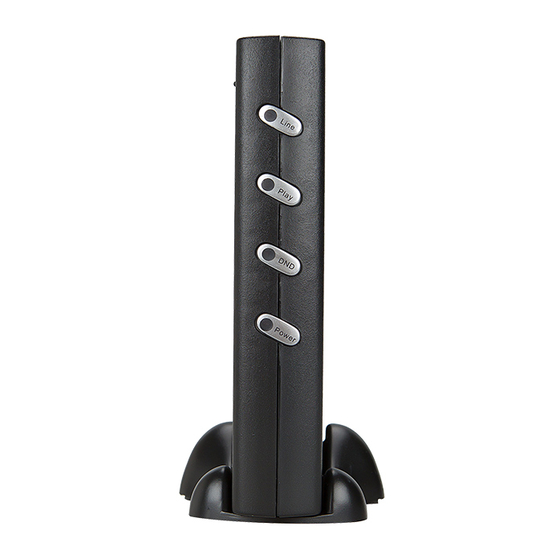
Section 2 Product Overview Please check each part of fonkorder1 hardware before operating. <Front View> Indicator Status Remarks Stands fonkorder1 auto online LINE Stands fonkorder1 not on line Play recording or monitor on build-in speaker Not use build-in speaker to play recording or... - Page 6 <Back View> (Main Unit Holder)
-
Page 7: Section 3 Packing Contents
Section 3 Packing Contents 1. fonkorder1 USB Recorder Hardware 2. fonkorder1 Application CD 3. USB Cable 4. RJ11 Cord 5. Main unit Holder 6. User’s Manual 7. Quick Installing Guide Section 4 System Requirements Pentium 400 MHz CPU or above... -
Page 8: Section 5 Install Fonkorder1 Usb Recorder And Application
Section 5 Install fonkorder1 USB Recorder and Application Insert CD driver to find out [Setup.exe] to start installation. - Page 9 Click [Install fonkorder1 Application] will pop up below window: This is the language selection interface for installing. Click [OK] to continue, click [Cancel] to exit installation. After clicking [OK] will pop up below window to click [Next] to continue.
- Page 10 Then will pop up a window to remind you select forkorder1installing location, click [Browse] can change scheduled path, we suggest use default path, then click [Next] to continue. Then will pop up a window to remind you select start menu folder on start program, click [Browse] can change folder name, suggest use the scheduled folder, then click [Next] to continue.
- Page 11 You can select [Create a desktop icon], then click [Next] to continue. Click [Install] to confirm all above procedures, then will start installation.
- Page 12 Then will display installing progress list, click [Cancel] to cancel installation. After progress reached 100% stands installing is done, then click [Finish] to end fonkorder1 application installation.
-
Page 13: Install Usb Recorder Hardware
5.1. Install USB Recorder Hardware 4 units of fonkorder1 can be installed to one PC at one time, the device ID must be selected via the back switch behind device, so if... - Page 14 If connecting is success, PC will remind [Found New Hardware], please wait a moment, system will continue auto detecting: Then will pop up below window, please select [Install the software automatically], click [Next] to continue.
- Page 15 After the device is recognized success, system will pop up below window to remind new device is already installed and ready to use, click [Finish] to end hardware installation. Then all procedures for hardware installing is completely finished, run fonkorder1 application can start any operations what you want.
-
Page 16: Section 6. Uninstall Fonkorder1 Application
Section 6. Uninstall Fonkorder1 Application Click [Start] to [All Program] to [Fonkorder1] folder, select [Uninstall fonkorder1] to remove fonkorder1 application. Click [Yes] to continue uninstalling fonkorder1 application. Then will display progress list, after done will pop up below window, click [OK] to confirm and end uninstalling procedures. -
Page 17: Section 7 Connect Fonkorder1 Hardware And Application
Section 7 Connect fonkorder1 Hardware and Application After installed fonkorder1 hardware and application, you can do some simple testing to check whether they are done correctly or not. Step1. Confirm hardware connecting as per above procedures. Step 2. Click [Start]\[All Program]\[fonkorder1]\[fonkorder1] to open fonkorder1 application, default username is [Admin], password is [1111]. - Page 18 Step 4. After login fonkorder1 application, the switch is slide to Line 1 stands Device ID is 1, if the telephone is hang up will show like below, you can pick up phone to check the line status changes. Step 5. If you can see the line status changes via operating telephone in different way that stands both hardware and software are done on the right way to go.
-
Page 19: Section 8. Login Fonkorder1 Application
Section 8. Login fonkorder1 Application 1. Click [Start]\[All Program]\[fonkorder1]\[fonkorder1] to run fonkorder1 application. 2. Then will pop up login window, key in username and password. (Default username is: [Admin], password is: [1111]) - Page 20 3. Then click [Login] to login software will display initializing device like as shown in below window. 4. After initializing device will display like below (Only use device ID one is [On Hook Phone] status), and will also display a small icon on right corner stands Fonkorder1 application is running.
-
Page 21: Section 9. Logout/Change User On Fonkorder1 Application
Section 9. Logout/Change User on fonkorder1 Application 1. Click fonkorder1 [File] to select [Logout]. 2. Then will pop up below window, click [Logout] again to logout application, click [Change user] can login with another user ID, click [cancel] logout operation. -
Page 22: Section 10. Exit Fonkorder1 Application
Section 10. Exit fonkorder1 Application 1. Click fonkorder1 [File] to select [Exit] to exit application. 2. Or right-click on small icon of fonkorder1 application to select [Exit] can exit fonkorder1 system. Section 11 Fonkorder1 Application Setting 1. Fonkorder1 System Setting (1).Application System Setting window... - Page 23 When you select this option, the DND LED of fonkorder1 will light on, and the first ringer will not be heard while ringing. (2). Auto run fonkorder1 application when windows starts When select it will automatically run fonkorder1 application when windows starts.
-
Page 24: Line Setting
(10). System date display format setting This setting is used to set system date display format on fonkorder1 application. (11). Recording file archived format setting This setting is used to set recording file archived format, default is in .AVN format with encryption need fonkorder1 application to open it), another is normal format in .WAV format. - Page 25 (9). Advanced setting After entered will display below window: fonkorder1 scheduled setting for line setting is basically in accordance with telecom standard, if there’s any difference or under special circumstances, you can change the scheduled setting according to exactly requirements.
-
Page 26: Answer Machine Setting
3. Answer machine setting After entered will display below window for answer machine setting: (1). Click fonkorder1 application [Tool] to select [Answering machine setting]. (2). Then will pop up below window for answering machine setting. - Page 27 (5). Synchronizing listen voicemail setting When select this item to remote login and start listening voicemail, the fonkorder1 device will be synchronized to listen leaved message. (6). Functional key setting [When play prompt voice for voicemail, press this hot key to enter listening...
-
Page 28: Low Hdd Space Alarm Setting
Note: The factory default is: [30] seconds. 4. Low HDD Space Alarm Setting (1). Enter Low HDD capacity alarm setting window Click fonkorder1 application [Tool] to select [Low hard disk capacity alarm setting]. (2). Then will pop up below window for low HDD setting. -
Page 29: Audio Device Setting
5. Audio Device Setting (1). Enter system audio device setting window Click fonkorder1 application [Tool] to select [System audio device setting]. (2). Then will pop up below window for audio setting. By this setting you can set audio device for monitor talking, play recording, and windows audio selection. -
Page 30: Record Time Field Setting
7. Record Time Field Setting (1). Enter recording time field setting window Click fonkorder1 application [Tool] to select [Recording time field setting]. (2). Then will pop up below window for recording time filed setting. By this setting you can set exactly time field for recording, the time field... -
Page 31: Non-Recorded Number Setting
[All non-recording numbers] >> Display all non-recording phone numbers 9. Administrator Setting (1). Enter user management Click fonkorder1 application [User management] page. (2). Then will enter below page for administrator setting. By this setting you can set fonkorder1 user all kinds of authorizations. -
Page 32: Fonkorder1 Language Setting
(3). User management tool bars as follows. Fonkorder1 application management: [High administrator] >> fonkorder1 only provide 1 high administrator with highest authorization, can edit all operations on application. [Administrator] >> Can add/delete user, set user authorization, but can not add/delete administrator [User] >>... -
Page 33: Section 12. Fonkorder1 Application Operations
[No] is to cancel the language changing. (3). After clicked [Yes], all pages on application will be changed to selected language, if clicked [No] will become normal without any changes. Section 12. Fonkorder1 Application Operations 1. Line Status Window Line status window includes below items: [Answer machine enable/disable status] >>... -
Page 34: Call Detail Record Window
2. Call Detail Record Window Call detail record window tool bars as follows: [Play] >> When the record with recording icon stands this record is recorded with voice file, then select it to click [Play] can play this voice file. [Delete] >>... -
Page 35: Search Record Window
[File path] >> Display stored path for this recording 3. Search Record Window Click fonkorder1 application [Search result] will display below page: Search record window is same as call detail record window, please refer to details for each bar function on above call detail record window. -
Page 36: Section 13. Telephone Recording Operations
3. Monitor Call while Talking (1). During talking status under inbound or outbound call, press this icon can live monitor talking to playback via PC audio device or fonkorder1 audio device. (2). Stop monitor to press this icon will stop monitor immediately. -
Page 37: Cancel Recording
[All not recording] status. (2). Use hot key to forcibly record As long as fonkorder1 device is connected ok to run application success, during talking status to press hot key [Hot key for start recording] can do forcibly recording. -
Page 38: Search Recording
7. Search Recording On [call detail record] or [search result] bar to press [Search] bar will display below menus, you can do exactly searching according to your requirement. [Today records] >> Press this bar can search out all today records [All records] >>... -
Page 39: Delete Recording
8. Delete Recording (1). On [Recorded Files] window to select your required recording, then click tool bar icon can delete this recording. (2). Press this bar will remind you whether delete both voice file and CDR, if you select both voice file and CDR will delete this recording completely, if you select only voice file will delete voice file, but will remain CDR on this recording unchanged. -
Page 40: Export Recording File
CDR window on application interface. Section 14. Answer machine Function Operations Fonkorder1 provides answer machine function for voicemail, only need enable answer machine function and select host leaved message , whatever you go out, the caller can do incoming voicemail immediately. -
Page 41: Enable/Disable Answer Machine
Ringing >> When incoming call is ringing will display ringing. (3). Pick up phone after ringing with 4 times, fonkorder1 system will be auto online to play host voicemail. Note: After waiting how many ringing times to enter answer machine can be set on application, system default is after ringing 4 times. -
Page 42: Play Voicemail Record
(5). Hang up phone >> After leaved message to go back to idle status via hang up phone will display standby icon. Note: During leaving message process can pick up phone talk to the other party directly. 3. Play Voicemail Record (1). -
Page 43: Export Voicemail Record
7. Export Voicemail Record (1). On [Answering machine] page, select your required voicemail, then click tool bar [Export] will pop up below menus. (2). You can select one of below format to export a. Export file in [.WAV] format and CDR info b. -
Page 44: Remote Access Voicemail
9. Remote Access Voicemail Fonkorder1 has remote access voicemail function, wherever you are you can remote access voicemail as per below way. 10. Remote Listen Voicemail (1). -
Page 45: Remote Access Voicemail Function List
Section 15. Other Operations on Application 1. Search System Log (1). Enter system log window Click fonkorder1 application [Tool] to select [System log] to search system operating detailed information. (2). After entered will pop up below window. By this window, you can inquiry, search, delete all kinds of operations are... -
Page 46: Contact Directory
Click [Delete] bar can delete selected operating record. 2. Contact Directory (1). Enter contact directory window Click fonkorder1 application [Directory] will enter contact directory page as shown in below window. (2). After entered will display below window for directory management. -
Page 47: Record Statistics
3. Record Statistics (1). Enter system record statistics window. Click fonkorder1 application [Records statistics] will come to records statistics. (2). After entered will pop up below window. By this window, you can analyze all call details for exact management. -
Page 48: Appendix For User
This manual doesn’t involve any forms of guarantee, expression or other instructions. If any direct or indirect profit lost or any benefit damage caused this manual, Artech or any staff of Artech will not be responsible for this issue. Moreover, this manual which refers to the product spec and info only for reference, if any update or changes will not make notification continuously. -
Page 49: Operating Warnings
Operating Warnings 1. Place product away from dusty or massed area. The dust often affects and result product shortness. 2. Get away from any magnetic area (e.g. Speaker or TV) to prevent magnetic interference. 3. Do not place the product under the sunlight. -
Page 50: Service Warranty
Service Warranty This product has made a series of quality control tests and exams by Artech, Ltd., Taiwan. If under normal circumstances the product is defeated without users’ failure of operation or breakage, the product is covered by its warranty and will be repaired by Artech. -
Page 51: Artech Contact Info
Artech Contact Info ARTECH Technology Design Co., Ltd. Address: 13F-2, No.293-2, Sec.1, Zhongshan Road, Banqiao Dist., New Taipei City 22065, Taiwan Tel: 886-2-2785-2954 Fax: 886-2-2786-2783 E-mail: sales@artech.com.tw Service time: Monday to Friday at AM9:00~PM:6:00 Official website: www.artech.com.tw Shenzhen Branch Address: 5F, Building No. 2, Pengfengfa Industrial Zone, 175 Industrial East Road, Longhua Town, Baoan Dist., Shenzhen, China...
Need help?
Do you have a question about the Fonkorder1 and is the answer not in the manual?
Questions and answers