
Subscribe to Our Youtube Channel
Related Manuals for Winplus TypeS BT56883


Summary of Contents for Winplus TypeS BT56883
- Page 1 Flex Mount Backup Camera Backup Camera Kit WP ITM. BT56883 Care & Use Instructions Important, retain for future reference: Read carefully...
-
Page 2: Table Of Contents
TABLE OF CONTENTS 1. Introduction ....................................1 2. Package Contents ...................................2 3. Product Specifications ................................3 4. Installation Guide ..................................3 5. Settings and Operation ................................9 6. Safety Information ................................14 7. Maintenance & Warranty ..............................17 8. Troubleshooting ..................................21 9. General Information ................................23... -
Page 3: Introduction
Consult an experienced technician if you are not comfortable installing the product. You can also contact Winplus at 866.294.9244 to speak to one of our installation specialists if you have any specific questions regarding the Backup Camera. -
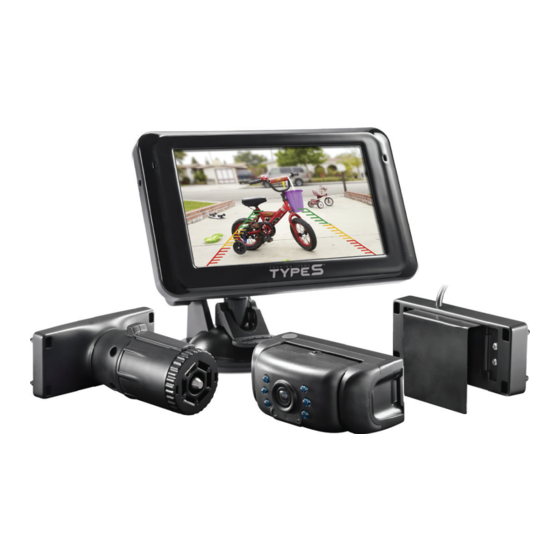
Page 4: Package Contents
2. PACKAGE CONTENTS 1. 5” Dash Monitor 2. Wireless Camera with Magnetic Mount 3. 7-way Round Plug Adapter 4. License Plate Mount Adapter 5. 12V/24V Power Adapter for Monitor and Camera *same adapter as used to power the monitor 6. Hardwire Cable for Monitor 7. -
Page 5: Product Specifications
3. PRODUCT SPECIFICATIONS 1. Frequency: 2.4GHz 2. Operating Voltage: DC 12V / 24V 3. Operating Temperature: -10~+50°C 4. Maximum Signal Range: 33 feet/10 meters (without Interference or Obstruction) 5. Camera Lens Water Resistance: IP67 rating 6. Battery capacity: 1500mAh 7. Battery usage time: 4.5 hours 4. - Page 6 A) MAGNETIC MOUNT OPTION The camera has a strong magnet on its back and can be mounted on any metal surface of a vehicle, trailer, or anything you tow. The camera is already charged, but it is a good practice to charge the camera when not in use.
- Page 7 B) 7-WAY ROUND PLUG MOUNT This installation is based on powering the Camera over the 7-way round outlet. When installed as directed, the camera image will only appear when the vehicle is in reverse. Caution: This unit is designed to operate on a 12V/24V DC NEGATIVE GROUND electrical system. Connecting to other types of electrical systems will cause damage to your vehicle.
- Page 8 C) LICENSE PLATE MOUNT OPTION Camera Cable Reverse Light Power Wires This installation is based on powering the Camera over the reverse tail lights. When installed as directed, the camera image will only appear when the vehicle is in reverse. Caution: This unit is designed to operate on a 12V/24V DC NEGATIVE GROUND electrical system.
- Page 9 4. Locate the reverse taillights wiring behind your reverse light. You may need to remove the interior panel in order to locate. You only need to attach the adapter to ONE of the reverse lights, not both. If you cannot manually locate the taillight cables, please contact the vehicle manufacturer or reference a wiring diagram for your vehicle.
- Page 10 15. Press the license plate and the adapter mounting firmly to the car to secure and get full contact between the license plate and the double-sided tape. Screw the license plate back onto the rear of your vehicle. 16. Attach the Camera to the adapter, you can adjust the vertical angle of the Camera to your specific need.
-
Page 11: Settings And Operation
5. SETTINGS AND OPERATION Power Menu Parking Aid Line / Enter Down Channel Button POWER ON/OFF • The Dash Monitor will automatically turn ON when it is connected to a power source. • Hold the power button to turn ON/OFF the unit if necessary. CONNECTION AND VIEW SELECTION •... - Page 12 BRIGHTNESS AND CONTRAST You can adjust the contrast and brightness of the Monitor according to your desired level. Note: Contrast and Brightness setting ONLY works while the camera image is on the screen. TO ADJUST BRIGHTNESS 1. Press “MENU” 2. Go to “Brightness” by pressing “– “ 3.
- Page 13 PAIRING The Type S Backup Camera (Camera 1) included with this Expandable System is already paired with the monitor. If you can not see the Camera image, pair the Camera with the following steps: 1. Turn on your vehicle and place in reverse gear. This will power the Monitor and the Camera. 2.
- Page 14 a. Press “Menu” b. Go to “Pair Camera” and select “Camera 2” c. Press “Parking Aid line” to confirm d. The unit is now in pair mode - if the monitor is able to connect with the Camera, the display will show “Pair OK”.
- Page 15 TO CHANGE YOUR DEFAULT CAMERA: 1. Press “MENU” 2. Go to “Set Default” by pressing “ – “ 3. Press “Parking Aid Line” to enter 4. Press “+ “ or “– “ to select Camera 1 or Camera 2 5. Press “Parking Aid Line” to confirm and exit ROTATE IMAGE You can rotate 180 degrees of the transmitted image signal and disable mirror imaging according to your camera install orientation.
-
Page 16: Safety Information
6. SAFETY INFORMATION WARNING: A failure to read and follow these warnings and instructions may result in a serious accident, including damaged property or a serious injury, including loss of life. • SAVE THESE INSTRUCTIONS– This manual contains important safety and operating instructions for battery charger. - Page 17 different from actual conditions. Objects viewed in the rear view monitor differ from actual distance because a wide-angle lens is used. Objects in the rear view monitor will appear visually opposite than when viewed in the rear view and outside mirrors. Use the inside mirror or glance over your shoulder to properly judge distances to other objects.
- Page 18 • The Camera Lens has a water resistant construction. Do not detach, disassemble or modify it. This may cause incorrect operation. Camera Lens is waterproof. • Do not submerge Camera in water, which can cause internal damage to the Camera. •...
-
Page 19: Maintenance & Warranty
1 year from the date of original purchase. Where permitted by law, Winplus North America’s liability shall be limited to that set forth in this limited express warranty. This limited express warranty shall be the exclusive remedy of the purchaser and Winplus North America makes no other warranty of any kind aside from the limited express warranty stated above. - Page 20 If at that time it is determined that a replacement unit is needed, the support representative will issue a Return Authorization and instruct on how to get a new unit. Winplus North America makes no other warranty of any kind aside from the limited express warranty stated herein.
- Page 21 WARRANTY OF MERCHANTABILITY OR FITNESS FOR A PARTICULAR PURPOSE. Winplus North America and/or its affiliates do not guarantee or promise that the user of Backup Camera will not be in an accident or otherwise not collide with an object and/or person. Our Backup Camera is not intended in any way to be a substitute for careful and cautious driving or for the consistent adherence to all applicable traffic laws and motor vehicle safety regulations.
- Page 22 3. Please include a detailed explanation of the problem you are having. 4. If your product is found by Winplus to have a defect in material or workmanship, within the warranty period, it will be repaired or replaced at no charge and returned to you prepaid.
-
Page 23: Troubleshooting
product has been damaged or rendered faulty by accident, abuse, misuse, incorrect application or if the product has been modified or tampered with. Proof of purchase is required to validate warranty claims. If this product is faulty, simply return it to the place of purchase with your receipt for a replacement product. - Page 24 Q: How long will it take the camera to charge? A: No need to charge between usage for 7-way round plug mount and license plate mount as the camera is powered by rear-light power source. If using magnetic mount option, it needs approximately 5 hours to fully charge.
-
Page 25: General Information
9. GENERAL INFORMATION CUSTOMER SERVICE/CONTACT For questions or issues regarding the product, please visit www.typesauto.com or contact Winplus in your area/region to speak to our customer service representative: Winplus North America Tel.: 866-294-9244 Tel.: 909-752-3074 Winplus Europe Tel.: 44-1223-919711 Winplus Australia Tel.: 61-3-8727-7600... - Page 26 FCC / IC COMPLIANCE STATEMENT: This device complies with Part 15 of the FCC rules and Industry Canada license-exempt RSS standard(s). Operation is subject to the following two conditions: (1) This device may not cause harmful interference, and (2) this device must accept any interference received, including interference that may cause undesired operation.
- Page 27 11 On Lai Street, Shatin, N.T., Hong Kong Fax: 852-2795-0241 www.typesauto.com © 2018 Winplus North America Inc. All Rights Reserved. Winplus, the logo design, and Type S are trademarks or registered trademarks of Winplus North America Inc. Revision date: August 2018...
- Page 28 Caméra de recul à montage flexible Trousse de caméra de recul WP ITM. BT56883 DIRECTIVES D’UTILISATION ET D’ENTRETIEN IMPORTANT, CONSERVER POUR RÉFÉRENCE FUTURE : LIRE ATTENTIVEMENT...
- Page 29 TABLE DES MATIÈRES 1. Introduction ..................................... 28 2. Contenu de l’emballage ..............................29 3. Spécifications du produit ..............................30 4. Installation ....................................30 5. Réglages et utilisation ................................ 36 6. Renseignements sur la sécurité ............................. 42 7. Entretien et garantie ................................45 8.
-
Page 30: Introduction
Consultez un technicien d’expérience si vous avez des doutes au sujet de l’installation du produit. Vous pouvez aussi communiquer avec Winplus au 866.294.9244 pour parler à l’un de nos spécialistes de l’installation si vous avez des questions spécifiques au sujet de la Caméra de marche arrière. -
Page 31: Contenu De L'emballage
2. CONTENU DE L’EMBALLAGE 1. Moniteur de 2,7 cm (5 po) 2. Caméra sans fil avec montage magnétique 3. Adaptateur de prise ronde à 7 directions 4. Adaptateur de montage sur la plaque d’immatriculation 5. Adaptateur de 12 V/24 V pour le moniteur *même adaptateur que celui utilisé... -
Page 32: Spécifications Du Produit
3. SPÉCIFICATIONS DU PRODUIT 1. Fréquence : 2,4 GHz 2. Tension de fonctionnement : 12 V / 24 V CC 3. Température d’utilisation : -10 à 50 °C /-14 à 122 °F 4. Portée de signal maximum : 10 mètres/33 pieds (sans interférence et obstruction) 6. - Page 33 A) OPTION DE MONTAGE MAGNÉTIQUE La caméra est dotée d’un aimant puissant à l’arrière et peut être montée sur n’importe quelle surface métallique d’un véhicule, d’une remorque ou de tout ce que vous remorquez. La caméra est déjà chargée, mais il est recommandé de recharger la caméra lorsqu’elle n’est pas utilisée. En règle générale, la caméra se recharge complètement en 5 heures.
- Page 34 B) MONTAGE DE PRISE RONDE À 7 DIRECTIONS Cette installation est basée sur l’alimentation de la caméra par une prise ronde à 7 directions. Lorsque la caméra est installée tel qu’indiqué, l’image de la caméra ne s’affiche que lorsque le véhicule est en marche arrière.
- Page 35 C) OPTION DE MONTAGE SUR LA PLAQUE D’IMMATRICULATION Câble de la caméra Câble d’alimentation de feux de march arriére Cette installation est basée sur l’alimentation de la caméra par les feux de marche arrière. Lorsque la caméra est installée tel qu’indiqué, l’image de la caméra ne s’affiche que lorsque le véhicule est en marche arrière.
- Page 36 partir de l’extérieur du véhicule jusqu’à l’intérieur. Tirez le câble de sorte qu’il y ait un petit jeu et que vous puissiez bouger la caméra autour de la plaque d’immatriculation. 4. Localisez le câblage des feux arrière sous un feu de marche arrière. Il se peut que vous deviez retirer le panneau intérieur pour localiser le câblage.
- Page 37 plaque d’immatriculation pour déterminer le meilleur emplacement pour l’installation. Le centre de la plaque d’immatriculation constitue le meilleur emplacement pour la caméra. Si le hayon arrière est doté d’une poignée, il se peut que vous deviez retirer le support de l’adaptateur, retourner le support et le fixer à...
-
Page 38: Réglages Et Utilisation
5. RÉGLAGES ET UTILISATION Alimentation Menu Ligne de l’assistant de stationnement / Entrée Haut Bouton de canal MISE EN MARCHE/ARRÊT • Le moniteur pour tableau de bord se met automatiquement en marche lorsqu’il est connecté à une source d’alimentation. • Au besoin, maintenez le bouton de MARCHE/ARRÊT pour la mise en marche et en arrêt du moniteur. - Page 39 LIGNE DE L’ASSISTANT DE STATIONNEMENT • Vous pouvez mettre en MARCHE/ARRÊT la ligne de l’assistant de stationnement en appuyant sur le bouton Parking Aid Line (Ligne de l’assistant de stationnement) lorsque l’image de la vue arrière s’affiche à l’écran. • Vous pouvez ajuster la ligne de l’assistant de stationnement qui s’affiche à...
- Page 40 4. Appuyez sur « + » ou sur « – » pour ajuster le niveau de contraste. 5. Appuyez sur « Parking Aid Line » (Ligne de l’assistant de stationnement) pour confirmer et quitter ce menu. JUMELAGE La caméra de marche arrière (Caméra 1) de Type S comprise dans le système expansible est déjà jumelée au moniteur.
- Page 41 Si l’appareil n’a pas trouvé la caméra, l’affichage indiquera alors « Pair Fail » (Échec du jumelage). Si vous obtenez un message « Pair Fail » (Échec du jumelage), veuillez communiquer avec notre service de soutien qui vous aidera pour le dépannage. Caméra 2 est désignée pour une caméra additionnelle de Type S.
- Page 42 Si l’appareil n’a pas trouvé la caméra, l’affichage indiquera alors « Pair Fail » (Échec du jumelage). Si vous obtenez un message « Pair Fail » (Échec du jumelage), veuillez communiquer avec notre service de soutien qui vous aidera pour le dépannage. RÉGLAGE DE LA CAMÉRA PAR DÉFAUT •...
- Page 43 POUR CHANGER LA CAMÉRA PAR DÉFAUT : 1. Appuyez sur « MENU ». 2. Allez à « Set Default » (Régler la caméra par défaut) en appuyant sur « – ». 3. Appuyez sur « Parking Aid Line » (Ligne de l’assistant de stationnement) pour entrer. 4.
-
Page 44: Renseignements Sur La Sécurité
6. RENSEIGNEMENTS SUR LA SÉCURITÉ AVERTISSEMENT : Le manquement de lire et de suivre ces avertissement et directives peuvent entraîner un accident grave incluant des dommages à la propriété ou une blessure grave, incluant la perte de vie. • CONSERVEZ CES DIRECTIVES – Ce manuel contient d’importantes directives de sécurité et d’utilisation pour le chargeur de batterie. - Page 45 libre. Si vous reculez votre véhicule en regardant uniquement l’affichage, vous pourriez heurter un véhicule, un piéton, un cycliste, un enfant, un animal ou d’autres objets pouvant entraîner des blessures ou la mort. Reculez toujours lentement. • Ne vous fiez pas uniquement à la Caméra de marche arrière lorsque vous faites marche arrière. L’image présentée à...
- Page 46 • Conformez-vous aux codes de la route applicables et à l’ensemble des règlements sur les véhicules automobiles applicables à cet appareil. • Consultez les lois et réglementations locales pour connaître les restrictions relativement à l’installation ou l’emploi. • Ne laissez jamais un enfant jouer avec l’appareil. Les petites pièces pourraient présenter un risque d’étouffement.
-
Page 47: Entretien Et Garantie
SÉCURITÉ AUTOUR DES AUTRES VÉHICULES L’utilisation d’une caméra de recul n’est pas suffisante pour compenser complètement l’angle mort du véhicule. Plusieurs blessures et décès évitables surviennent dans les entrées ou les aires de stationnement où les conducteurs ne voient pas les enfants, les animaux et les autres personnes ou objets près de leur véhicule. - Page 48 (1) an à compter de la date d’achat initiale. Là où la loi le permet, la responsabilité de Winplus North America se limitera aux dispositions de la présente garantie limitée expresse. La présente garantie limitée expresse constituera le recours exclusif de l’acheteur et Winplus North America ne formule aucune autre garantie que ce soit à...
- Page 49 RESPONSABILITÉS DU PROPRIÉTAIRE : Winplus North America ne ménage aucun effort pour honorer sa garantie dans un délai raisonnable. POUR TOUTE QUESTION AU SUJET DU SERVICE REÇU, OU POUR DE L’ASSISTANCE EN VUE D’OBTENIR DU SERVICE, VEUILLEZ COMPOSER LE 1-866-294-9244 (SANS FRAIS) PENDANT LES HEURES D’OUVERTURE, SOIT DE 8 H À...
- Page 50 Caméra de recul, et Winplus Amérique du Nord et (ou) ses sociétés affiliées, le fabricant, le distributeur et le détaillant ne peuvent être tenus responsables des blessures, pertes, dommages, incidents ou de circonstance découlant de l’utilisation réelle ou prévue du...
- Page 51 3. Indiquez dans une note détaillée la nature du problème. 4. Si Winplus découvre que votre appareil comporte un vice de matériel ou de fabrication pendant la période couverte par la garantie, il le réparera ou le remplacera sans frais et le retournera à...
-
Page 52: Dépannage
8. DÉPANNAGE Q : Pas d’affichage ou image affichée sur le moniteur R : Cette Caméra de recul à montage flexible prend en charge un système à deux caméras, vérifiez les points suivants : 1) Suivez les directives de la section 4 de ce manuel pour vous assurer d’une installation appropriée. - Page 53 d’alimentation des feux arrière. Si vous utilisez une option de montage magnétique, il faut environ 5 heures pour une recharge complète. Q : La caméra peut-elle être laissé sur une source d’alimentation constante de sorte qu’elle soit toujours chargée ? R : Oui, lorsqu’elle est branchée à...
-
Page 54: Renseignements Généraux
SERVICE À LA CLIENTÈLE/CONTACT Pour toute question ou problème concernant le produit, visitez notre site, à l’adresse www.typesauto.com ou communiquez avec Winplus pour parler à un représentant de notre service à la clientèle de votre région : Winplus North America Tél. - Page 55 REMARQUE : cet appareil a été testé et s’est avéré conforme aux limites applicables à un appareil numérique de classe B, en vertu de la partie 15 des Règles de la FCC. Ces limites sont établies de manière à assurer une protection raisonnable contre les interférences nuisibles dans une installation résidentielle.
- Page 56 Téléc. : 852-2795-0241 www.typesauto.com © 2018 Winplus North America Inc. Tous droits réservés. Winplus, la conception du logo et Type S sont des marques de commerce ou des marques déposées de Winplus North America Inc. Date de révision : Août 2018...
Need help?
Do you have a question about the TypeS BT56883 and is the answer not in the manual?
Questions and answers