
Summary of Contents for Award Easy Dryer 1700
- Page 1 Easy Dryer 1700 427001258 Keep this manual so that it will always be Drying cabinet User manual on hand for future reference.
- Page 2 Award offers you all these features. When you buy an Award Easy Dryer 1700 you can be sure that the inside is just as good as the outside and that the ethics and morals that go into building this Easy Dryer are just as high as the quality and function you are getting.
-
Page 3: Table Of Contents
REHANGING OF DOOR DIMENSIONAL DRAWING POSITIONING/ATTACHMENT WARRANTY EVACUATION / SUPPLY AIR CONNECTION TO EVACUATION ELECTRICAL CONNECTION START-UP ARRANGING LAUNDRY FOR DRYING USER TIPS AIR FLOW BREAKDOWNS OVERHEAT CUT-OUT OPERATION EASY DRYER 1700 CONTROL PANEL CHOICE OF SETTINGS CARE CLEANING SERVICING... -
Page 4: This User Manual
THIS USER MANUAL The contents of this user manual describe Note: Keep this user the drying cabinet’s function and opera- manual so that it is always tion and instructions for installation and to hand for future use maintenance. -
Page 5: Safe Operation
SAFE OPERATION This advice on safe operation has been compiled to enable you to avoid incorrect use and unnecessary risks of accidents and should be read before the drying cabinet is installed and used. CAUTION This equipment is intended only to be used to dry fabrics washed in water. -
Page 6: Description Of The Drying Cabinet
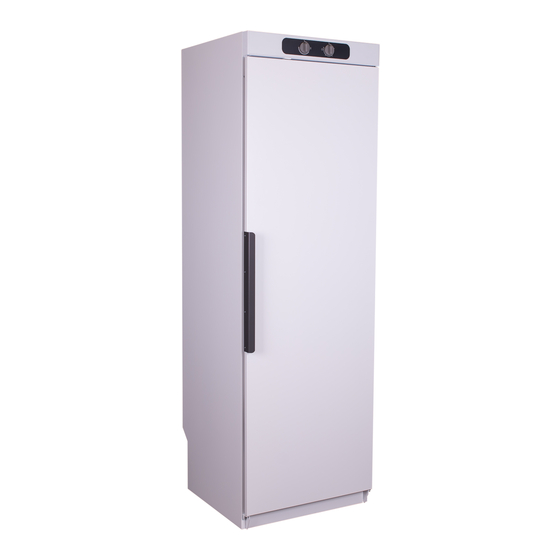
DESCRIPTION OF THE DRYING CABINET The drying cabinet operates with hot air that removes moisture from the laundry. Heating and fan components are combined in the upper part of the drying cabinet behind the con- trol panel. Easy Dryer cabinet is controlled by two knobs, one for setting power modes and the other for regulating drying time. - Page 7 AIR FLOW IN THE DRYING CABINET Note the direction of air flow inside the cabinet when positioning laundry. See also this section.
-
Page 8: Unpacking
UNPACKING PACKAGING MATERIALS The packaging that protects the drying cabinet against damage in transit has been chosen with concern for the environment in mind and is therefore recyclable. Packaging that is returned to the material cycle means reduced consumption of raw materials and a smaller volume of waste. -
Page 9: Assembly Kit
UNPACKING ASSEMBLY KIT Plastic plug Draught stabiliser Spacer 8.2x12x15 Hose, Ø 120 x 1000 mm Spigot Screw TRX 5x70 fzk Washer NB 5x25... -
Page 10: Rehanging Of Door
REHANGING OF DOOR The door may be right-hung or left-hung. 3 Detach the hinge pin at the upper hinge Lay the drying cabinet down on its side. (2) and install it on the opposite side. The 2 Loosen the hinge pin at the lower hinge pin has a slot for a screwdriver. -
Page 11: Positioning/Attachment
POSITIONING/ATTACHMENT The drying cabinet is intended only for location indoors in a dry place and secured to a wall. The drying cabinet must not be placed in an environment in which high-pressure water is used for cleaning. The drying cabinet must be level on a flat The cabinet must be attached to a wall to surface, resting on all four feet. -
Page 12: Evacuation / Supply Air
EVACUATION / SUPPLY AIR When the cabinet is on, approx. 95 m³ moist air per hour is evacuated. It must therefore be ensured that air can enter the room to replace the moist air that is vented out. CONNECTION TO EVACUATION The drying cabinet is connected to exhaust air ventilation in accordance with standard. - Page 13 EVACUATION / SUPPLY AIR With draught stabiliser Moist air out Connect the flexible hose (2) to the spigot. Connect the other end of the hose to the draught stabiliser (3) which is then pressed home on the exhaust vent in the room. The drying cabinet must not be connected to a flue.
-
Page 14: Electrical Connection
ELECTRICAL CONNECTION The drying cabinet must be connected to a If the mains lead for any reason is dam- 230 V single-phase 50-60 Hz and protectively aged, it must be replaced. A genuine earthed wall socket. spare part can be obtained from the dealer who supplied the cabinet. -
Page 15: Start-Up
START-UP Read these op erating CAUTION Read the safety instructions instructions before using on page 5 before using the cabinet. the drying cabinet for the first time. 1 Make sure that the cabinet is firmly attached to the wall. See page 11. 2 Make sure that no packaging material has been left behind. -
Page 16: Arranging Laundry For Drying
ARRANGING LAUNDRY FOR DRYING There are three sections with hangers in the cabinet, depending on choice of interior fittings. Each section has a number of rails for hanging laundry. USER TIPS Hang the items in the drying cabinet according to how much space they require Always following the laundry instructions - not according to their weight. -
Page 17: Breakdowns
BREAKDOWNS OVERHEAT CUT-OUT The cabinet is equipped with an overheat cut-out. This trips when the temperature in the fan unit exceeds 120 °C. Easy Dryer When the overheat cut-out has tripped, the cabinet is closed and the timer stops for example at 2 hours with the laundry wet. - Page 18 BREAKDOWNS OFF - press the switch in the rear hole ON - press the switch in the front hole Illustration shows the Sensor Dryer drying cabinet Toggle switch behind inner panel Hole in inner panel for operation of the toggle switch with a screwdriver or similar tool...
-
Page 19: Operation Easy Dryer 1700
OPERATION EASY DRYER 1700 CONTROL PANEL HEAT DRYING TIME The cabinet is equipped with two knobs The right-hand knob regulates drying for setting different power modes. time steplessly up to four hours. The left-hand knob regulates heat with power modes on a stepless scale. -
Page 20: Care
This information can be found on the identification plate located inside the cabinet. Identification plate (inside) Name of the drying cabinet Article number Serial number (12 digits) Follow Award instructions in repair and replacement of parts. -
Page 21: Management Of End-Of-Life Drying Cabinet
MANAGEMENT OF END-OF-LIFE DRYING CABINET When the drying cabinet has reached the end of its useful life, it must be taken to a recycling centre for disposal. Many parts of the drying cabinet can be re- used, but it also contains other material that must be dispose of correctly. -
Page 22: Technical Data Easy Dryer 1700
TECHNICAL DATA EASY DRYER 1700 Capacity: Up to 6.0 kg laundry (cotton) Dewatering capacity: Up to 25 g/min Electrical connection: Single-phase 230 V, 50-60 Hz Fuse 10 A Motor: 38 W Heating element output: 2,000 W Overheat cut-out: Fan capacity: 184 m³/hour... -
Page 23: Troubleshooting
TROUBLESHOOTING EASY DRYER Questions What you can do The drying cabinet is 1. Check that the mains lead is connected to a power not working. socket and that power is supplied. 2. Check that no fuse has tripped. 3. Is the door closed? 4. -
Page 24: Dimensional Drawing
DIMENSIONAL DRAWING 1700 1700 1474... -
Page 25: Warranty
(12) months warranty cover. The Warranty covers rec�fica�ons of faults arising from defec�ve materials, components, faulty workmanship or assembly. The product will be repaired or replaced at the sole discre�on of Award Appliances (NZ) Ltd. Condi�ons of Warranty: The purchaser/installer carefully follows the installa�on instruc�ons provided and complies with electrical, gas,... - Page 26 Award Appliances (NZ) Limited E-mail: sales@award.co.nz www.awardappliances.co.nz...
Need help?
Do you have a question about the Easy Dryer 1700 and is the answer not in the manual?
Questions and answers