Advertisement
Available languages
Available languages
Park Tool Co.
6 Long Lake Rd. St. Paul, MN 55115 (USA) www.parktool.com
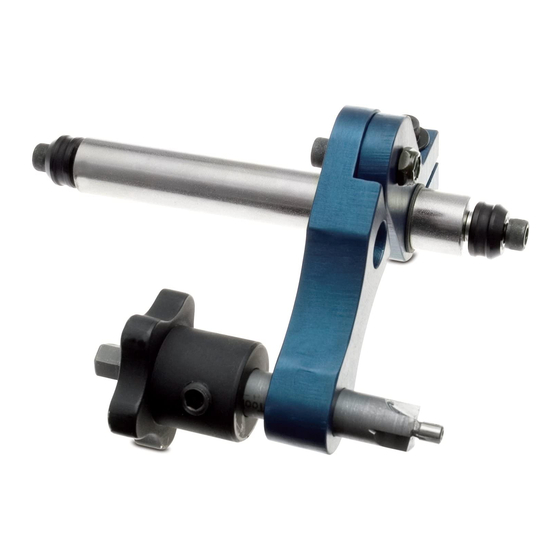
The Park Tool DT-1 Disc Brake Mount Facing Tool is a precision
tool system designed to machine disc brake mounts flat, parallel,
and in the same plane. Use of the DT-1 helps ensure proper disc
brake setup and performance.
The DT-1 includes everything needed to face the disc brake
mounts on frames using 10mm axles and forks using 9mm axles.
It also includes special adapter bushings to allow facing of disc
brake mounts on frames using 12mm through axles and forks
using 20mm through axles.
Being a precision cutting tool, the DT-1 should be used and
stored with extreme care. Always liberally apply cutting fluid (we
recommend Park Tool CF-2 Cutting Fluid) to the brake mount and
cutting teeth of the facer during each use. Components should
be kept clean and the facing cutter should be periodically wiped
with an oily cloth or rust inhibitor before storage, especially in
a damp or humid environment. Store the DT-1 in its original
packaging or other safe location. Like all cutting tools, the facing
cutter included with the DT-1 should be periodically replaced or
sharpened by a qualified technician.
Always wear safety glasses when using the DT-1.
ASSEMBLY
Determine the frame or fork axle size and spacing, and assemble
DT-1 as shown (page 2).
INSTRUCTIONS
Read instructions completely before using the DT-1 Disc Brake
Mount Facing Tool. Additionally, we recommend contacting the
manufacturer of frame or fork for specific recommendations,
cautions, or warranty issues before facing disc brake mounts.
1.
Install axle of assembled DT-1 fully into frame or fork drop-
outs. For 9mm and 10mm axles, tighten axle mounting
bolts (ref. #1). For 12mm and 20mm through axles, tighten
axle mounting bolts and pinch bolts provided with bike.
2.
Loosen knob set screw (ref. #8). Slide knob (ref. #9) to end
of facing cutter shaft (ref. #7), next to 10mm hex. Tighten
knob set screw.
3.
Loosen pinch bolt (ref. #12) and pivot bolt (ref. #10) just
enough to allow lower body (ref. #5) and upper body (ref.
#6) to pivot and slide on axle.
4.
Slide body against retaining ring (ref. #3) or bushing (ref.
#14 or #15).
5.
Insert cutter (ref. #7) through lower hole of body. Insert
piloted tip of cutter fully into hole of brake mount.
6.
Tighten pinch bolt and pivot bolt to lock position.
7.
Turn knob clockwise while applying hand pressure to face
surface of brake mount. Remove only enough material to
create a clean, flat cut around the face of the mount. NOTE:
For speed and leverage, a ratcheting wrench with a 10mm
socket can be used to turn the 10mm hex head on the cutter.
Disc Brake Mount
Facing Tool DT-1
8.
With teeth of cutter contacting face of brake mount,
loosen knob set screw and slide knob on shaft of cutter
until contact is made with body. Tighten set screw.
9.
Pull knob and cutter from lower hole and insert through
upper hole. Loosen pinch bolt and/or pivot bolt to fit piloted
tip of cutter fully into hole of brake mount, then retighten.
10. Note position of cutter teeth.
a. If cutter teeth contact brake mount and there is gap
between knob and body, complete step 11 and stop.
b. If knob contacts body before cutter teeth contact brake
mount, OR, if knob contacts body at the same time
cutter teeth contact brake mount, skip step 11 and go
straight to steps 12 through 16.
11. Turn knob clockwise while applying hand pressure to face
surface of disc mount. Continue facing mount until knob
stops against body. The facing process is complete. The
upper and lower mounts should have a clean, flat cut
and the faces should be parallel and in the same plane.
Remove DT-1 from frame.
12. Loosen knob set screw and position knob at end of cutter
shaft, next to 10mm hex. Tighten knob set screw.
13. Turn knob clockwise while applying hand pressure to face
surface of disc mount. Remove only enough material to
create a clean, flat cut around face of brake mount.
14. Loosen knob set screw and slide knob on shaft of cutter
until contact is made with body. Tighten set screw.
15. Pull knob and cutter from upper hole and insert through
lower hole. Loosen pinch bolt and/or pivot bolt to fit tip of
cutter into hole of brake mount, then retighten.
16. Turn knob clockwise while applying hand pressure to face
surface of brake mount. Continue facing mount until knob
contacts body. The facing process is complete. The upper
and lower mounts should have a clean, flat cut and the
faces should be parallel and in the same plane. Remove
DT-1 from frame.
NOTE:
Some disc brake systems require the use of an adapter to
secure the caliper to the frame or fork mounts. If the DT-1
machines a smaller contact area than the contact area of the
adapter, the brake may require the use of spacing washers.
For additional instructions and images, visit:
www.parktool.com
Advertisement
Table of Contents

Related Manuals for Park Tool DT-1


Summary of Contents for Park Tool DT-1
- Page 1 Use of the DT-1 helps ensure proper disc until contact is made with body. Tighten set screw.
- Page 2 Montage des Bremssattels an der Aufnahme von Rahmen Uhrzeigersinn. Entfernen Sie nur soviel Material, so dass oder Gabel. Wenn das DT-1 einen schmaleren Bereich fräst als eine glatte, flache Fräsung um die Bohrung herum entsteht. der Adapter erfordert, benötigt die Bremse eventuell Unterleg- HINWEIS: Schneller und kraftvoller fräsen können Sie mit...
- Page 3 Park Tool Co. 6 Long Lake Rd. St. Paul, MN 55115 (USA) www.parktool.com Le DT-1 de Park Tool est conçu pour fraiser les faces des pattes Lorsque la fraise touche la face de la patte de fixation de de disque, laissant une surface plane et propre. Le montage et frein, desserrer l’écrou de fixation et faire glisser la fraise...
- Page 4 Girar la perilla en el sentido de las manecillas del reloj, disco al cuadro o tijera. Si el DT-1 se fresa un área de contacto mientras se presiona con la mano para fresar la superfi- mas reducido del área de contacto del adaptador, puede ser...
- Page 5 Bien vérifier la taille de l’axe du cadre ou de la fourche puis assembler le DT-1 comme indiqué: Determinar el tamaño y la distancia del eje del cuadro o tijera y ensamble el DT-1 como se muestra: Rear 10mm axle with 135mm dropout spacing 10 mm-Hinterachse mit 135 mm Einbaubreite Axe arrière 10mm avec adaptateur pour 135mm...
- Page 6 Front Axle 1777 Bushing for 12mm Through Axle (axle not included) 1778 Bushing for 20mm Through Axle (axle not included) © 2008 Park Tool Co. ® The color BLUE is a registered trademark and trade dress of Park Tool Co.
Need help?
Do you have a question about the DT-1 and is the answer not in the manual?
Questions and answers